Time reports for payroll
Time reports > Time reports for payroll
Installing externall payroll
Feature “Data export of CBA-interpreted work time data to externall payroll” can be activated from Basic Settings-tabs page "Tuntinetti's paid features". When the feature has been activated, you can choose the wanted payroll system in use from Basic Settings-tabs page "Company basic information".

The following explains how to use time reports for payroll and different features associated with them. The information of time reports is directly available for salary calculation in Tuntinetti, so you don't have to transfer them in other programs. This guide describes, how to view employees working hours in the time reports, print and download time reports and export data from time reports to external systems.
There is also a demo video on how to use Time reports for payroll: Time reports for payroll - Tuntinetti
Finding reports
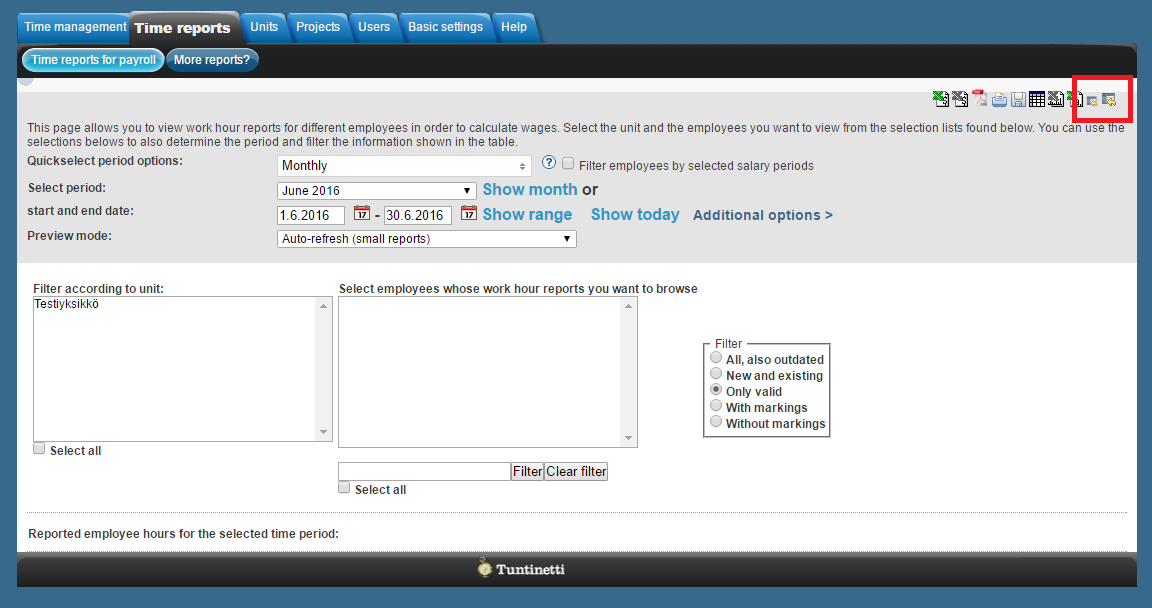
Selecting month or time frame
First select month or time frame you would like to see. Depending on preview mode, chosen month/start and end date will refresh automatically or you have to press "Show month" or "Show range".

Use "Quickselect period options" to change the periods available in "Select period" menu.
"Quickselect period options" contains all of the company's salary periods.
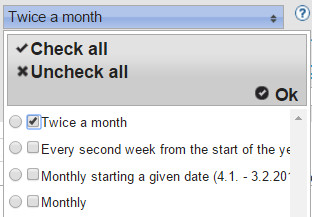
Company's "Default salary period" is preselected in the "Quickselect period options".

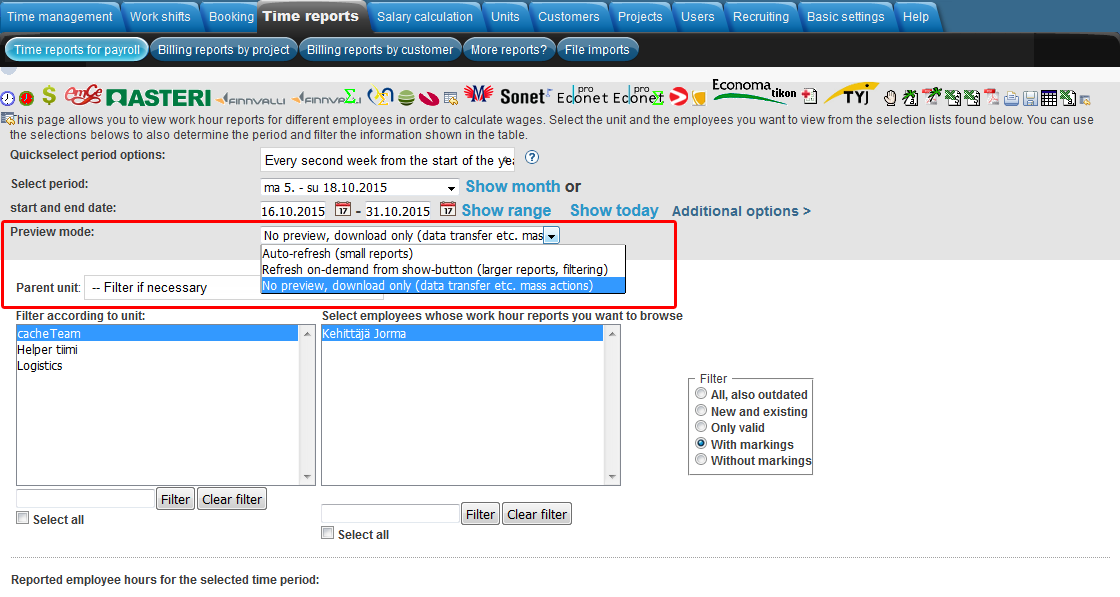
There are three different preview modes:
- Auto-refresh (small reports)
- Refresh on-demand from show-button (larger reports, filtering)
- No preview, download only (data transfer etc. mass actions)
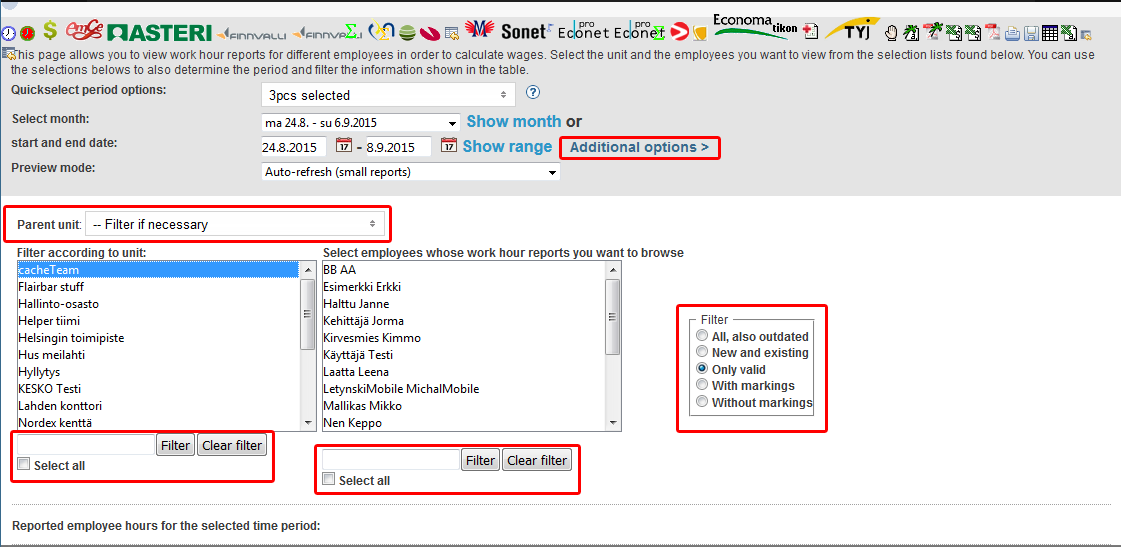
Filtering units and employees
Units and employees can be filtered by:
- Parent unit menu
- Word filter
- Filter settings (You can see more detailed information by moving mouse pointer over the names):
- All, also outdated
- New and existing
- Only valid
- With markings
- Without markings
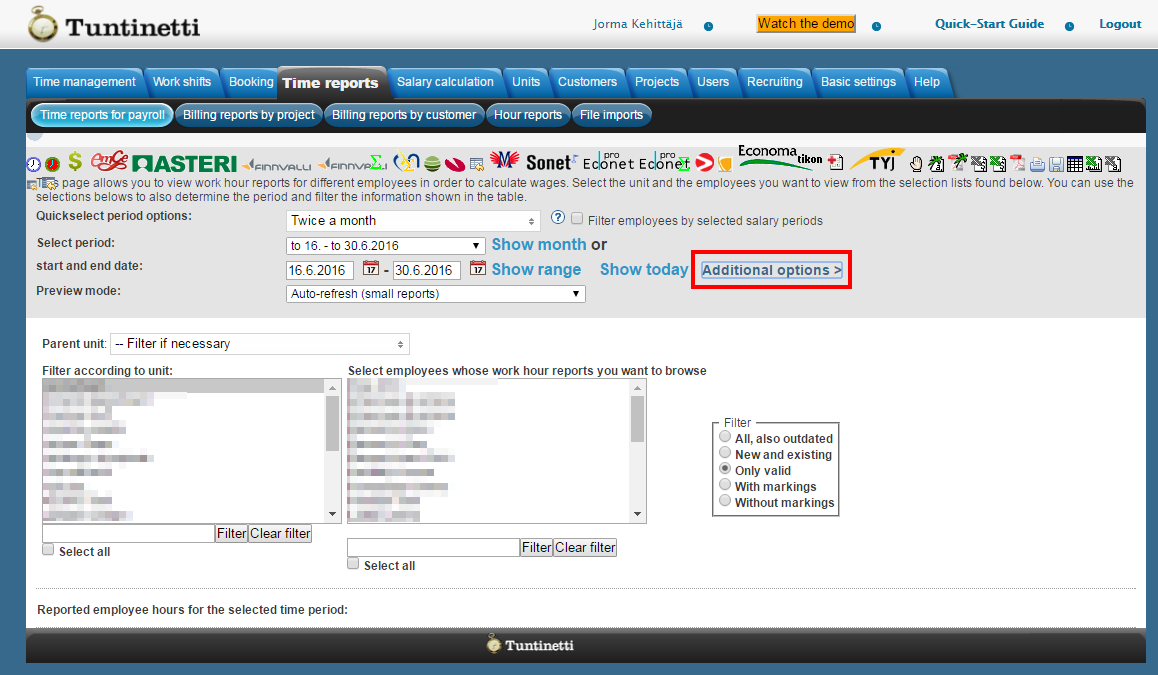
More filtering options can be found in the Additional options menu.
Additional options
More ways to sort and filter data shown in the reports, can be found in the Additional options menu. Additional options offer versatile possibilities to modify reports to suit your needs.
- According to payment date
- You can filter reports according to payment date by choosing first the time frame and pressing then "Show"
- Salary mode
- Filtering by salary mode
- Bill
Hourly salary
Monthly salary
Without a valid employment contract
Without employment contract
- Filtering by salary mode
- Employment
- Filtering by employment
All
Fixed term
Valid until further notice
Valid
Begun and ended
- Filtering by employment
- Employment contract work time
- Supervisor
- The employee's customer in the chosen time period
- Approval status
- State of billing
- Show profitability charts also in downloadable prints (checkbox)
Additional feature Profitability charts must be enabled
Basic settings > Tuntinetti's paid features > Profitability charts checkbox
- Show entry warnings
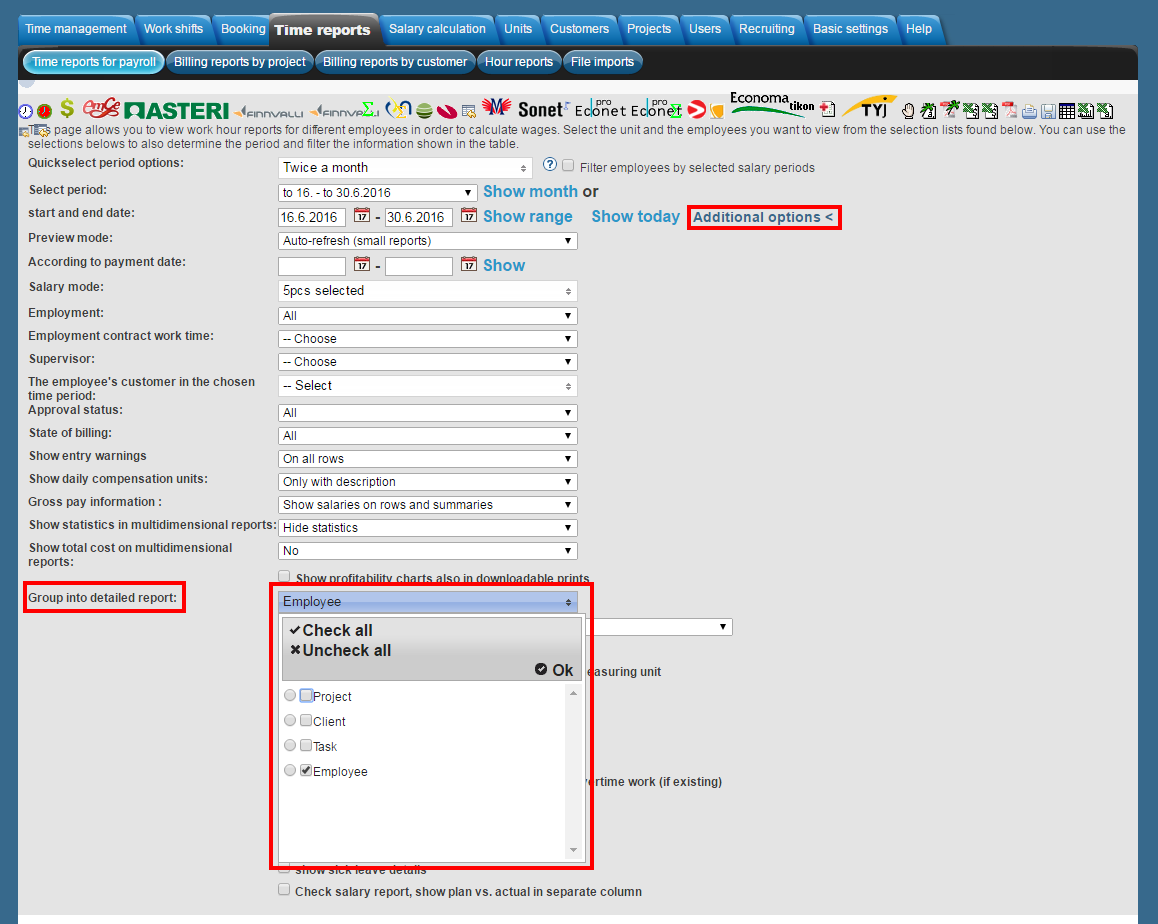
- Group into detailed report (
 )
)Project
Client
Task
Employee
- Show daily compensation units
- You can choose whether you want the daily compensation units to be displayed together or in their own separate columns
- Gross pay information
- You can choose wheter you want to see the gross pay information only in summaries or also in the hour entries or not at all
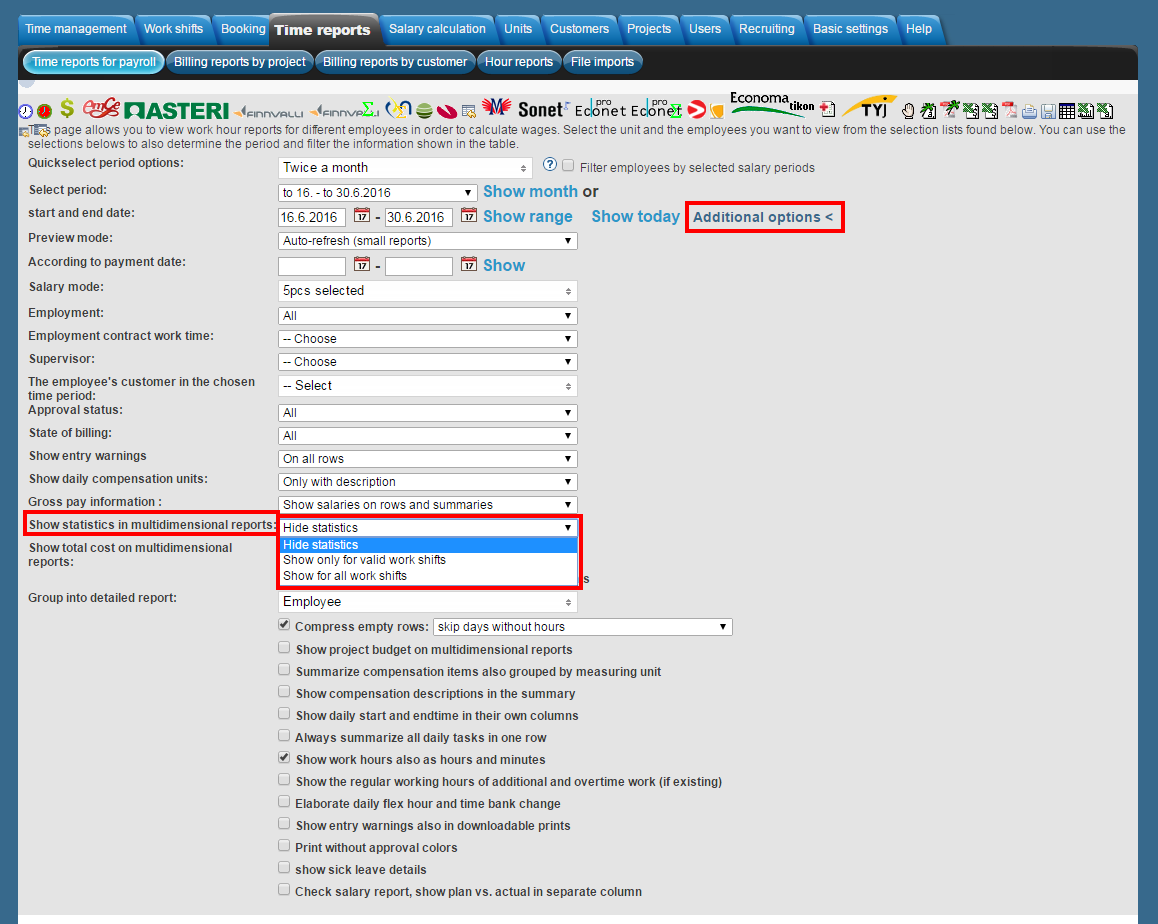
- Show statistics in multidimensional reports ()
- Hide statistics
- Show only for valid work shifts
- Show for all work shifts
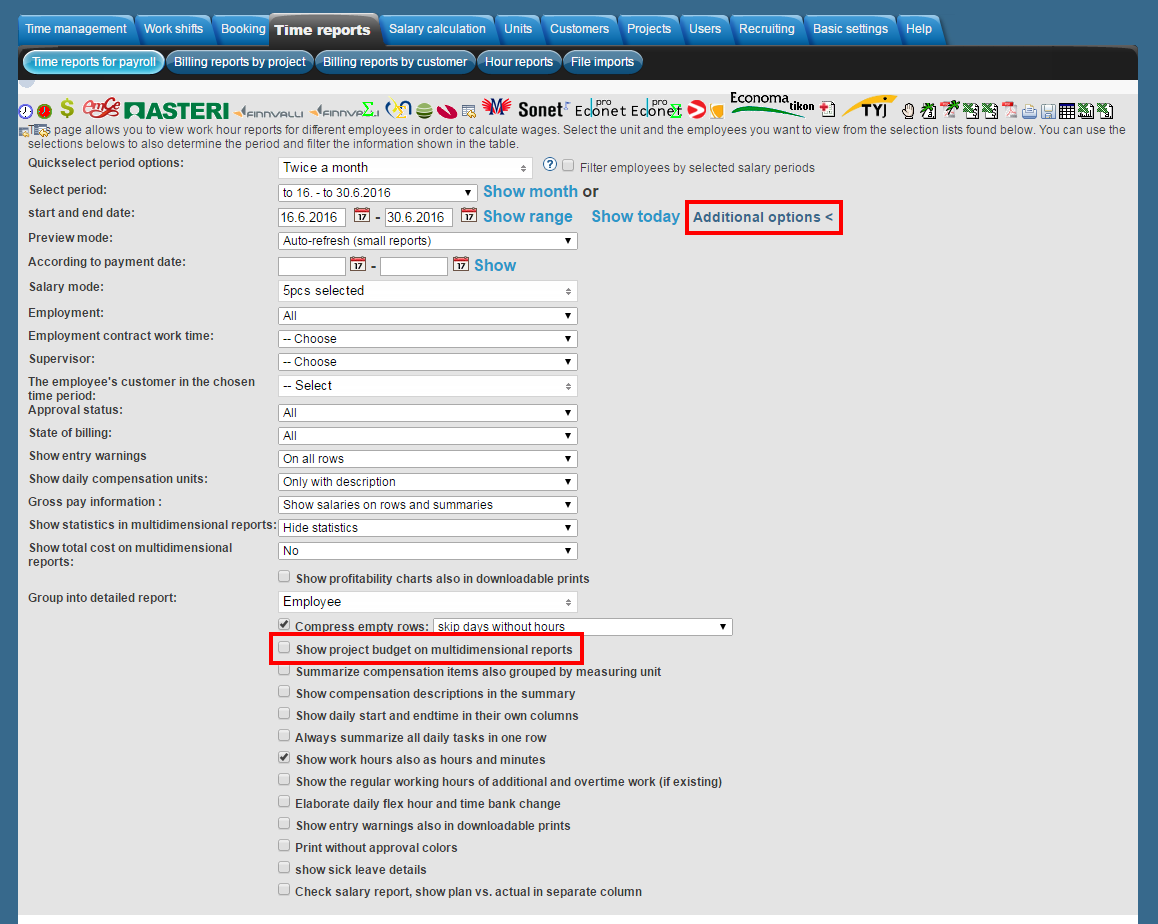
- Show project budget on multidimensional reports () (checkbox)
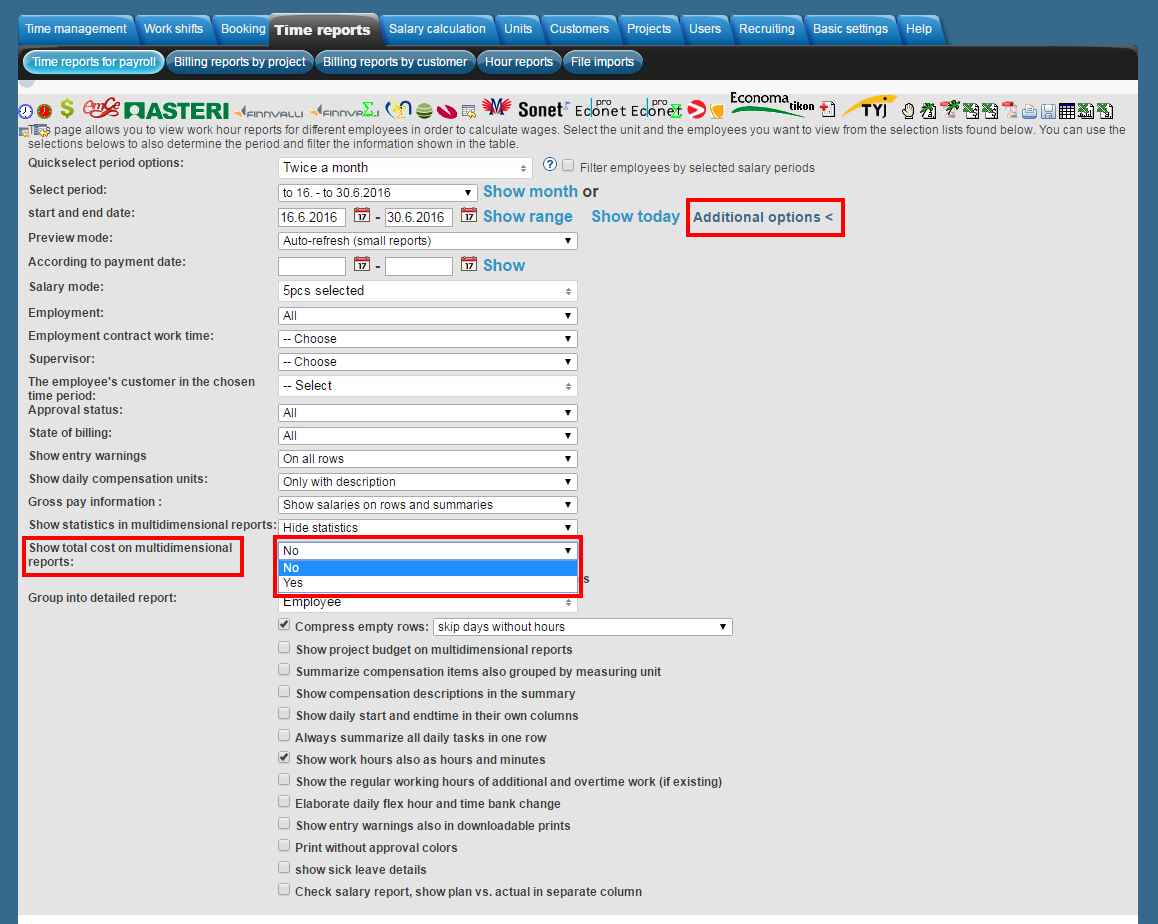
- Show total cost on multidimensional reports ()
- Summarize compensation items also grouped by measuring unit (checkbox)
- Compress empty rows (checkbox + menu)
- With this you can select how to filter the report rows
- Skip days without hours
- Omit all daily reports, show only summary
- With this you can select how to filter the report rows
- Show compensation descriptions in the summary (checkbox)
- Show daily start and end time in their own columns (checkbox)
- Always summarize all daily tasks in one row (checkbox)
- Show the regular working hours of additional and overtime work (if existing) (checkbox)
- Elaborate daily flex hour and time bank change (checkbox)
- Show entry warnings also in downloadable prints (checkbox)
- Print without approval colors(checkbox)
- Show sick leave details (checkbox)
Selecting units and employees
Choose first the unit(s) and then the employee(s) you want to be shown on the report.
Employees reports open automatically below selection menus, everyone to their own worksheet, if "Auto-refresh" Preview mode is selected. If "Refresh on-demand from show-button" is selected, remember to press "Show" after selecting the employees.
Browsing large time reports
When you want to manage time reports which contain large amounts of data, you should do the following before downloading:
- Select No preview, download only in the Preview mode drop-down menu.
- Select Omit all daily reports, show only summary in the Compress empty rows setting in the additional options.
![]()
- You can also select the reports to be grouped by employees in the additional options, if needed.
Example: Downloading a time report for a calendar year
When you have the large time report settings activated, you can easily manage time reports that include a lot of data such as a report for a whole calendar year.
- Select the time range to be 1.1-31.12 with the time range options.
- Filter the desired employees to be visible with the filter options.
- Select the employees whose time report should be downloaded in the employee selection windows.
- After this the report can be downloaded in different formats with the download icons.
Examining reports
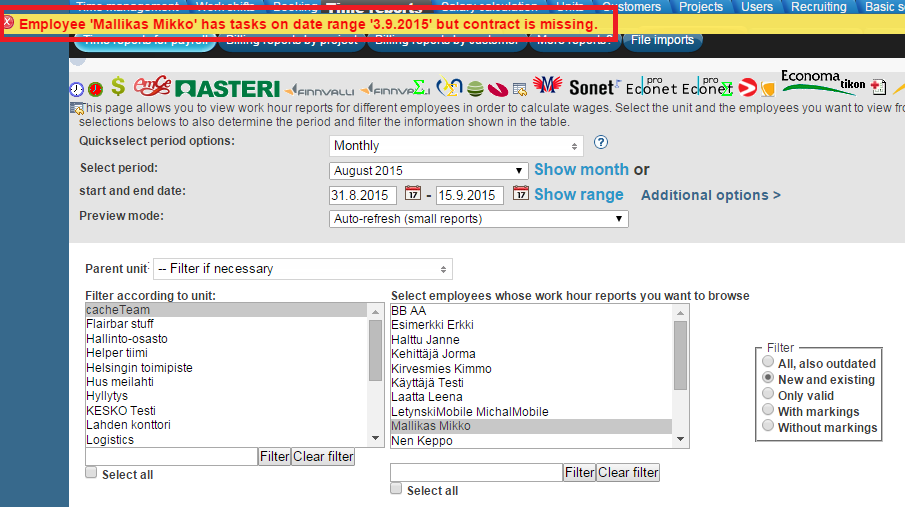
Adding missing employment contract
Tuntinetti informs, if employee doesn't have employment contract. Employment contract can be added in the Users tab. Users > (Select the right employee) >Employee contract history > "Add new contract period" button
Adding missing overtime assignment and tracking for total working hours
If employee contracts are up to date, Tuntinetti is able to check whether the employees have done overtime or not. If there has been overtime, and employee doesn't have overtime assignment, Tuntinetti will notify that about the employee's missing overtime assignments.
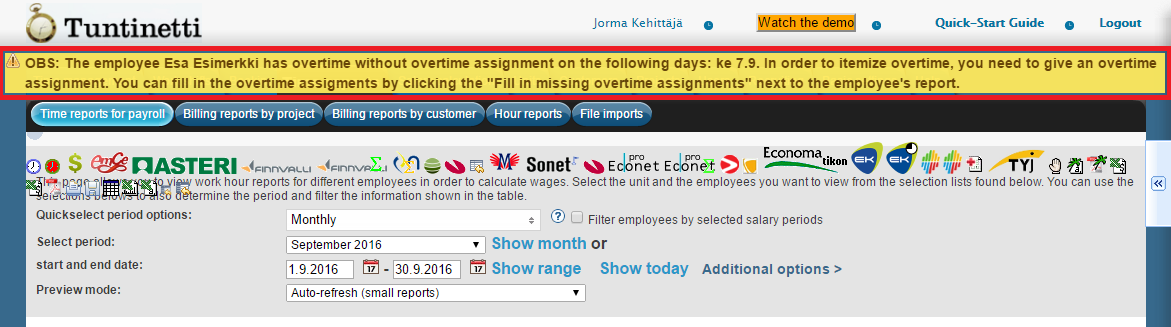
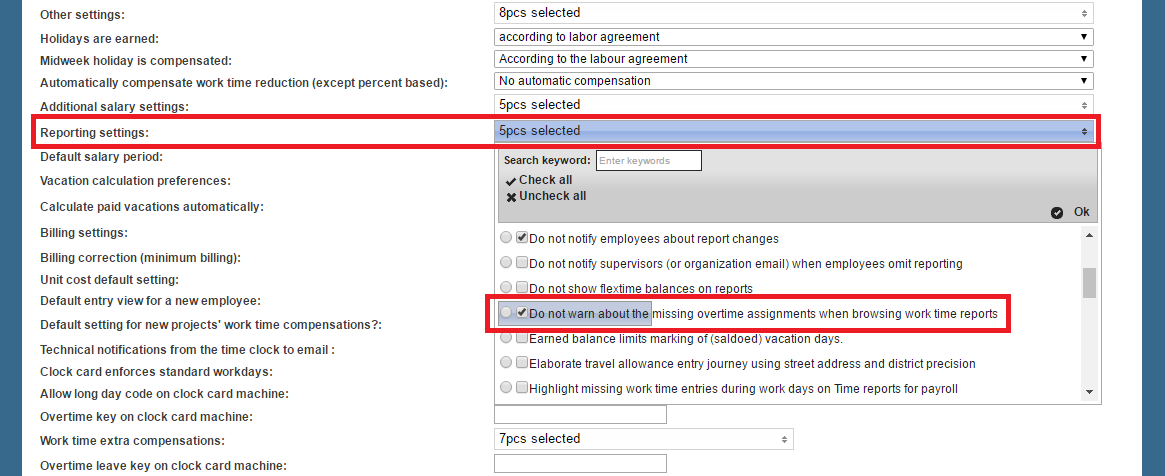
The notifications can be turned off in the Basic settings in the Reporting settings menu. Just select the option "Do not warn about the missing overtime assignments when browsing work time reports" active.
Overtime assignments can be given by clicking "Fill in the missing overtime assignments" link above the report.
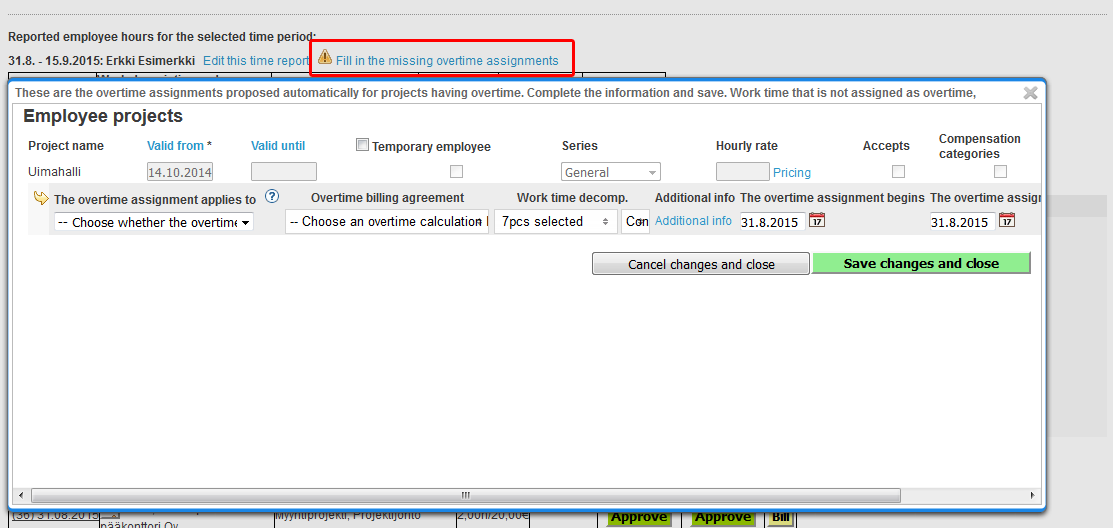
Click on "Fill in the missing overtime assignments" link
Choose whether you want the overtime assignment to apply to the:
employee's salary only
invoice report only
salary and to the invoice report
Choose overtime billing agreement
You can also change "Work time decomp." and "Additional info"
- From "Additional info" you can choose which compensations will be compensated as freetime.
- Between "Work time decomp." and "Additional info" is a menu, from where you can choose "consider all hours until regular work day length" and/or "consider all of the period's working hours until regular work time".
Tuntinetti suggests automatically beginning and ending dates for the overtime assignments, according to the dates that employee has done overtime. Dates can also be changed, if needed.
Save changes
When the overtime assignment has been added, Tuntinetti will itemize the overtime hours according to the overtime assignment and labour agreement.
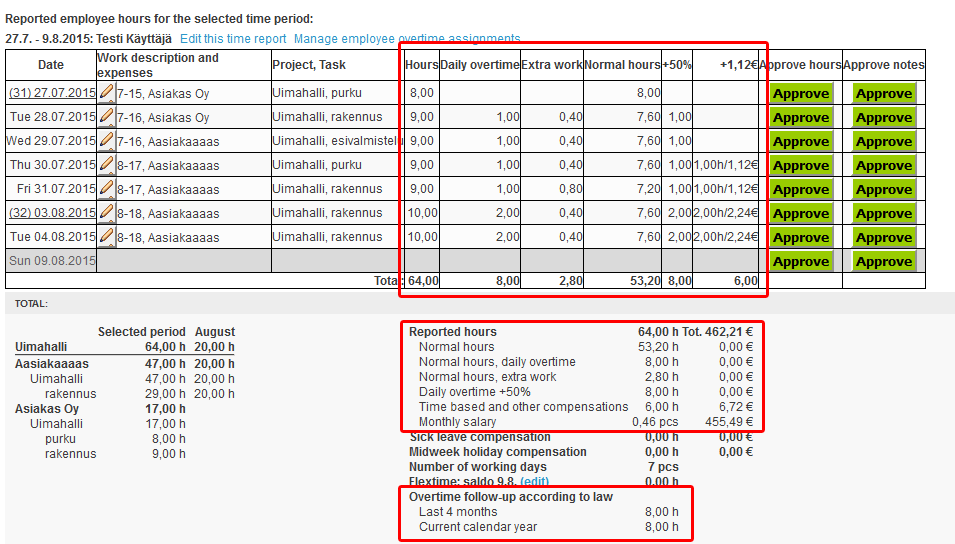
In Tuntinetti you will find the tracking for Working Hours Act in employees report summary. The 'Total working hours control' shows actual total working hours from the past four months as well as working hours week average during that time.
![]()
Editing reports
Managers can edit the data in the reports, if needed. Reports data can be modified by choosing either individual row with pen-icon in "Work description and expenses" or the whole report with "Edit this time report" link.
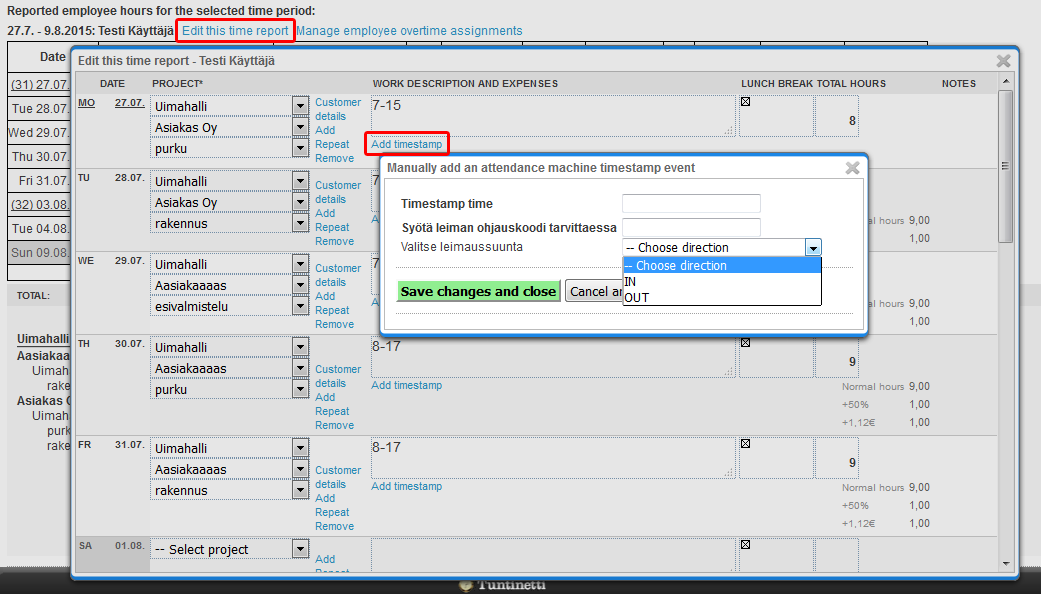
Adding timestamp
If needed, you can add timestamp manually with "Add timestamp" link.
Travel bill
Travel bill can be downloaded from this window, with "Download travel bill" button.
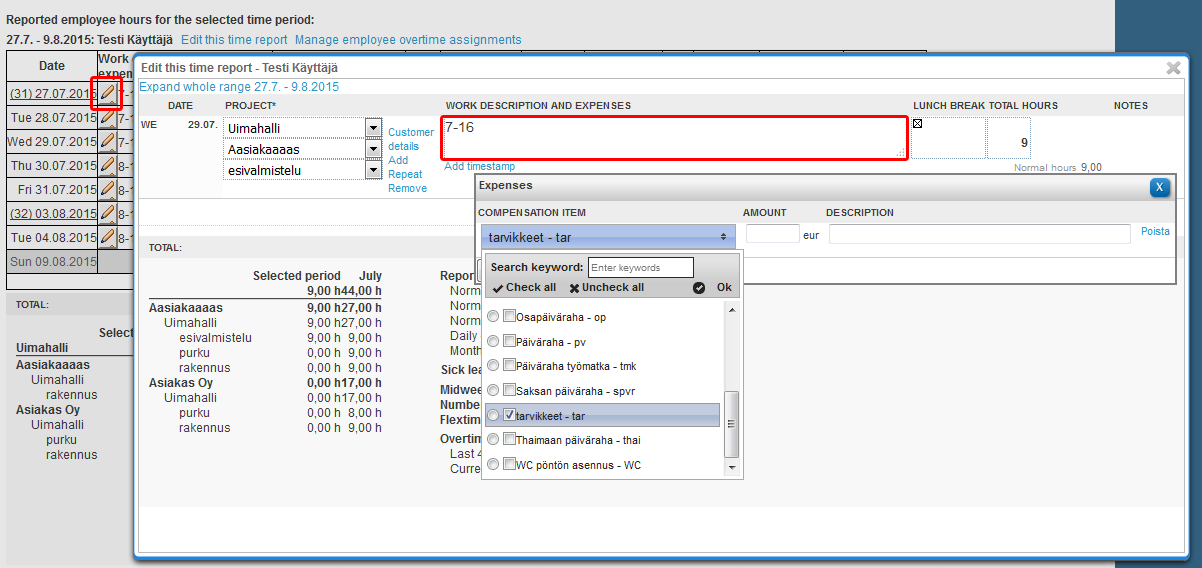
Expenses
It is possible to make compensation entries for some projects. You can record expenses either among the work hours in "WORK DESCRIPTON AND EXPENSES" field or choose from selection list. You can open the "Expenses" window, by clicking "WORK DESCRIPTION AND EXPENSES" field. New expenses can be added, by pressing "Add compensation" button in the "Espenses" window. Select compensation item from the "Choose compensation type" menu. In that menu you can find all of the compensation types that can be added for the selected project. After you have entered all the compensations and information for them, you can just close the window and the data will be saved automatically.
Expenses can be written among the work hours, if the project has these expenses in use. If the expenses have been given short names like day or km, these short names are used to write the expenses straight amongst the work hours.
Expanses become visible on the "WORK DESCRIPTION AND EXPENSES" column and in the report itemization, after you save the changes with "Save changes" button.
Expenses can be activated in "Project wizard". More information about that in the user guide and instruction video Project wizard Organizational costs for the "Project wizard".
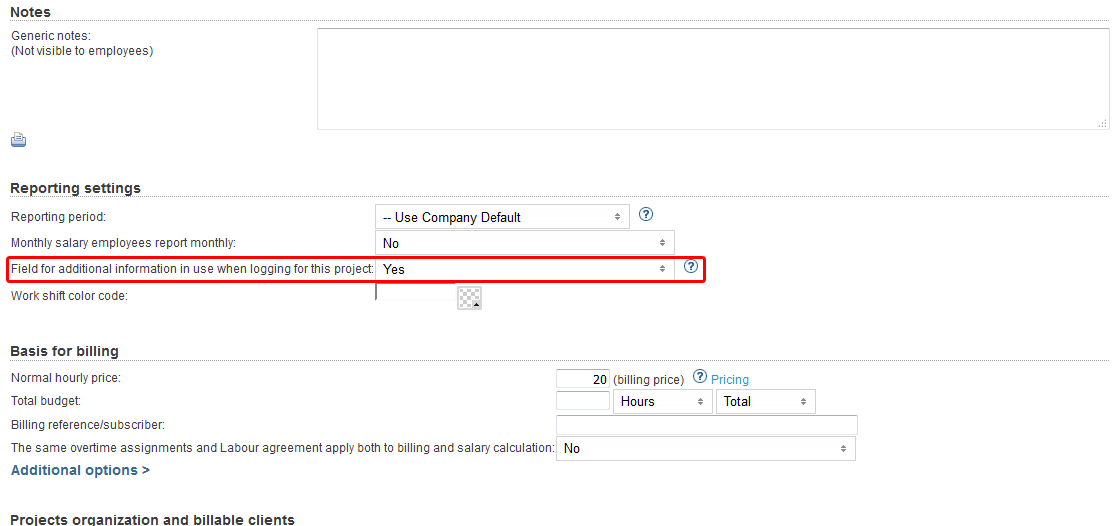
Depending on project's settings, notes regarding the project can be added in the "NOTES" text field. "Notes" field can be activated from "Field for additional information in use when logging for this project" menu in the "Reporting settings" section of the "Projects" tab.
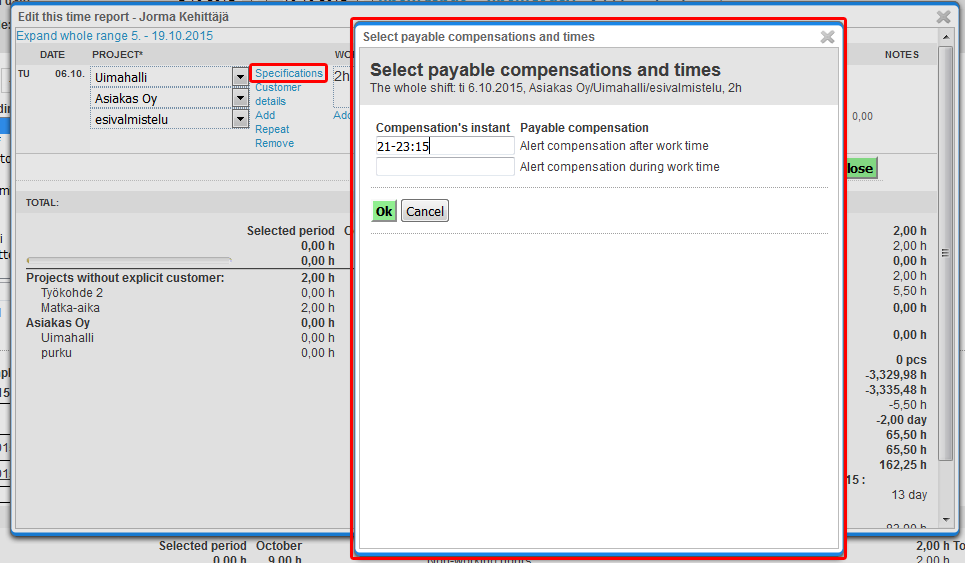
Specifications
Possibility to set specifications in the time reports, can be switched on, if needed. These are related to manual work time compensation types in the labour agreements. Please contact customer service, if you have need for the specifications.
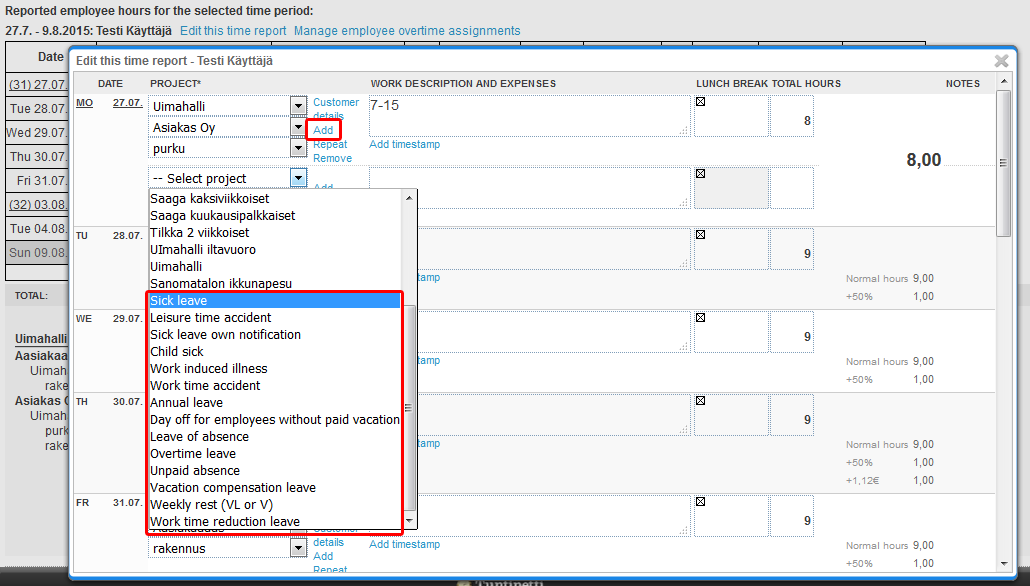
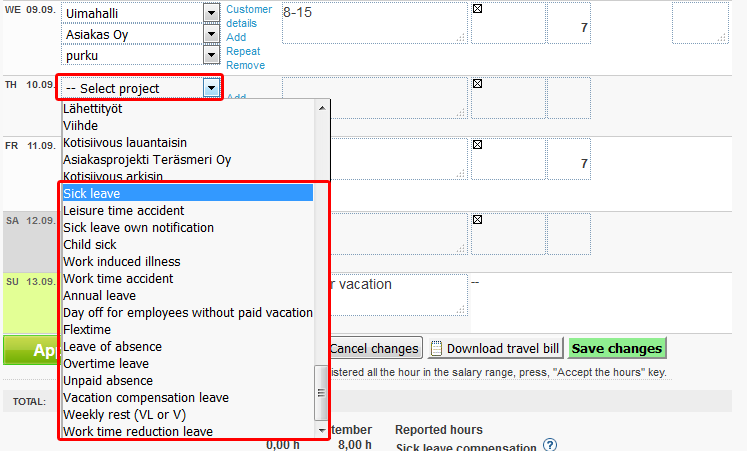
Adding project
New project, overtime leave, sick leave etc. can be added with "Add" link:
- Select "Add" link
- "Select project" menu appears
- Select project, or other option
- If project is selected, "Select customer" menu, and depending on project possibly also "Select task" menu, appears
- Select customer and possibly task
- Write work time in the "Work description and expenses" text field
- Save changes with "Save changes and close" button
Sick leave
From here you can also add sick leave, if for instance employee is sick part of the day.
Sick leaves are also displayed on the report. If checkbox for sick leave is checked, it has been approved for labour agreement interpretation and vacation calculation. If it is unchecked, it is not valid. This means that for example there is no medical certificate or there is some other employment contract related explanation that makes the sick leave not valid.
Incorrect work hours
Registered work hours work chronologically in Tuntinetti.
For example: Saturday's work hours have been entered in one entry with the following times: "03:30-05:30 18:00-20:00, 05:30-12.00, 15:00-18:00" (The employee intended to record all hours to Saturday). This means, that employee has recorded 3:30-5:30 to Saturday morning, 18-20 to Saturday evening, chronologically continues next to Sunday morning 05:30-12 and to Sunday afternoon 15-18.
In which case, time report displays a warning: "Hours span long to the next day". Such entries should be corrected to chronological order (from the smaller time to the larger), to get it right.
Timestamps differing from the planned work shift
Stamped time will never lose planned data. If employee's timestamps deviate from the planned work time, time report shows the deviations from the plan. If necessary, they may be hidden by deselecting the "Show entry warnings also in downloadable prints" checkbox in the additional options.

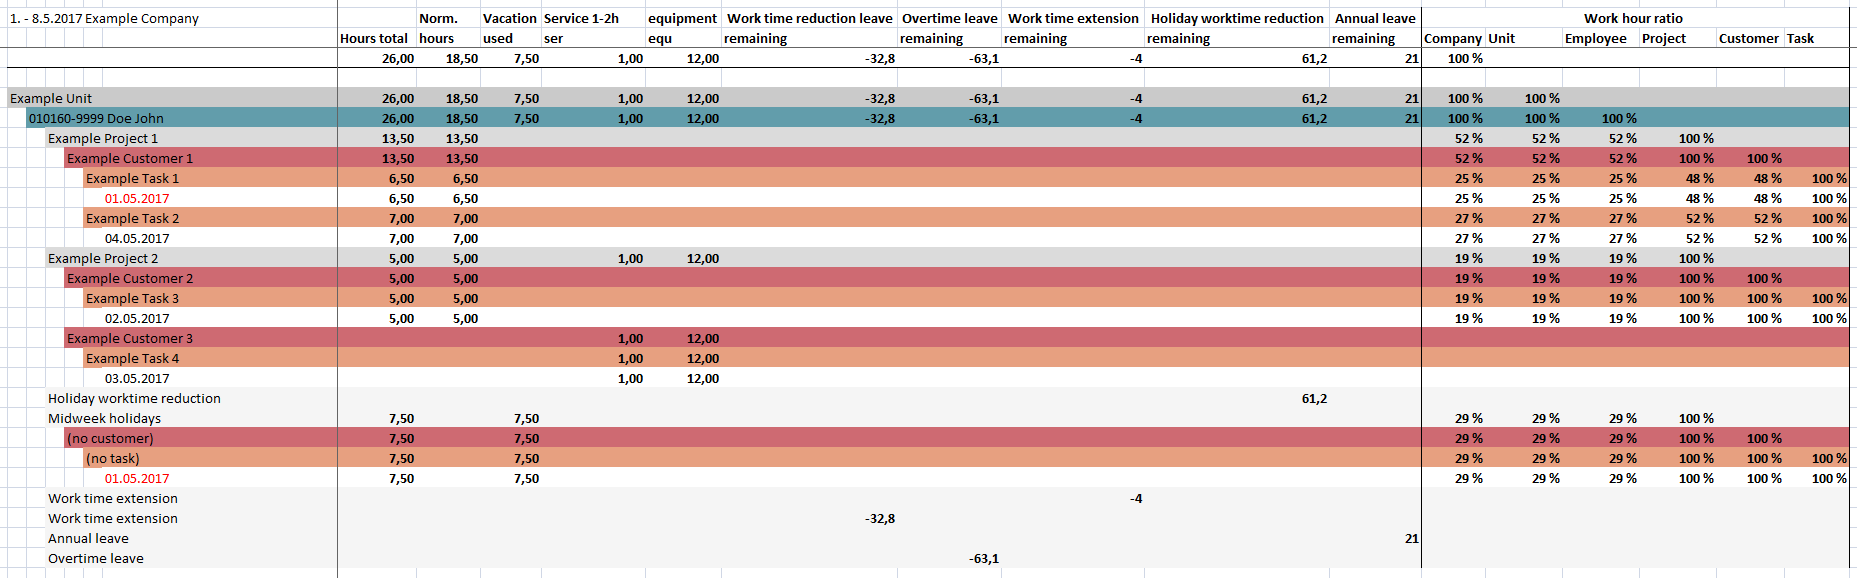
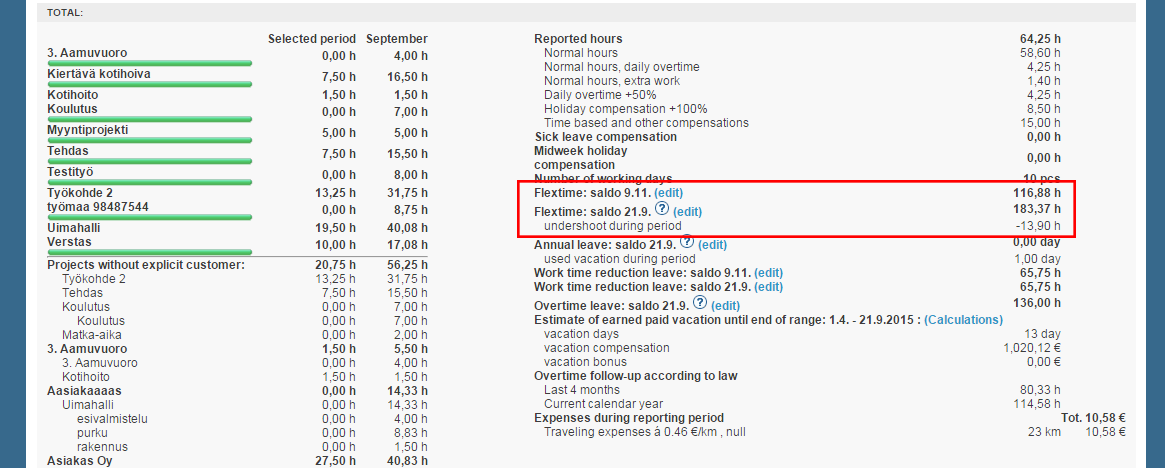
Report itemization
Below the report is detailed itemization of the employee's work hours:
- Normal hours
- Sick leave compensation
- Midweek holiday compensation
- Number of working days
- Flextime saldo
- Annual leave
- Overtime
- Overtime saldo
"Labor agreement interpretations" additional feature must be enabled, so that Tuntinetti can calculate the itemization (Basic settings > Tuntinetti's paid features > "Labor agreement interpretations" checkbox). Overtime itemization also requires, that employee overtime assignments are up to date. Expenses during reporting period can also be found on the report itemization.
Modifying saldos
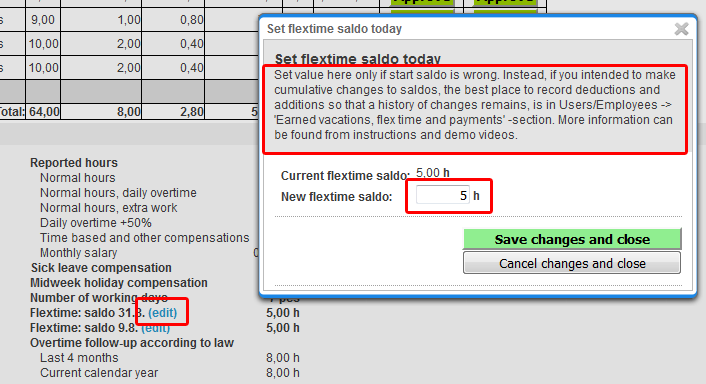
You can change the saldo, by pressing (edit) link. Set value here only if start saldo is wrong. Instead, if you intended to make cumulative changes to saldos, the best place to record deductions and additions so that a history of changes remains, is in Users/Employees -> 'Earned vacations, flex time and payments' -section.
Better instructions about activating annual leave, can be found in the Basic settings.
Profitability chart
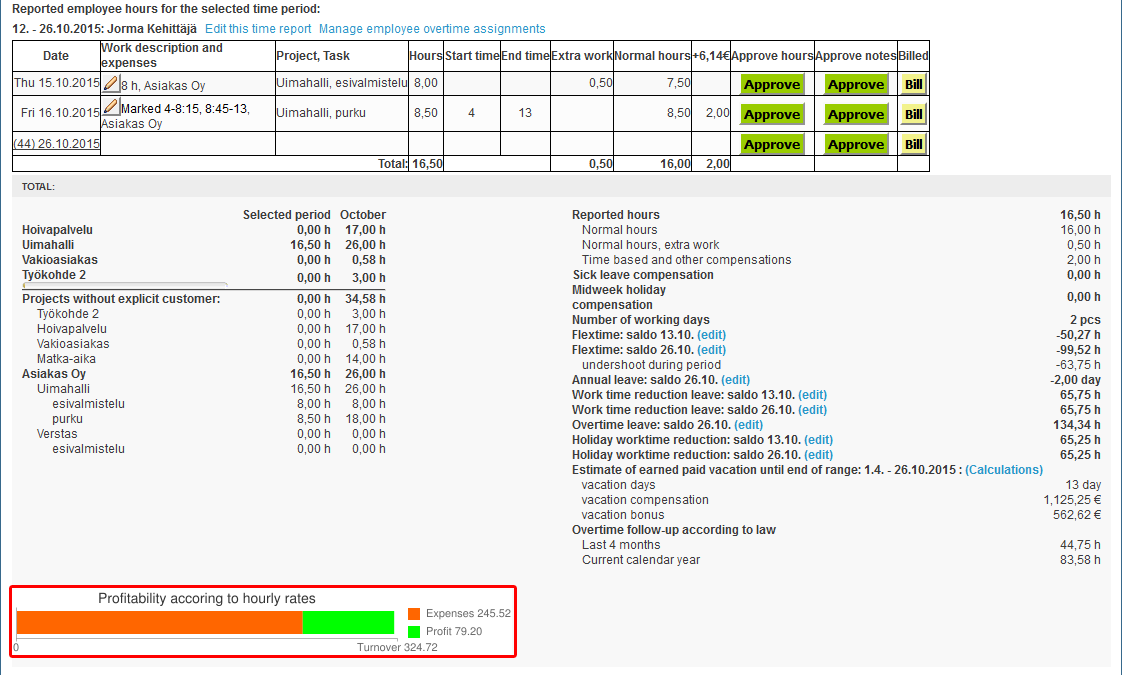
If additional feature Profitability reports is enabled, profitability calculation and bar chart is displayed below the report. Profitability calculation is particularly useful, when company's profit comes from billable work. Profitability calculation is formed from employees' and projects billing and cost prices.
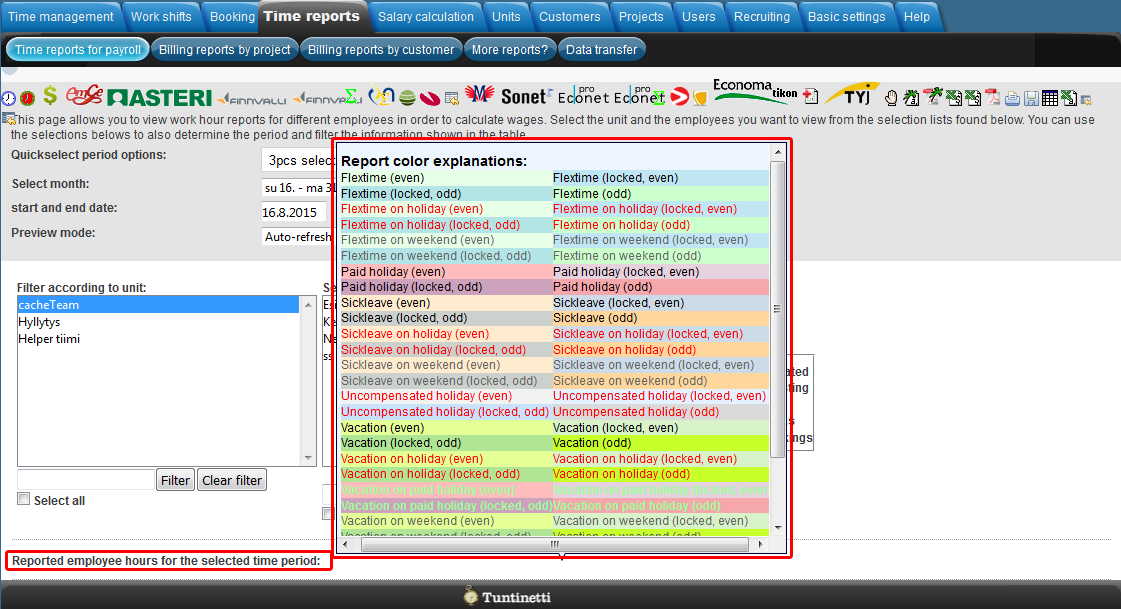
Report color explanations
Explanations for colors found in the reports can be opened by bringing the mouse pointer above the "Reported employee hours for the selected time period:" text at the start of the reports.
Multidimensional report
With a multidimensional report you can easily view for example the work hours of a unit. You can download a multidimensional report to your computer with the desired itemizations. You can download a multidimensional report with or without itemized workdays by clicking the icons in the top part of the page.
Selecting a time range
First you should select a time range. The multidimensional report will include the information of the given time range.

Selecting employees
Then you should select the desired employees in the selecttion windows.
You can select multiple units and employees. Consecutive lines can be selected by drag-selecting with mouse or with SHIFT key and individual lines with CTRL key.
This way you can export for example a unit's employees' work hours on a report.
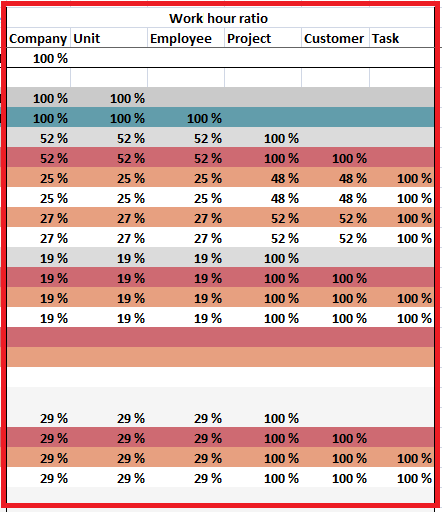
Work hour ratio
With the work hour ratio which is located on the right side of a multidimensional report, you can see how work time is divided in the company across units, projects, customers, tasks and employees.
Multidimensional report's settings
You can change the multidimensional report's setting in the additional options.
You are able to leave out days which haven't got any work hours.
![]()
You can group the report by Project, Client, Task and/or Employee.
You can select statistics to be visible of valid work shifts or all work shifts.
The multidimensional report can include a total cost calculation. A cost calculation gives a clear view of the profitability.
The multidimensional report can also include a project budget.
Approve and Bill buttons
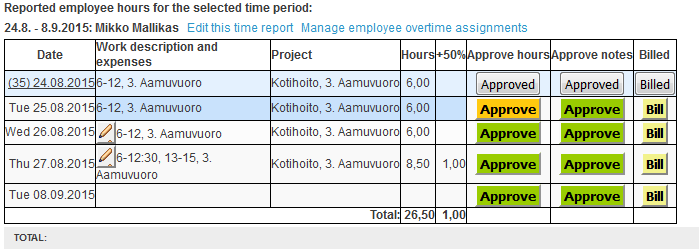
Finished report can be approved by pressing Approve button. Approving freezes hours, for example for salary calculations, so that the report can't be edited anymore. Hours and notes can be approved separately.
Clicking Approve button approves hours until that date. Approval can be cancelled simply by clicking Approved button.
Explanation for button colors:
- Green = reported hours are not approved for any project on this day
- Orange = reported hours are approved for some projects on this day
- Gray = reported hours are approved for all projects on this day
Report can be marked as billed, by pressing Bill button. Bill buttons are displayed only if billing price (hourly price or price list) has been set for the customer or the project. More information about the pricing settings can be found from Projects and Customers tabs' demo videos (Creating a new project - video tutorial and Customers CRM - video tutorial) and instructions (Projects and Customers).
Workshift cycle
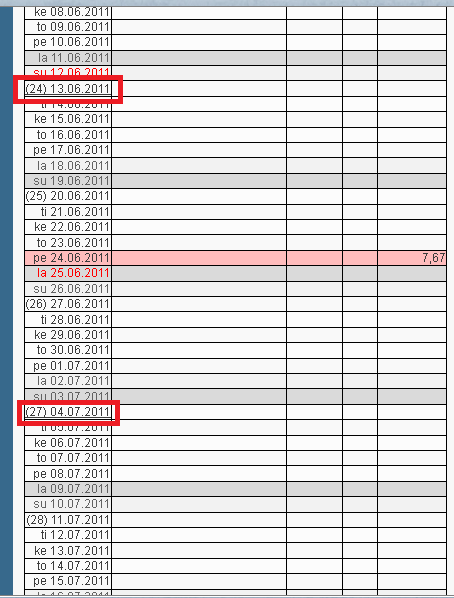
The week number in the brackets shows always the actual week number. Underlined day is the day on which the work time cycle begins. The length of the work time cycle can come from the labour agreement as such (can be e.g. a normal 1 week or e.g. 3 weeks, typical for the restaurant sector). The starting date for the work time cycle can be defined in the work time cycle settings. In addition, in the work time cycle settings, you can deviate from the e.g. 3 week setting and set that it is 2 weeks or even 26 weeks.
Work time cycle settings can be found in the:
- Basic settings (general, basic settings -instruction)
- Unit level (Units -instruction)
- Employee contract history: you can select a work time cycle group, differing from labour agreement and user's unit , for the selected employee (Employee settings -instruction)
- From the "Employment contract additional information" window, you can select a work time cycle group differing from labour agreement and user's unit, for the employment contract (Employee settings -instruction)
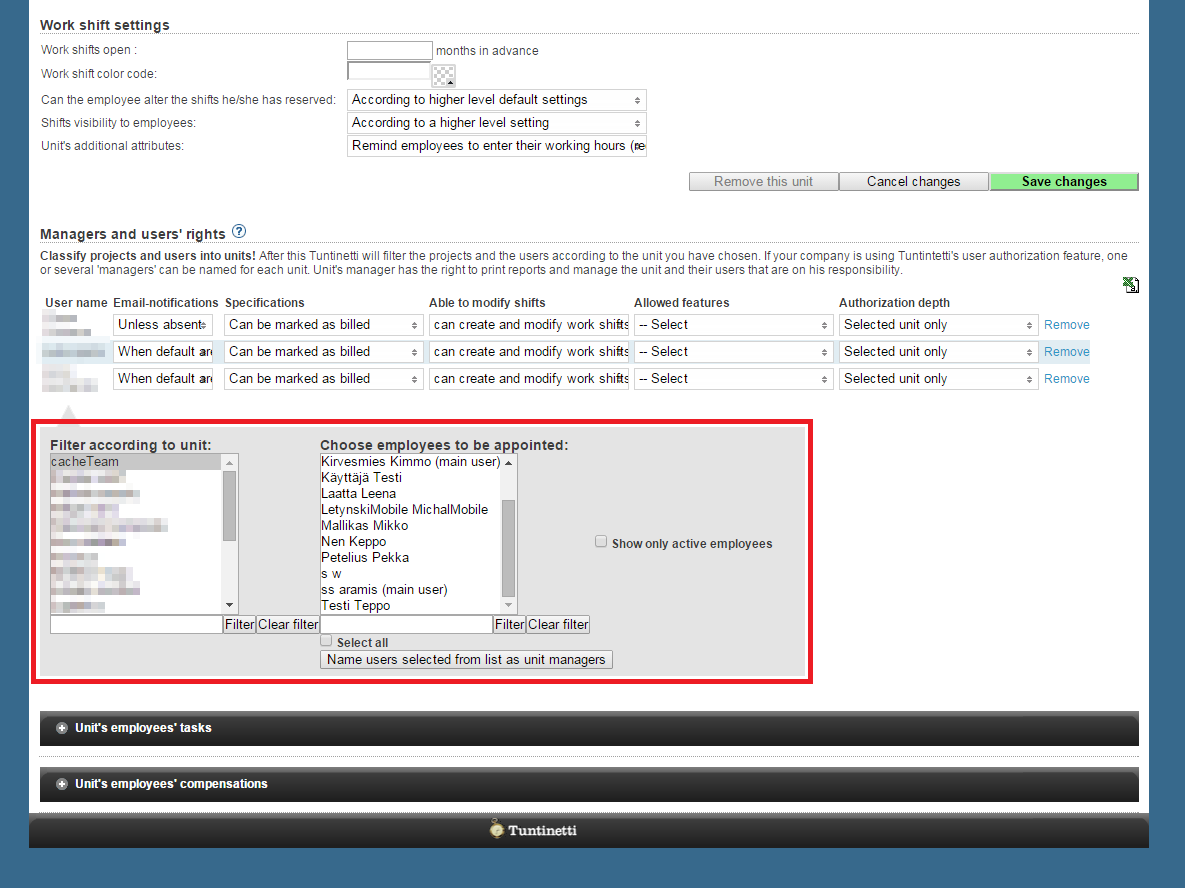
Assigning rights for time report browsing
Time reports for payroll can be browsed with limitations. This way you can set the salary amount to be not visible and the shift manager can check the time reports without being able to see the employees' salary amounts.
Employee should have supervisor rights in the desired unit's settings, so he or she can see the unit's other employees' work time reports. This can be done by adding the desired employee to the supervisor list in the selection window.
Automating time spent transitioning between projects in Tuntinetti
The time spent transitioning between projects can be automated in Tuntinetti as follows.
1.First, create a dedicated project for transitions and assign the desired employees to it:
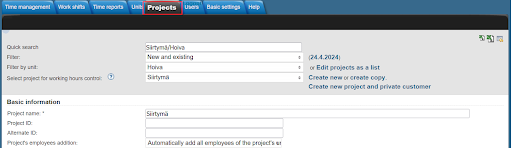
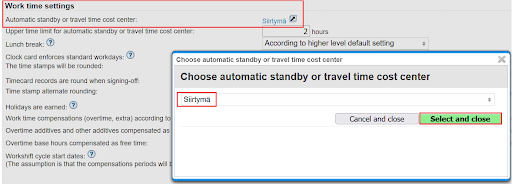
2. After that, you can select the project for the unit under the 'Automatic standby or travel time cost center' section. Tuntinetti will choose this as the work project during times when nothing else is specified:
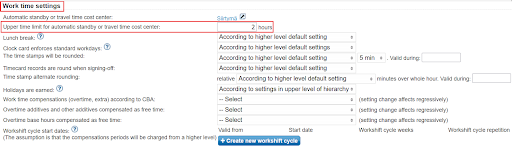
3. If you wish to use automatic transition time, you need to specify in the 'Upper time limit for automatic standby or travel time cost center' field the duration of any single break that should not be counted as a transition under that unit:
4. With these settings, the transition will be automatically calculated as part of the employee's working hours when recording working time:
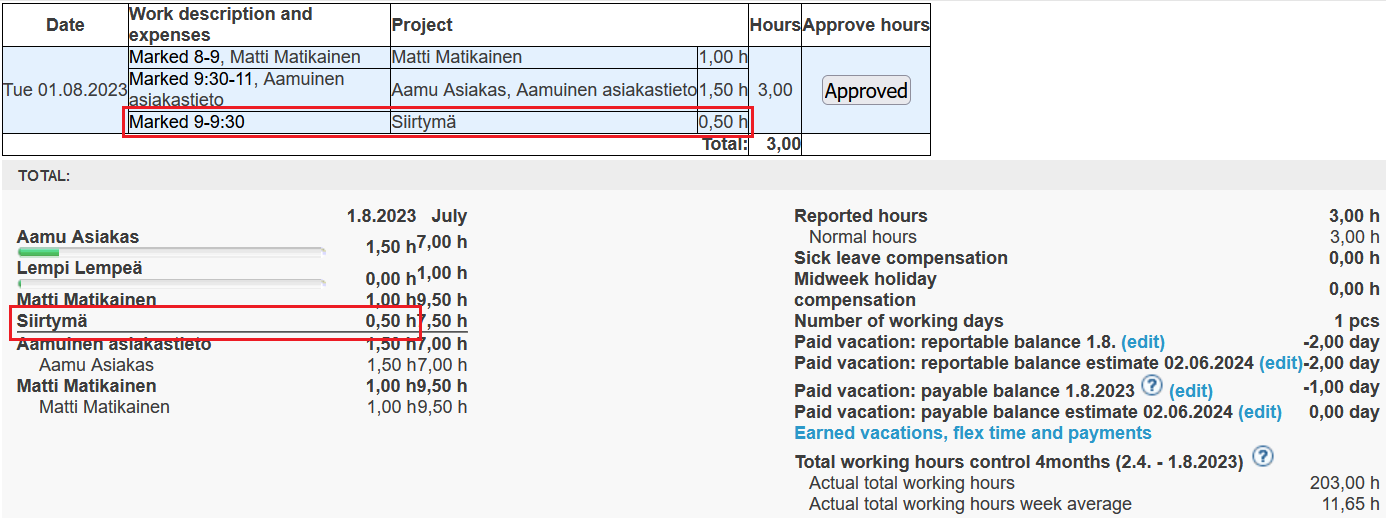
Tip! Hours logged under the transition project can be reviewed in bulk, for example, through the multidimensional report.
Rounding of the euro amount on a time report
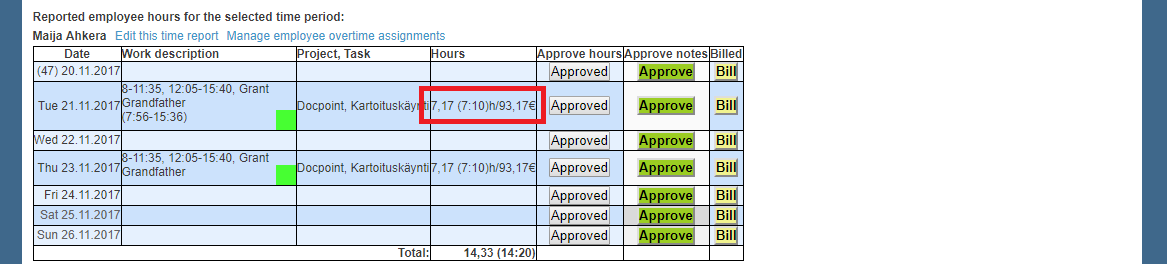
It is possible to include the euro amount of salaries with the Gross pay information additional option.
Tuntinetti calculates the report's euro amounts using exact values of work hours, even though the hours are presented with two decimal places on the report. An exact amount means the following: for example 8 hours and 35 minutes is 8,58 hours. But technically it is 8 and 35/60 hours which is 8,583333... hours. This principle must be taken into account when doing your own calculations.
Example calculation
Employee's hourly salary is 10,50 euros and he has been working for 8 hours and 35 minutes.
The right way to calculate his salary is: 10,50 x (8 + (35/60)) = 90,125. Which can be rounded to 90,13 euros.
Flextime tracking
Flextime balance is visible in the time report's summary on two separate rows.
- On the first row there is the yesterday's or the current day's balance. The day that is visible can be defined in the Company's basic information by selecting the Reporting settings' "Show today's flex balance in reports instead of yesterday's balance" option accordingly.
- On the second row there is the total balance of the time range that is defined to the time report.
Daily flextime balance
Daily flextime balance can be turned visible by checking the "Elaborate daily flex hour and time bank change" check-box in the additional options.

Using flextime in time reporting
Flextime can be used easily in time reporting. Just select "Flextime" as the project and the software will automatically calculate the flextime balance deduction according to the time that is marked.
Paying flex saldo
You can pay flex saldo in the Users tab. Detailed instruction on how to manage earned vacations, flextime and payments can be found in the Earned vacations, flex time and payments.
Balance report
With balance reports you can keep track of employee's flextime balance. A balance report can be downloaded the same way as other reports:
- Select a desired time range or a period.
- Select the desired employees.
- Download the balance report by clicking the Balance report -icon (
 ).
).
![]()
The balance report also includes a tool for time tracking, which facilitates monitoring of employees' actual working hours (as required by the variable working hours examination obligation defined in the employment contract law).
The balance report includes a tab for 12-month weekly working hours, where the employee's weekly working hours are detailed separately.
Downloading reports
Reports can be downloaded in different formats: pdf ( ), doc (
 ), xls (
 ) and csv (
 ). You can also open reports in new window for printing (
 ).
).
Report data can be transferred to many different programs with the buttons found at the top. You can see tooltips about the buttons by hovering mouse pointer over them.
Buttons at the top:
- Selected time range's work hour stamps to Excel (
 )
) - Selected time range's erroneous work hour stamps to Excel (
 )
) - Check billing prices (
 )
)- Inadequately priced projects are analyzed here, to see if the billing settings are likely either right or wrong. The feature can be further customized for your company.
- Downloading report data in formats needed by different programs:
- EmCe (
 )
) - Asteri (
 )
) - Fivaldi (

 )
) - Netvisor (
 )
) - Procounter (
 )
) - Visma (
 )
) - FM-Haus Oy (
 )
) - Mepco (
 )
) - Sonet (
 )
) - Econet (

 )
) - Clarus Oy (
 )
) - Personec (
 )
) - Tikon (
 )
)
- EmCe (
- Report of sick leave data (
 )
) - Prefilled salary certificate (
 )
) - Print a salary support form (
 )
) - Estimate on due paid vacation salaries to spreadsheet (
 )
) - Paid vacation calculations on a PDF file (
 )
) - Report of compensations grouped daily and weekly (
 )
) - Report of compensations summarized by employees ()
- Report in PDF form ()
- Report in a popup for printing ()
- Report to an Office suitable form ()
- Report into a spreadsheet program in CSV format ()
- Report into a spreadsheet program ()
- Multidimensional report having only employees without work days ()
- Time reports for payroll#Multidimensional report ()
- Time reports for payroll#Balance report, which includes flextime balance information ()
Needing guidance or training? Give us a call +358-(0)9-6898 8221. |
||
Technical support +358-(0)9-6898 8222 tuki@tuntinetti.fi |
Sales services +358-(0)9-6898 8221 myynti@tuntinetti.fi |
|