Billing and pricing
This page introduces how to create and modify price lists as well as the settings associated with them. At the same time we'll see, where you can modify price lists and what is the imperative order of them.
There is an instruction video about the topic here: Billing and pricing - Tuntinetti
Setting up the price list
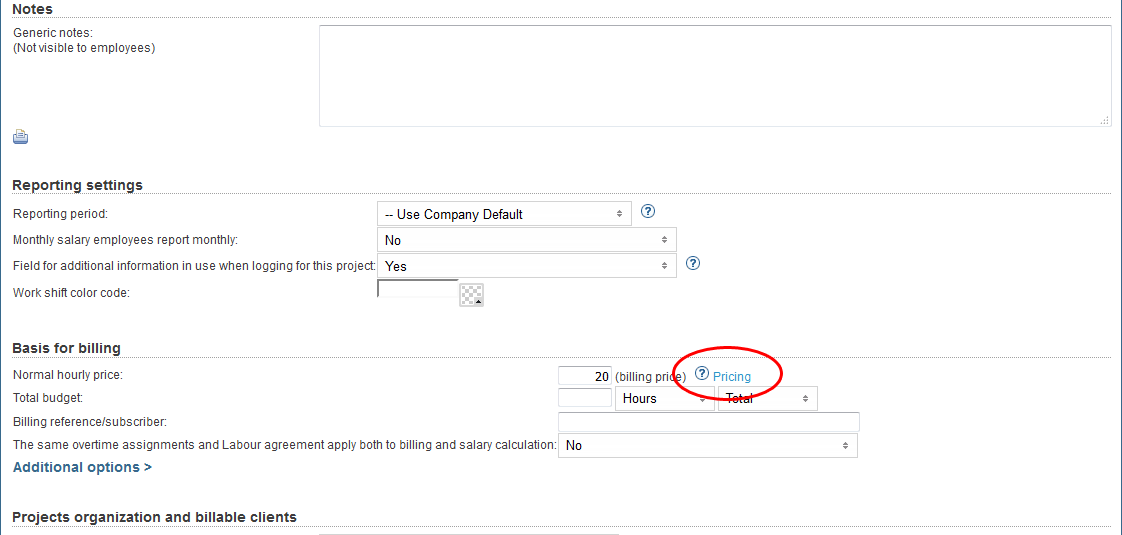
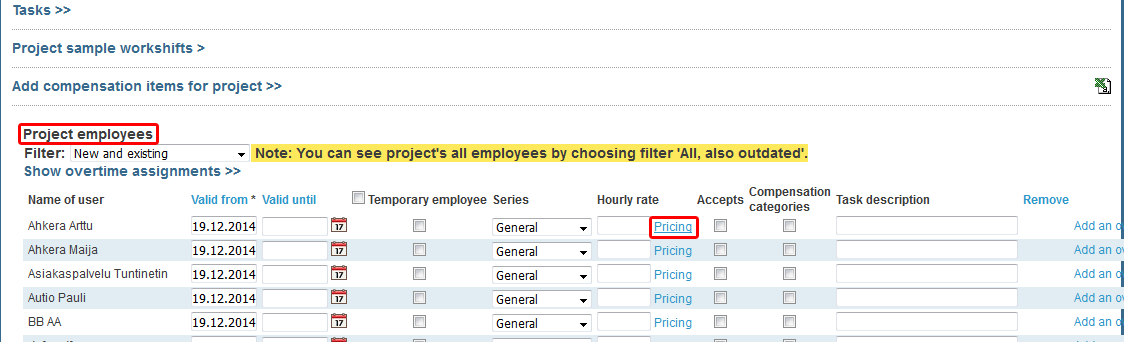
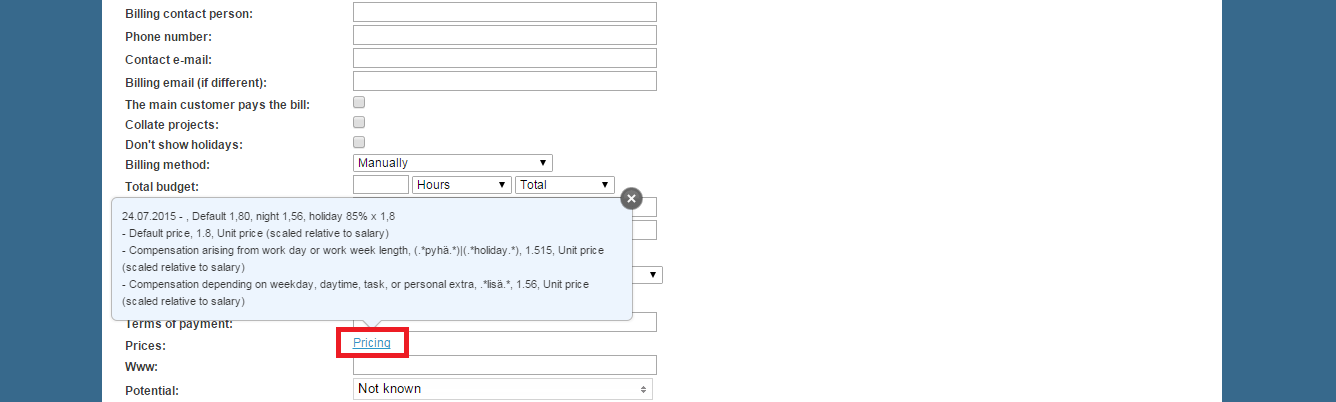
Price lists can be set in several different ways with the accuracy of customer, employee and project. This example uses project's price list. Open up "Projects" tab. Project's price list can be found in the "Basis for billing" section. Price list window opens with the "Pricing" link. Additional information about the price list can be shown by moving mouse pointer over the question mark icon ( ).
).
You will see the price lists set for the project in the pop-up window. If the project doesn't have a price list yet, "Price list is not set yet" text will be shown in the field. Listed price lists can be filtered with the "Show" options at the top. Tooltips for the filtering options can be displayed by hovering the mouse pointer over them.
Price list information
- Start date (The price list will be valid from this day forward. Please note: Hoursmart's prices are determined based on the rate applicable on the day the shift is scheduled. For instance, if you desire the price for the following early morning, the portion pertaining to the morning shift should be recorded under the morning shift. )
- Price list name
- In use (The price list is active, if this is checked)
- Modify (This opens "Price list modification" window, which is covered in the "Creating new price list" section)
- Remove
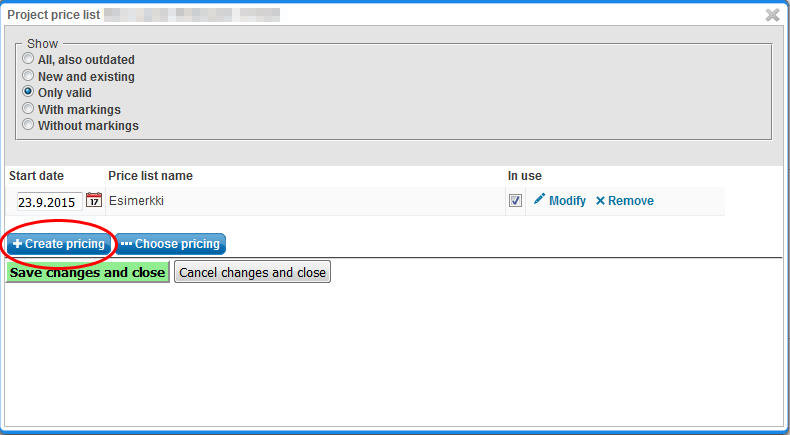
Price lists can be set in two different ways:
- Create pricing (Button opens a window for creating new price list)
- Choose pricing (Button opens a window, from where you can select a previously created price lists)
Buttons can be found below the list of price lists.
Choosing existing price lists
After opening "Pricing" link, you can select a previously created price list by pressing the "Choose pricing" button. This opens a window, where the old price lists are listed. You can filter price lists according to units, with the "Unit selection" menu. Price lists can be searched also by using search words. Number of shown rows can be selected with the "Show" menu at the right upper corner of the list.
- When you find the price list you were looking for, you can select it by pressing the name of it. This will take you back to the previous price list window.
- You can copy the old price list as a template for new price list, by pressing "Copy".
- You can make changes to the listed price lists by clicking "Modify". This opens the "Price list modification" window, which is covered in the "Creating a new price list" section.
- You can delete unnecessary price lists, by clicking "Remove".
- The "Create pricing" button found at the bottom of the window directs you into creating a new price list.
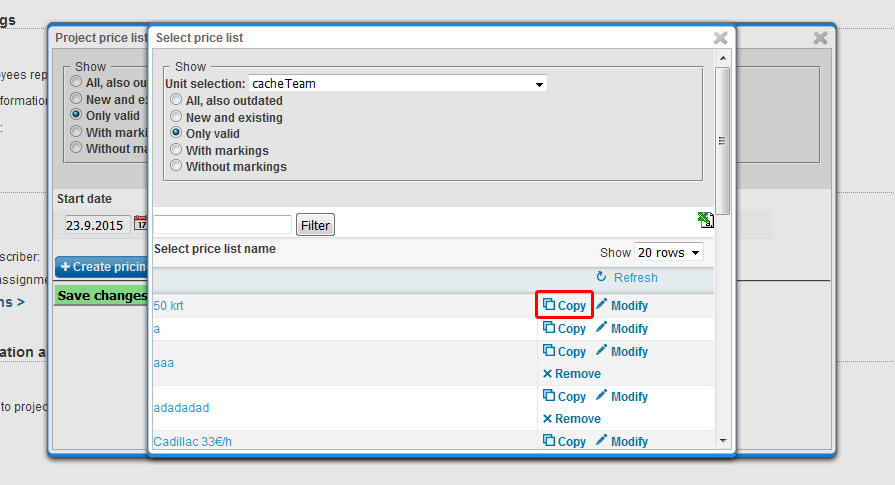
 ) icon at the upper right corner of the list. Please note that the listing will only show the price lists of the project's unit.
Creating a new price list
You can make an entirely new price list by pressing the "Create pricing" button. This opens the "Price list modification" window, the content of which is explained below.
Price list modification window
- Help (Button at the upper left corner opens a more in-depth pricing instruction)
- Price list name (Mandatory information)
- Price list's price groups (Price groups are listed in here. If there are no price groups, field will display text "Price list is not set yet")
- Add to group (Adds new price group to the list)
- Save changes and close
- Cancel changes and close
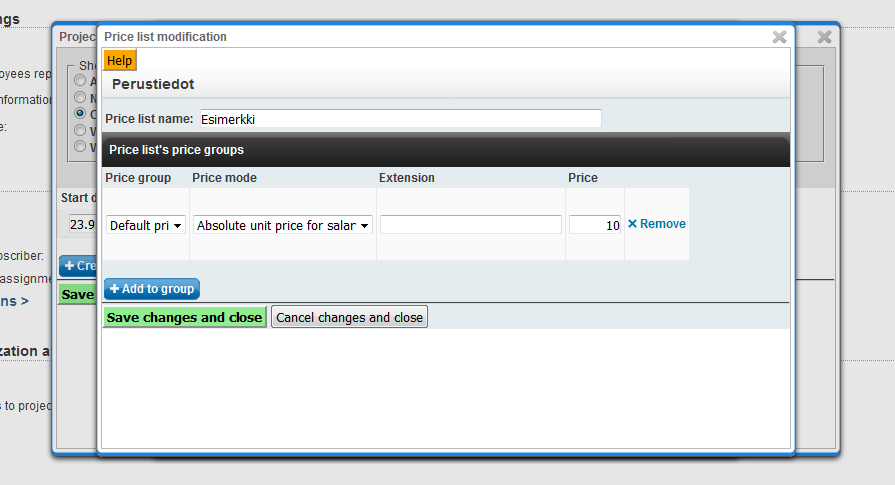
New price list must be given a name and added at least one price group into it. Price groups' information is explained below.
Price groups
- Price group (Mandatory information, select the salary class)
- Default price (Is directed to any of the salary classes with the conditions specified in the "Extension" field, for which there is no corresponding price categories. Please note, that this does not count the cost of expenses.)
- Compensation arising from work day or work week length (This means overtime. Different prices can be set for the normal hours and the increase parts of the overtime)
- Compensations depending on weekday, daytime, task, or personal extra (These are for example evening, night and holiday compensations)
- Expense categories (e.g. mileage, part-time allowance)
- Selected names (Is directed to any salary class defined with "Extension")
Price mode (Mandatory information, defines the changes applying to the selected price group)
Absolute unit price for salary class (Salary class is priced with the given hourly price)
Unit price (scaled relative to salary) (Salary class is priced relatively with the given hourly price. This option also takes into account the prices in labour agreement)
Pricing factor to salary (Salary class is priced with a multiplier. The multiplier used for employee's hourly salary is marked in the price field)
Daily price (For each occurrence of the salary class during the day, the given price is charged, once for each employee)
Daily starting price
Extension (With this Billing and pricing#Regexp extension, pricing is directed to individual salary classes inside price groups)
Price (If you are using "Pricing factor to salary", mark the multiplier here instead of the price)
- Limit eur/h (It is possible to use self-liability price limits.)
Remove
A few price grouping examples are listed below.
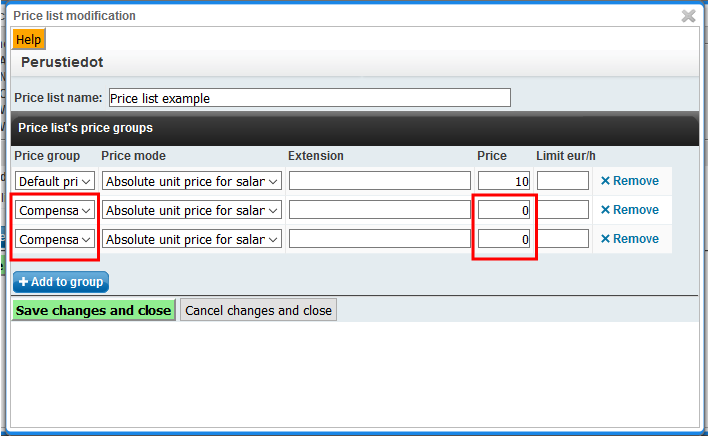
You can set different price groups to zero by entering 0 to the "Price" -field and changing price mode to "Absolute unit price for salary class". By adding in a regexp extension, you can target individual salary classes.This is demostrated in the picture below.
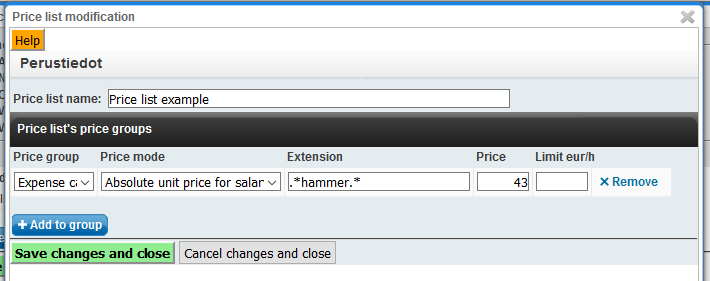
In the case of expence categories, you can use regexp extensions to target individual expences.
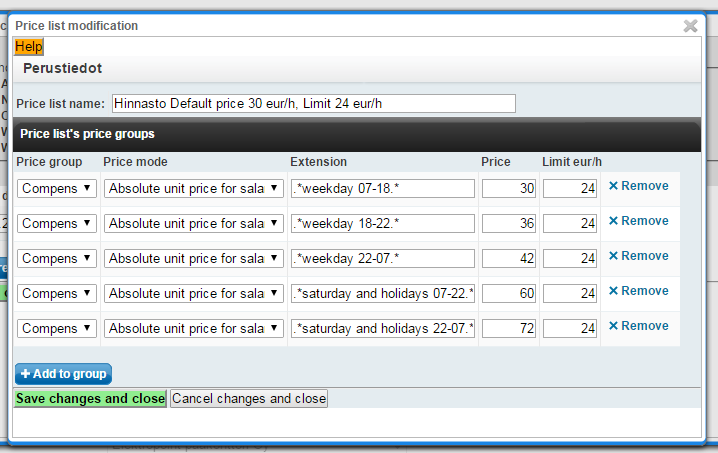
Self-liability price limit
In the self-liability pricing model, the immediate customer pays only the portion exceeding the hourly rate indicated in the limit column. The payer (i.e., the hq customer selected to the individual customer) is liable for a maximum amount equal to the value specified in the self-liability limit column. Therefore, the invoice compiled for the payer will not exceed the limit, and the customer's own invoice will only include the portion exceeding the self-liability limit.
Regexp extension
With Regexp (Regular expressions) extension, you can select individual salary classes inside specific price group. If for example you want price to be directed to only evening compensation, you can select "Compensation arising from work day or work week length" as price group, and specify it by writing in the Extension (Regexp) field: .*iltalis.*
Extension uses universal Regexp markup standard, for which there are plenty of guides online. There are also test benches where you can test the functioning of the expressions. It is advisable to test Regexp expressions on the Internet before using them in the Tuntinetti.
http://regexpal.com/ (Online test bench, where you can test Regexp attributes)
Some useful Regexp attributes are listed below.
Targeting Regexp extension to:
- The name of the salary class, in the case of time-based compensation (e.g. night compensation)
- The name of the salary class, in the case of multiplicative salary class (e.g. daily overtime, evening compensation +50%)
- The name of the salary class, in the case of multiplicative salary class, for which a substitutive hourly salary or salary class has been set (e.g. training salary)
- The type of the salary class, in the case of compensation's salary class ("Default price", "Compensations" or "Selected names" as price group)
- When using other than an hourly salary in the billing: ("Default price" or "Selected names" as price group)
- Monthly salary: .*MONTHLY_SALARY_FOR_REPORTING.*
- Daily salary: .*DAILY_SALARY_FOR_REPORTING.*
- Monthly extra: .*MONTHLY_EXTRA_FOR_REPORTING.* when it hasn't been defined to act according to monthly salary
- Salary class type, in the case of work time reduction leave or other similar:
- Work time reduction compensation: .*PAID_WORK_TIME_REDUCTION_FOR_COMPENSATION.*
- Percent based work time reduction compensation: .*PERCENT_BASED_WORKTIME_REDUCTION_COMPENSATION.*
- Percent based work time reduction compensation on sickleave: .*PERCENT_BASED_WORKTIME_REDUCTION_COMPENSATION_EARNED_DURING_SICKLEAVE.*
- Midweek holiday compensation: .*PAID_HOLIDAY_FOR_REPORTING.*
- You can inquire other similar things from the customer service
- Salary class type, in the case of overtime increase part supplemented with increase percent: (Hintaryhmänä ("Default price", "Compensations" or "Selected names" as price group)
- Daily overtime +50%: .*DAILY_OVERTIME.*50.*
- Extra work +50%: .*EXTRA.*50.*
- Daily overtime: .*DAILY_OVERTIME.* (add the desired percentage e.g.: .*DAILY_OVERTIME.*25.*)
- Weekly overtime: .*WEEKLY_OVERTIME.*
- Holiday overtime: .*HOLIDAY_OVERTIME.*
- Special Saturday overtime: .*SPECIAL_SATURDAY_OVERTIME.*
- Salary class type, in the case of basic part of overtime:
- Normal hours during overtime assignment: .*NORMAL_TOWARDS_OVERTIME.*
- Normal hours without overtime assignment: .*NON_OVERTIME_NORMAL.*
- Normal hours during extra work: .*NORMAL_DURING_EXTRA.*
- Normal hours during daily overtime: .*NORMAL_DURING_DAILY_OVERTIME.*
- Normal hours during holiday overtime: .*NORMAL_DURING_HOLIDAY_OVERTIME.*
- Normal hours during special Saturday overtime: .*NORMAL_DURING_SPECIAL_SATURDAY_OVERTIME.*
- Normal hours during weekly overtime: .*NORMAL_DURING_WEEKLY_OVERTIME.*
Please note, that the Regexp attributes can also be used exclusively ("all, except...").
Pricing levels
The following explains, from where the different price lists can be found and what is the imperative order of them.
The imperative order of the price lists
- Employee's price list in a project
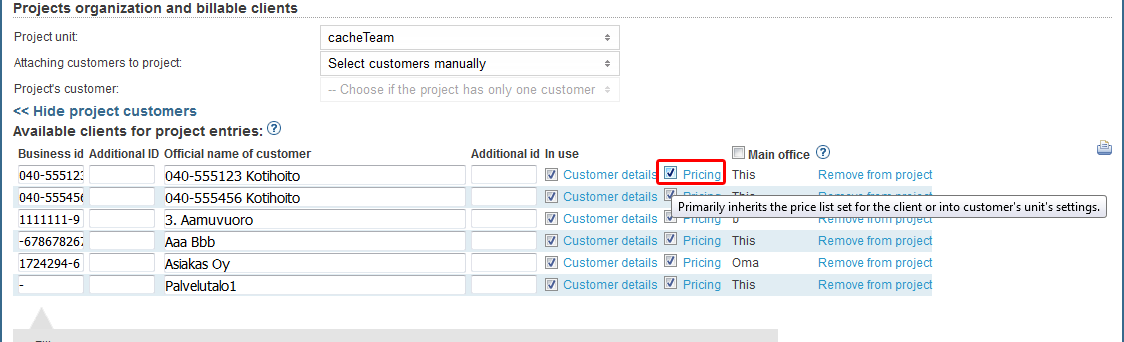
- If a project has a customer and the pricing checkbox for it has been selected:
- Price list of the task
- Price list of the project
- Price list of the project's unit
Locations of the Pricing links
1. Price of the project's employee
2. Customer charges the price list
2. a) Price of the task

2. b) Price list of the customer
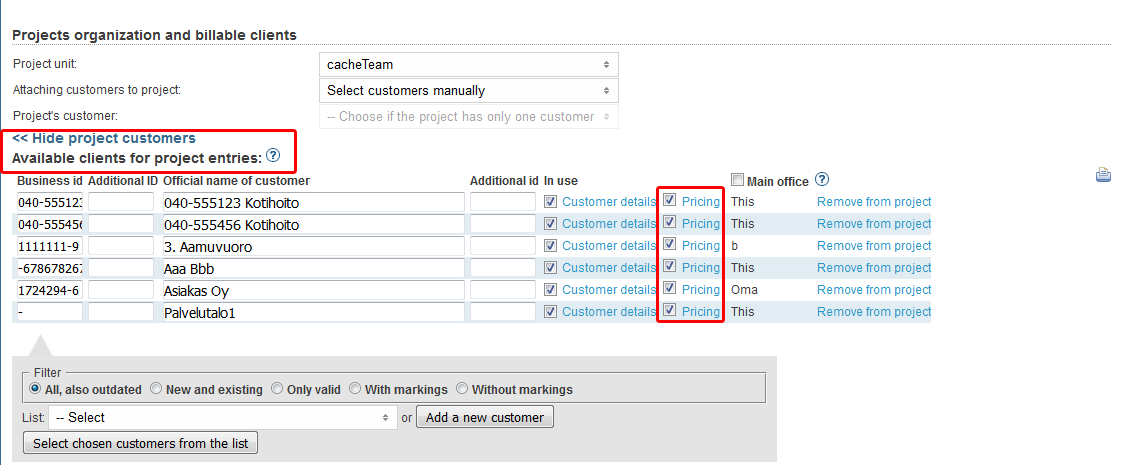
Can be found by pressing the "Customer details" link in the project's customers section. This opens a window, from where you can find customer's "Pricing" link. Alternatively you can also go to "Customers" tab.
Price list of the customer's headquarters
Same as the previous "Price list of the customer", but edit the price list of the customer's headquarters.
2. c) Price list of the customer headquarters' unit
2. d) Price list of the customer's unit
Same as previous "Price list of the customer headquarters' unit", but edit the price list of the customer's unit.
2. e) Price list of the project's customer
3. Price of the task
4. Price of the project
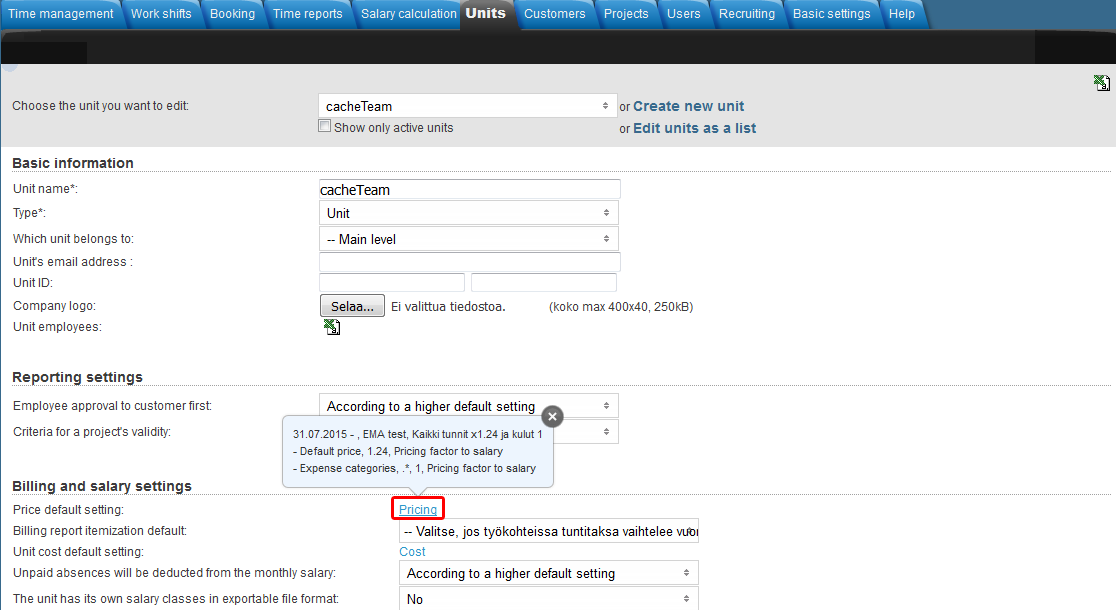
5. Price of the project's unit
Choosing a collective agreement
If you want to decompose extras and overtime to a billing report, you need to choose a labour contract that is used for the calculation.The following explains how this is done in the project-level.
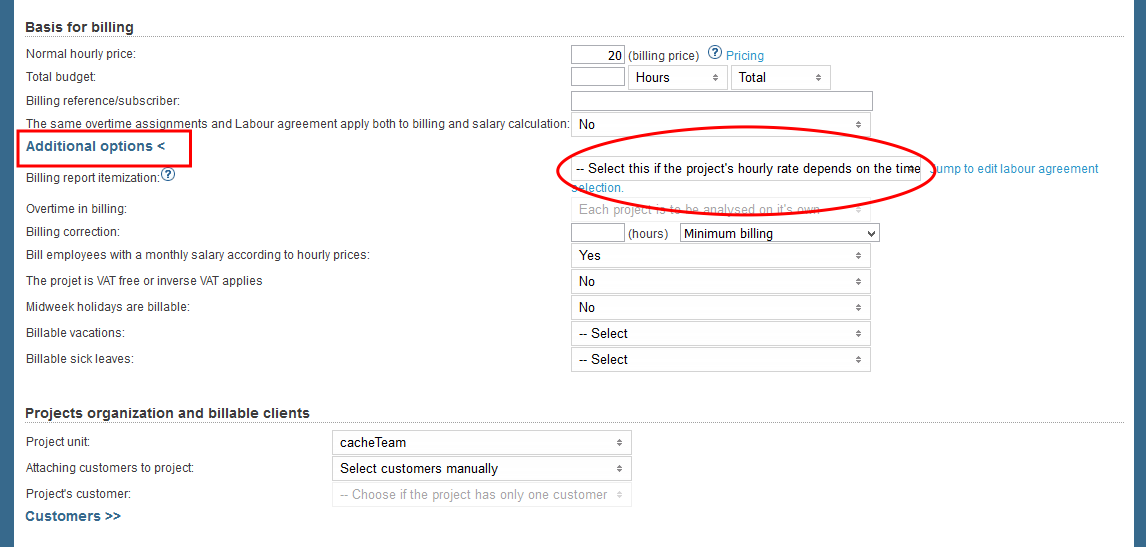
- Open "Projects > Basis for billing > "Additional options"
- Make sure you've set "The same overtime assignments and Labour agreement apply both to billing and salary calculation" as "No".
- Now you can choose the collective agreement from "Billing report itemization" -menu. If you can't anything suitable, you can modify the contracts by pressing the link next to the menu
- Save the changes.
A labour contract can also be selected in the unit-level. If both, the unit- and the project-level, have a labour contract chosen, the project-level's selection (closer to the project) is the imperative.
- Open "Units > Billing and salary settings".
- You can choose the collective agreement from "Billing report itemization default" -menu.
- Save the changes.

If a labour contract and a pricing is selected, but the report doesn't have any prices or the prices seem wrong, the labour contract and the pricing doesn't fit together.
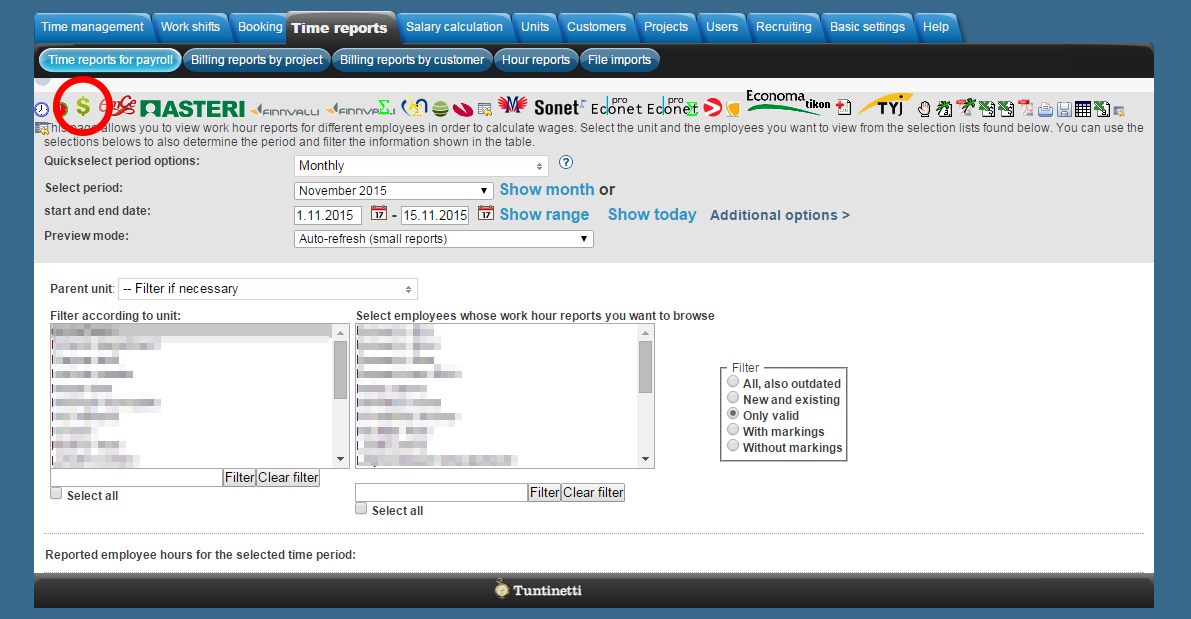
In Tuntinetti it is possible to perform a check to the billing prices. The report checks if the prices seem right (Too low, too high or missing price will appear on a warninglist). The inspection report can be found in the Time reports > Time reports for payroll-tab from the icons in the top part of the page.
Needing guidance or training? Give us a call +358-(0)9-6898 8221. |
||
Technical support +358-(0)9-6898 8222 tuki@tuntinetti.fi |
Sales services +358-(0)9-6898 8221 myynti@tuntinetti.fi |
|