Employee settings
Users > Employees
The following goes through the content of the Employees page and the functions of it. In Employees page, you can search for users, create new users and invite them to use the Tuntinetti, add skills and projects for the users and manage their contracts. Employees can be added and their settings modified also in the Employee wizard.
There is an instruction video about the topic here: Managing user accounts - Tuntinetti
Searching employees
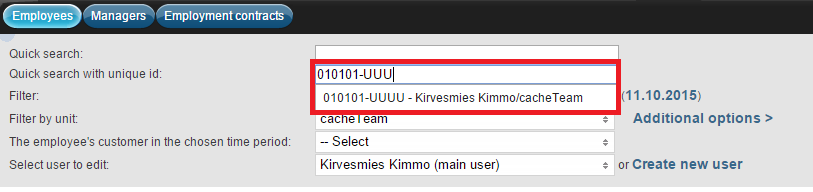
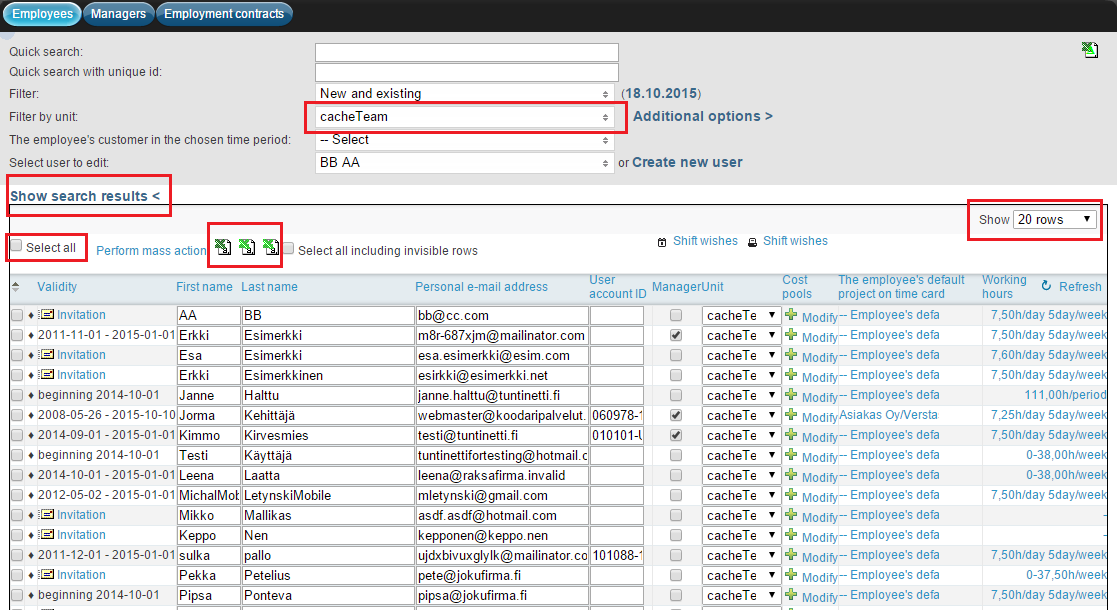
You are able to search employees with different search criterions. You can write a part of the employees name to the quick search field. You can also search with an unique id, if that is in use. The unique id can be for example personal identification number or some other identity number.
You are able to filter the search to employees who have an active employment contract to some project or you can choose the employees with expired contracts as well. With the time period choice you can search employees who have entries in Tuntinetti for that time period. You are able to choose the date, at the right side next to the filter -field.
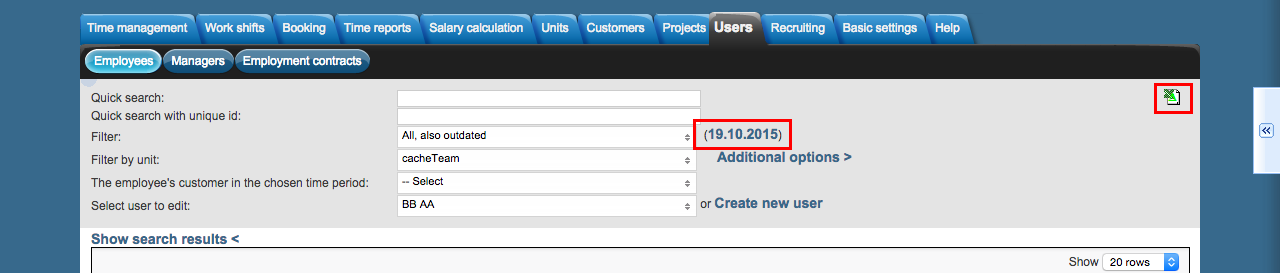
If you can't find the user you are looking for, you might want to try the All also outdated -selection from the filter -list. This is helpful, for example when you get a compatibility issue with other employee after changing information, but you can't find that person anywhere.
How to filter employees by time period.
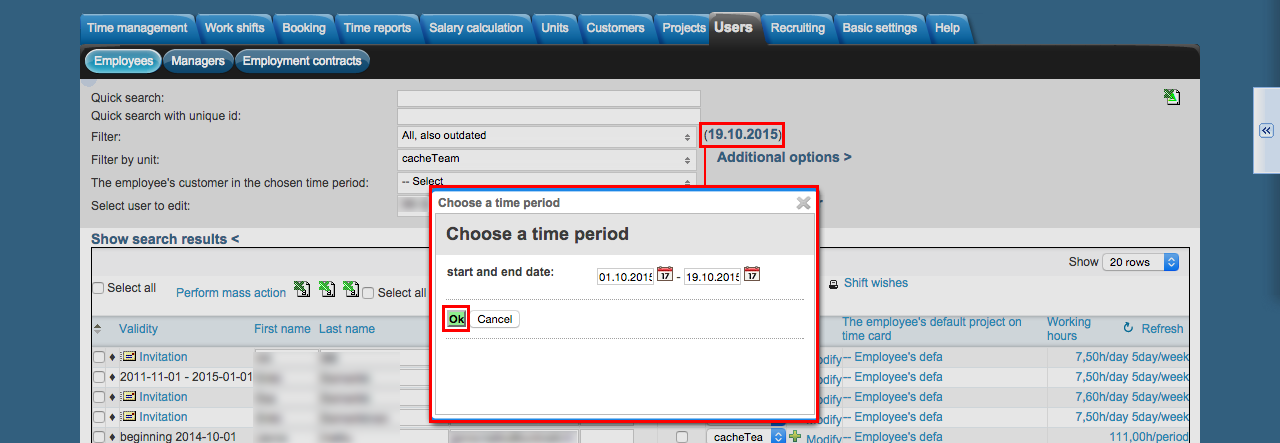
If you want to view changed user data from a specific time range, choose the time period and click the table -icon from the right.
Search results
By clicking the Show search results > -button you are able to see the filtered employees. You are able to create new users, modify existing ones or send them an invitation to Tuntinetti.
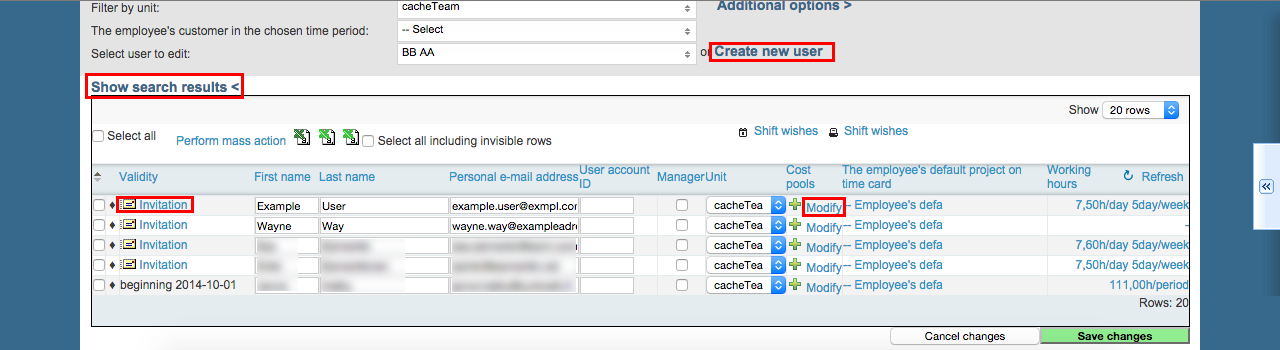
You are able to change the employee's information straight from the search result list. You can send mass message to multiple employees by first choosing the employees and then clicking the Perform mass action -link. From the opened window you can write the message and choose wether it will be sent as a text message or as an email. Default project enables the employee to simply clock in/out when arriving/leaving a work place.
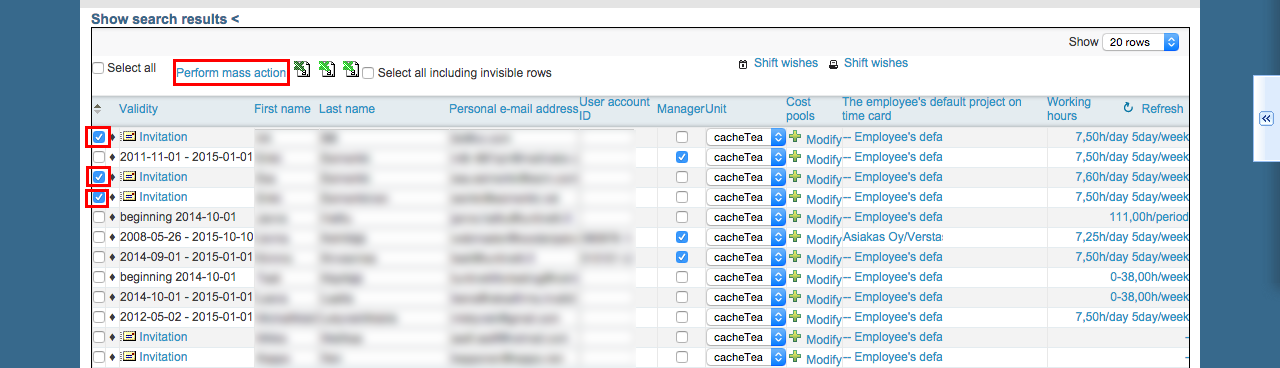
The chosen employee's information can be added to a table, that can also be done with employee skills or contracts. The table buttons can be found next to the Perform mass action -link. With "Select all including invisible rows" selection, you can select all search results for downloading. With "Shift wishes" buttons you can edit selected employees' shift wishes and print shift wishes into a table.
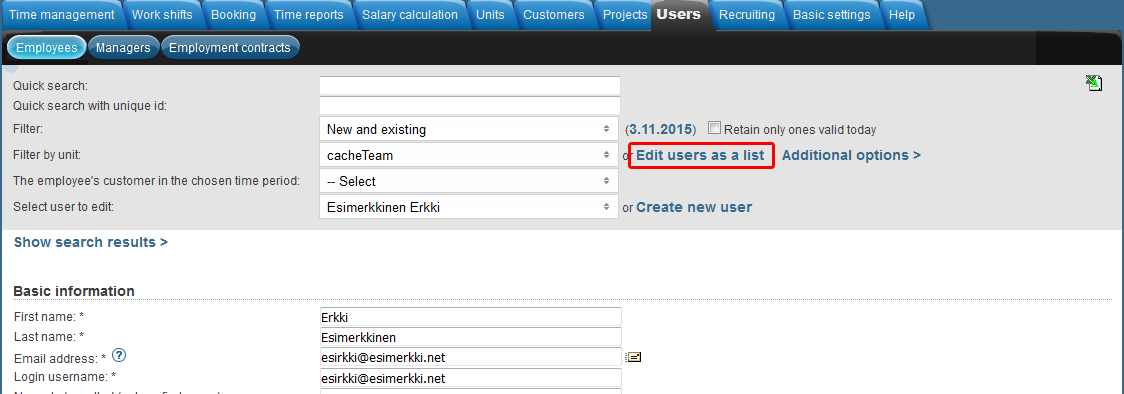
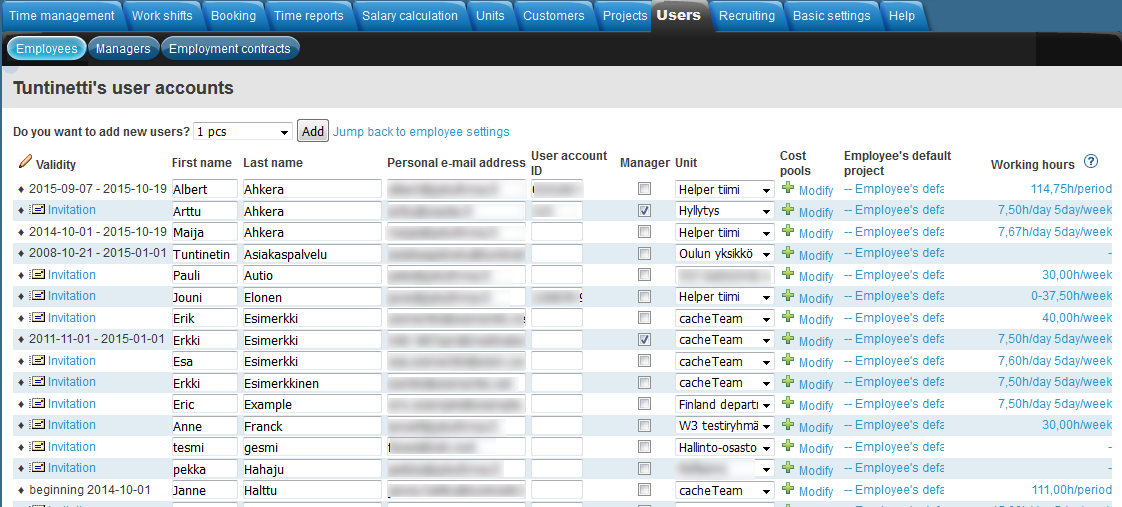
Edit users as a list
"Edit users as a list" opens employees in a list view, where you can create new users, edit employees' information or send them invitations to use the system. With "Superuser" checkbox, you can give superuser privileges to users. You can also set unit for the employee as well as add or remove work items. Employee's default project enables the employee to simply clock in/out when arriving/leaving a work place. By clicking "Working hours" links you can modify employee contract information.
Note that the "Edit users as a list" function is not available if the system has a lot of employees, and then "Show search results >" replaces it.
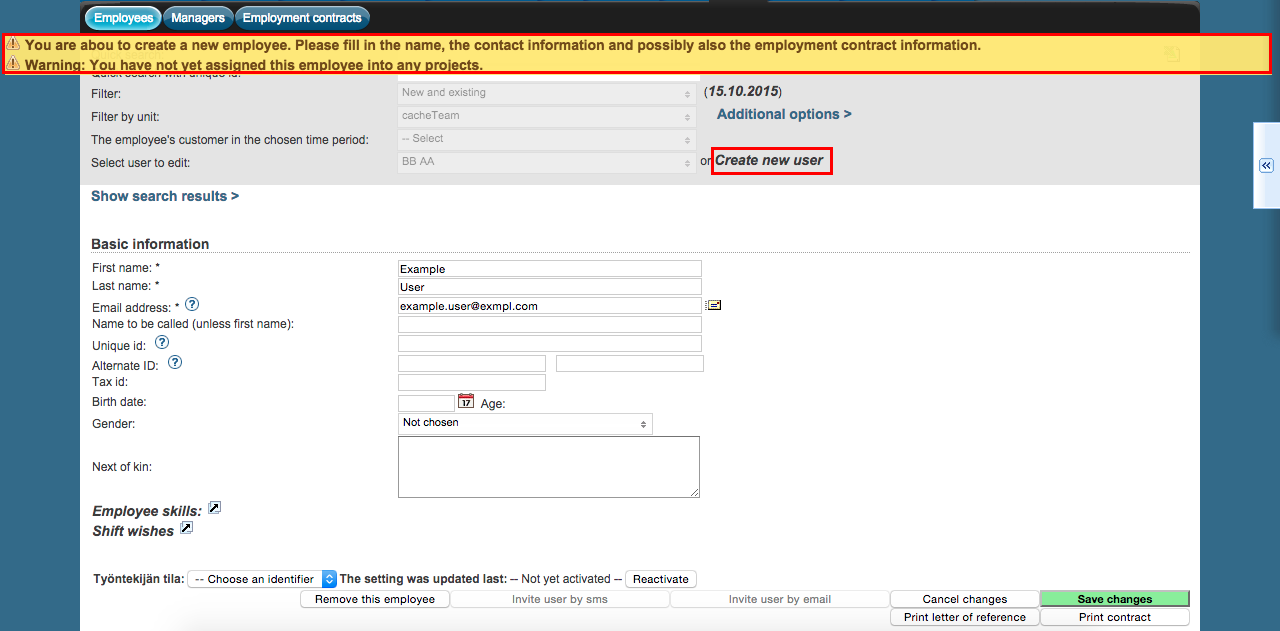
Creating a new employee
You are able to add new user by clicking the Create new user -link. You need to add at least the basic information, at the same time you can add information about projects and contracts. If you want to remove an user you have created, click the Remove this user -link, remember that you are only able to remove users that haven't used Tuntinetti yet. Renaming users is also possible.
Inviting users to use Tuntinetti
You are able to invite the employee to Tuntinetti by text message or email. Send invites with "Invite user by sms" or "Invite user by email" buttons. Invites can also be sent when sending messages, with " Invitation" button in the search results or with "Invitation" button in the "Edit users as a list" view.
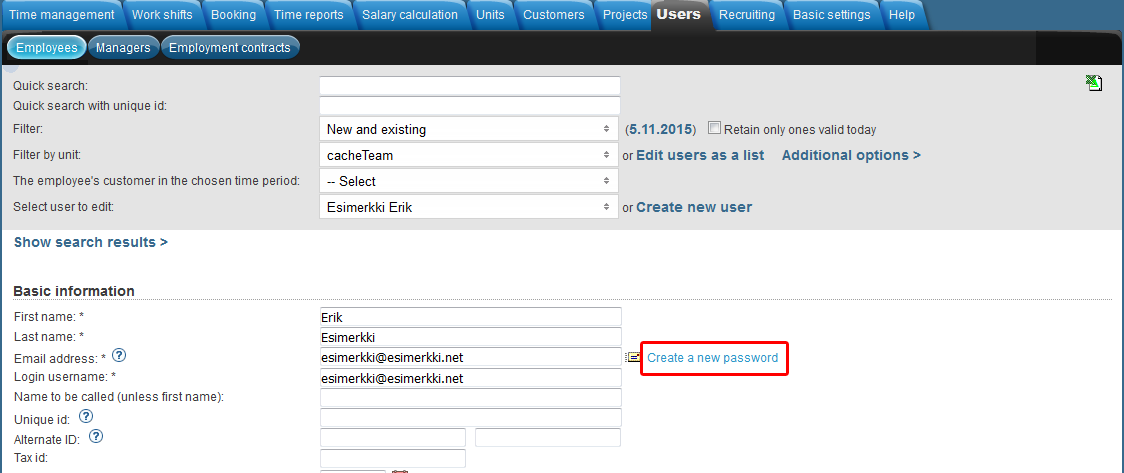
Superusers can order new passwords with "Create new password" button next to button, if the setting "If needed, the supervisor can create a new user password and print it" has been selected in the "Other settings" menu in the "Company's basic information" page
Employee settings
Remember to save changes with "Save changes" button or if necessary you can also cancel changes with "Cancel changes" button.
Basic information and functions
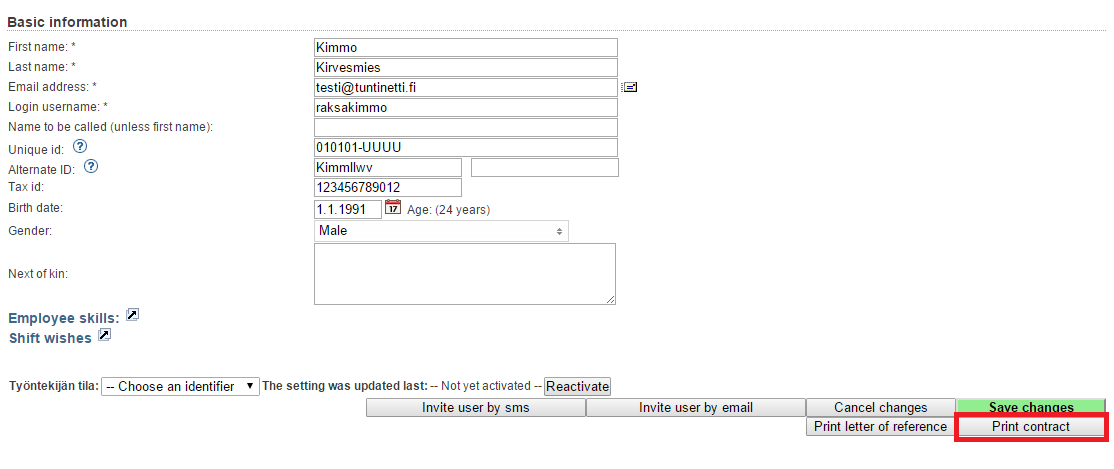
In the basic settings of the employee you chose, there are for example employee's name- and address information. You are able to modify these informations at your will.
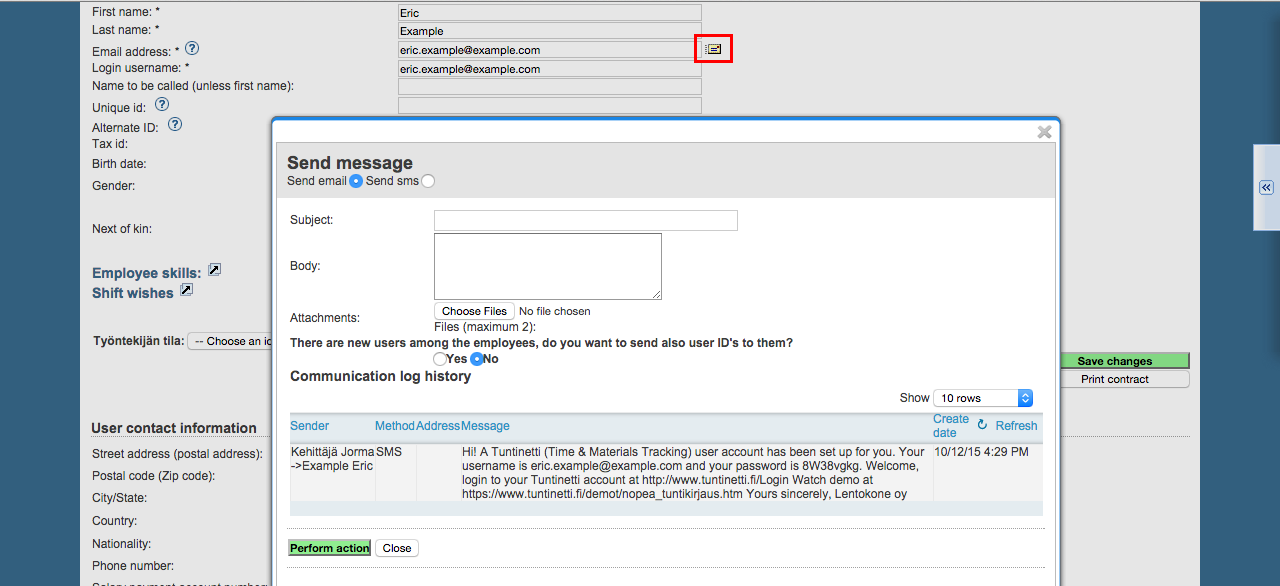
Sending messages to employees
At the same place you are also able to give to the employee their username to Tuntinetti. Messages can be sent to the user after the email address is set, by clicking the mail -icon. In addition to writing a new message you are also able to see the message history.
Unique id and Alternate ID
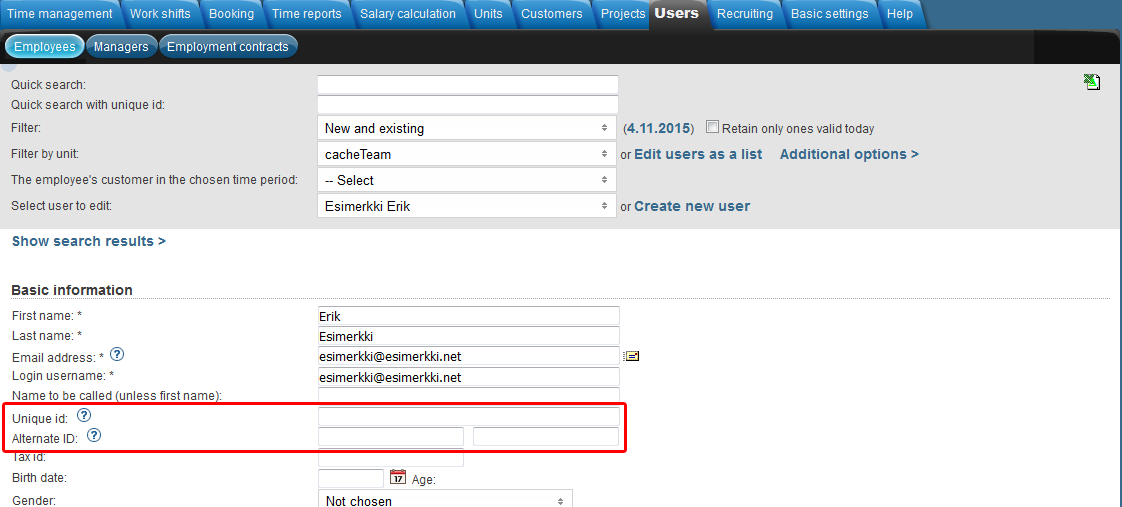
The user ID can be an employee number or a social security number. The user ID is used for payroll purposes, for example. If the social security number does not exist use ddmmyy-UUUU. If the date of birth is also unknown use 010101-UUUU.
If the ID used already is the user's identity number (social security number), an employer ID may be used as an alternate ID if it is required to e.g. move salary types into the salary calculation system. In Tuntinetti salary calculation this ID will be printed in the field for the employee's identity number. Työaikanappi identifier is entered into the "Alternate ID" field. If the Työaikanappi isn't in use, you can use alternate ID for something else.
Skill editor
By clicking the Employee skills -link you will open a menu, where you are able to edit the user's skills. You can quickly check the employee's skill information by taking your mouse over the Employee skills -link.
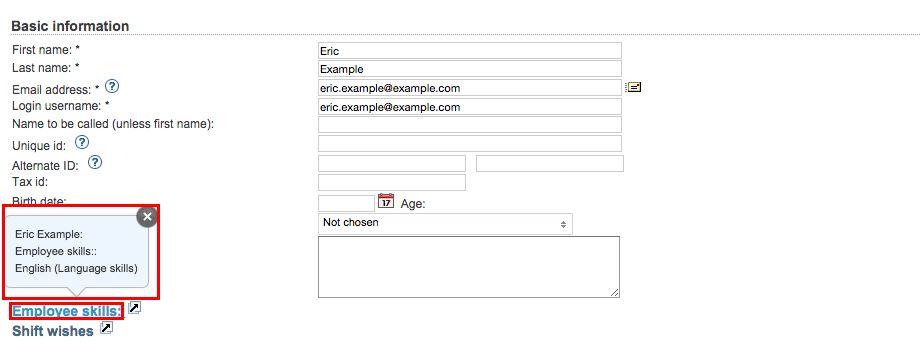
The skills are defined inside skill groups and you are able to add new group at the skill editor.
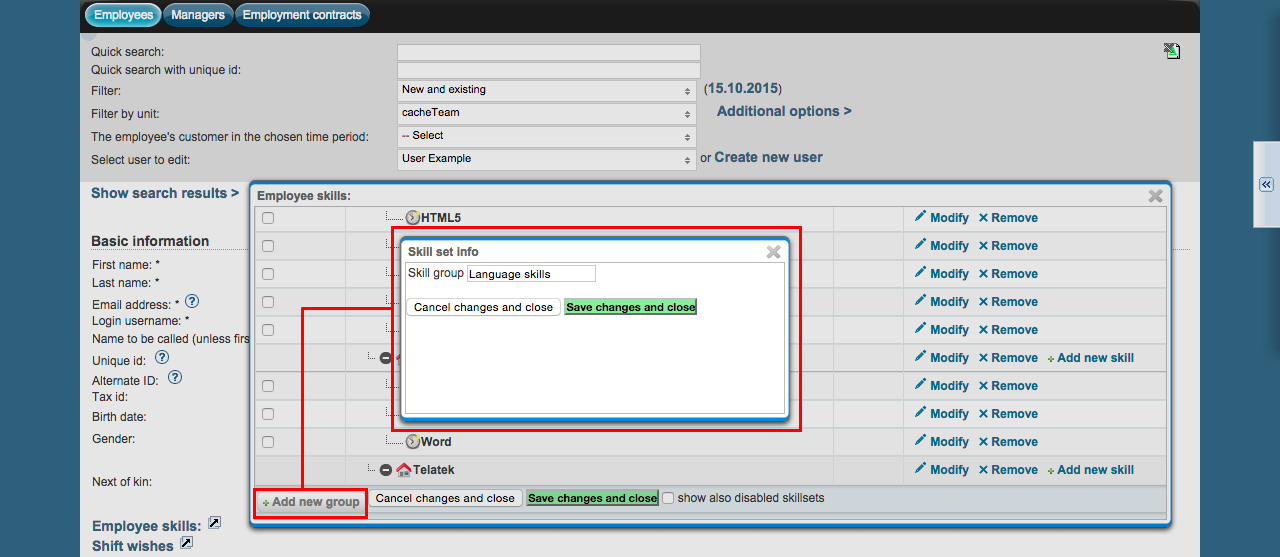
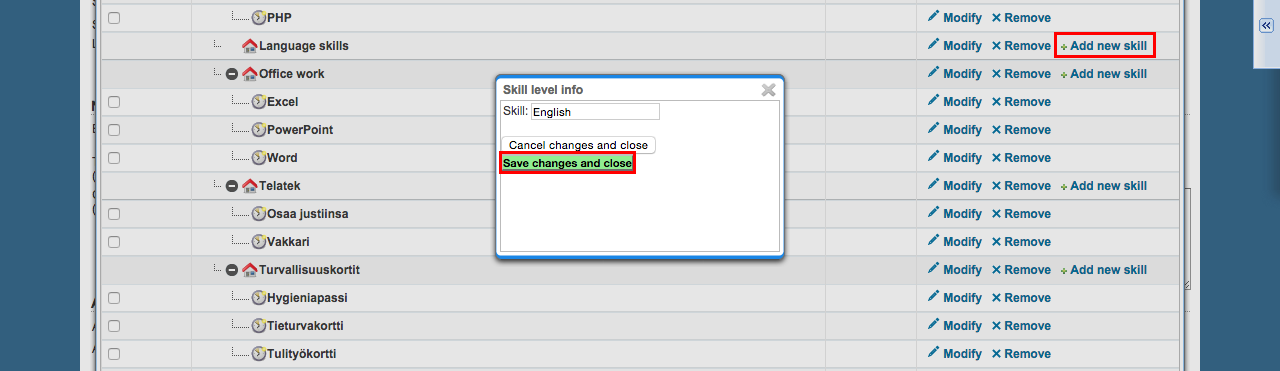
New skill can be added with "Add new skill" button to a suitable skill group.
Features of Skill editor
With Skill editor the employer can collect for example vaccination certificates of employees required by Infectious diseases law safely into the system. It is possible to ask employees to save all the required certificates in Tuntinetti at once.
This feature is enabled by adjusting skill settings in Employees tab by selecting Modify employee skills/permits.
If you want to gather employee vaccination records in Tuntinetti, you can add a skill group Corona vaccination certificate and add following skills into it:
- Vaccination certificate
- Certificate of positive test result within 6 months
- No certificate
- No vaccination due to health reasons
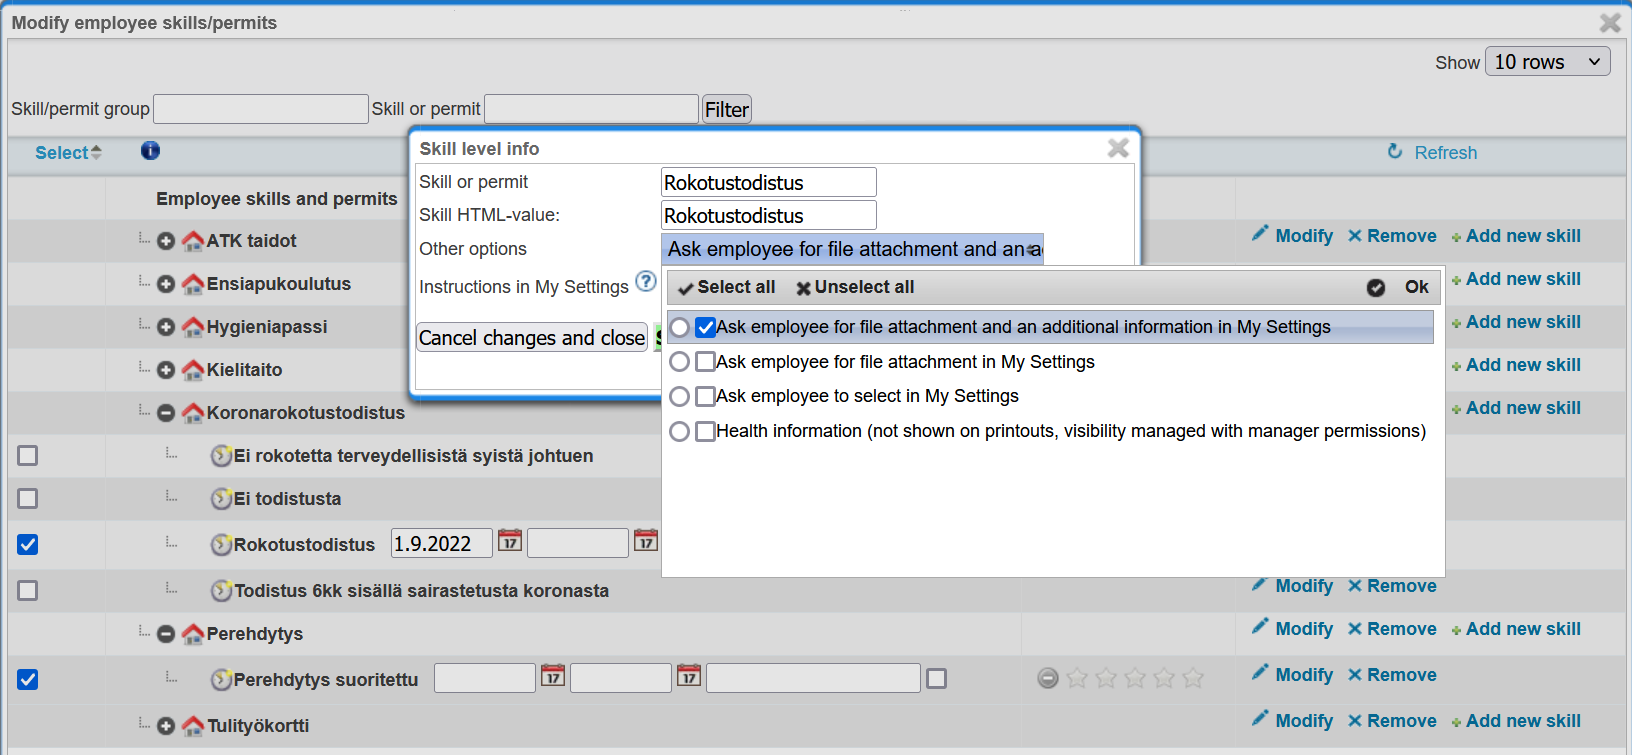
This feature is enabled by selecting one of the following options:
- Ask employees for a file attachment and an additional information in My settings
- Ask employees for a file attachment in My settings
- Ask employees to select in My settings
- Health information (not shown on printouts, visibilty managed with manager permissions only)
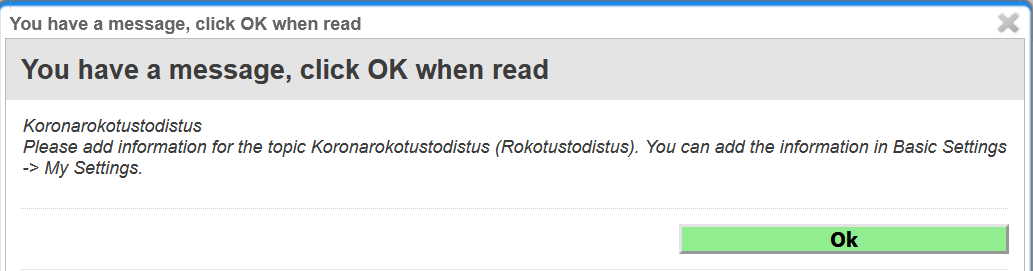
After this feature is enabled, the employees receive a notification when they log into the system. They are guided to selecting the appropriate skill choice in My settings:
Required information is added in My settings tab:

When the required attachment has been added in My settings, the employee receives a confirmation email. Managers can see added attachments in Employees tab by first selecting the employee and then Notes:

If you want to limit the visibility of vaccination certificates to managers of your choice, you can select an additional setting Health information (this type of data is not included in printouts and its’ overall visibility can be limited by using manager rights) and define specifications regarding visibility of vaccination records to managers in Units tab.
Shift wishes
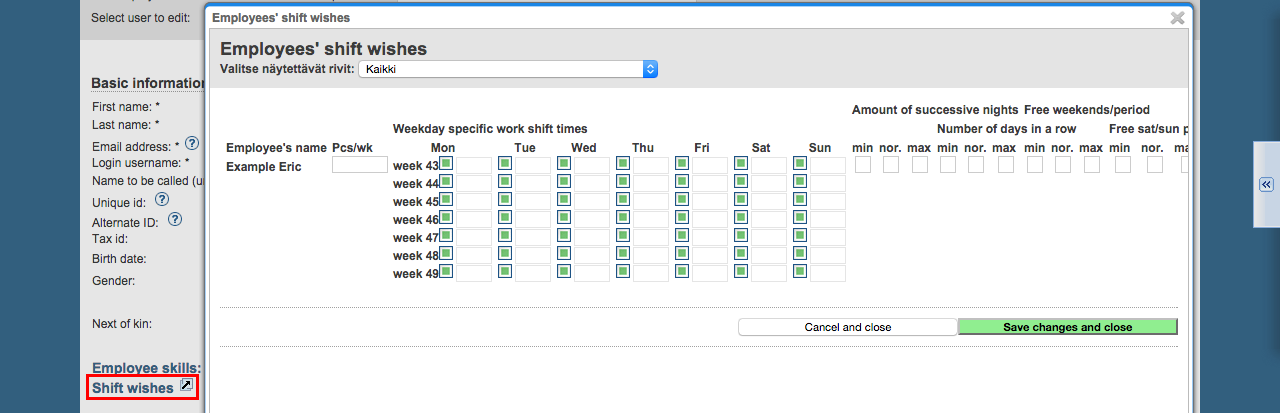
Shift wishes -link opens a new window, where the user can add his wishes about shifts.
Which shifts would you like to work on next weeks:
- How many shifts do you wish to have per week
- Which shifts would you like to work on next weeks
- You can mark shift wishes to the the days at your will by clicking the box next to the day.
- The state of the shift wish will change when you click the box multiple times. Write the wanted time (for example 8-16). The field will be freed when the box has a tick.
- Fully green box
 means that you have not asked or refused to take shifts for that day.
 - Tick in the box
 means that you can take shifts for the whole day.
 - Tick in the box and a time next to it means that you are wishing to have shifts for that day.
- Empty box
 means that you can't work on that day.
- Fully green box
- The state of the shift wish will change when you click the box multiple times. Write the wanted time (for example 8-16). The field will be freed when the box has a tick.
- In this window, you can also give wishes in min nor. max text fields:
- Amount of successive nights
- Number of days in a row
- Free weekends/period
- Free sat/sun per period
- Long day
- Long days per period
- Short day
- Short days per period
Employee status
You can choose the employees status to be "työaikanappi" or "kellokapula". If you have a Tuntinetti timecard solution, you can select Kellokapula (mobile option) or Työaikanappi (more traditional solution). Configuration for these functions can be found in the Basic settings tab. Työaikanappi identifier is entered into the "Alternate ID" field in the basic information section.
Printing letter of reference and contract
Print letter of reference -button opens a window, where you can set different settings and information about the letter of reference.
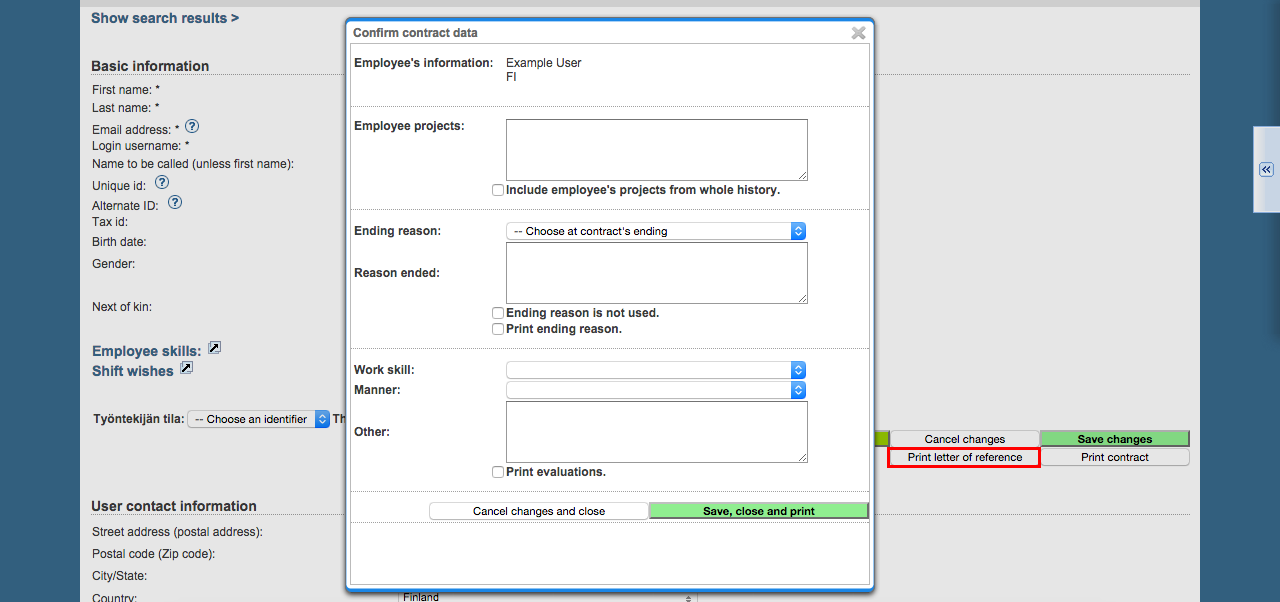
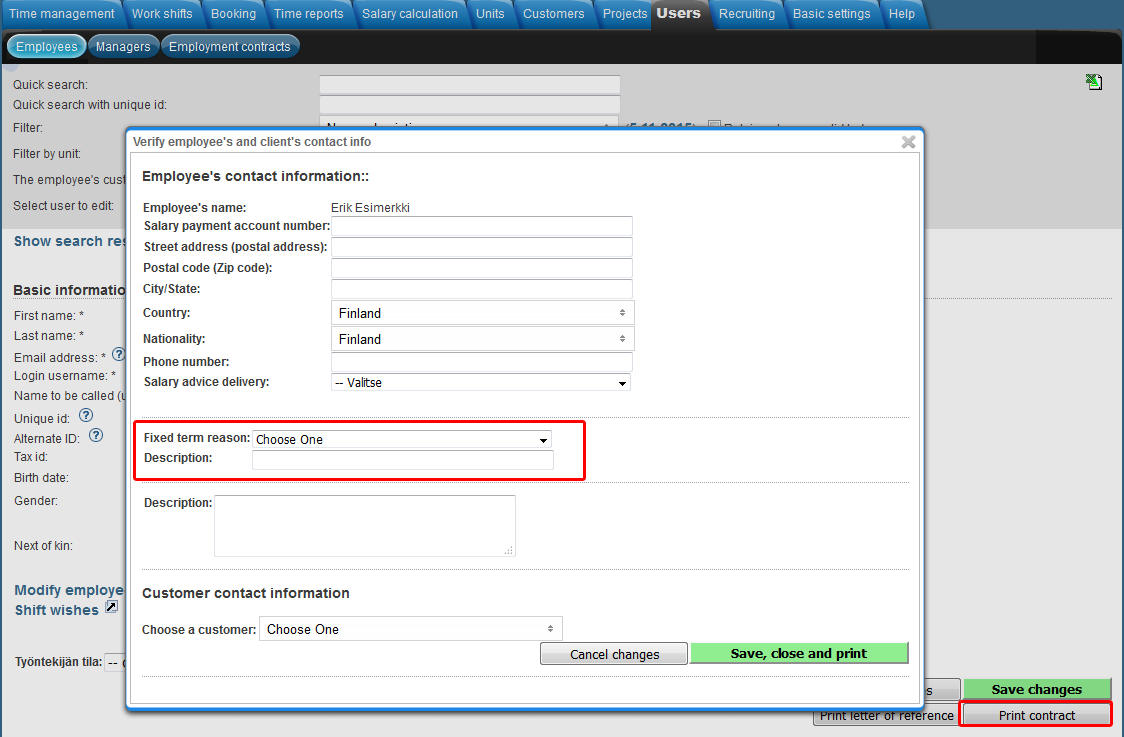
Print contract -button opens a new window to check (and modify if needed) the contract information, after that, you can print it.
If employee has a fixed-term contract, you can select a reason for the fixed-term and write a description of it in the text field below.
User contact information
- Street address (postal address)
- Postal code (Zip code)
- City/State
- Country
- Nationality
- Phone number
- Salary payment account number
Payslip/Paystub delivery
If the Payslip delivery additional feature is active, you can define the payslip delivery method here. Otherwise they will be sent via email. The available delivery methods are:- Mail (For Netpost and mail delivery you need a separate contract with OpusCapita Oy. Contact our customer service when activating an iPost delivery system.)
- Via email
- Online (With the "The employee can see his/her own salary advice" basic setting you can have payslips visible for your employees immediately after confirmation. Employees can view them in their own Tuntinetti account in the Own salary calculations tab.)
- Latest Application received
Notes
At the notes you can write for example a general description of the employee. And the employee can for example tell his free form shift wishes. The employee can edit his wishes by himself. You are also able to create notes that are visible only to the admin user.
New notes can be added to the text boxes and any changes must be saved with the "Save changes" button.

Employee notes in a list
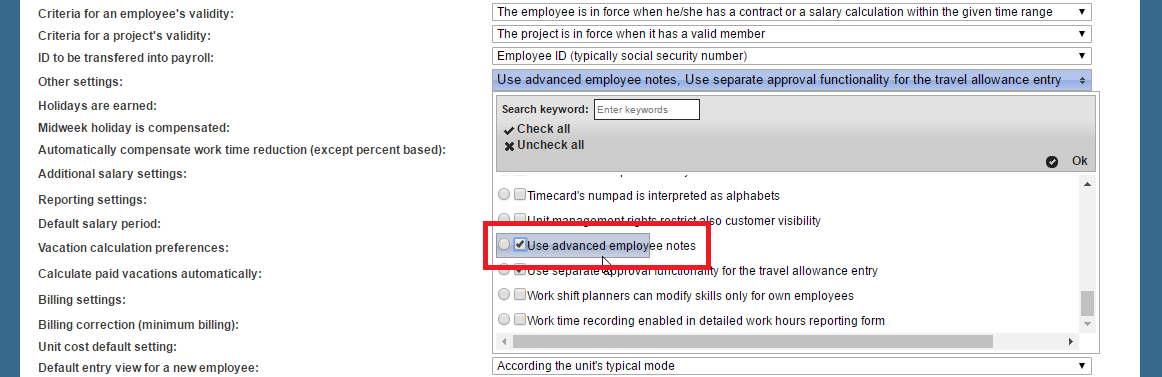
Employee notes that are visible to superusers can be handled also in a list instead of a text box. The employee notes list can be activated in Company's basic information with the other setting "Use advanced employee notes".
This setting affects all of the company's employees.
If the setting is later changed back to text box view, notes that were made in the list view won't be added to the text box note.
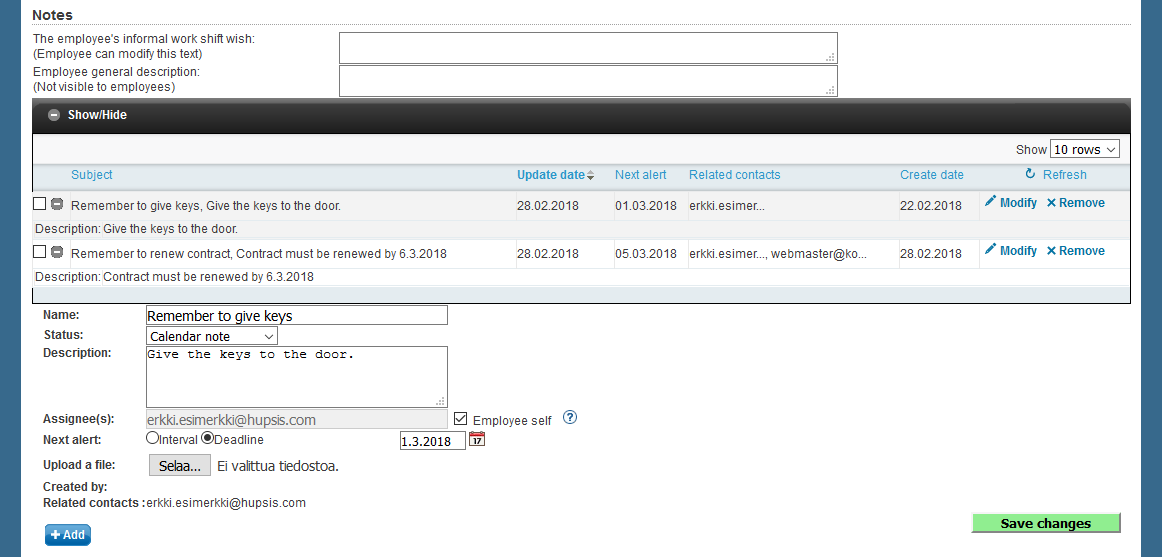
A new employee can be added by clicking the "Add"-button. Fields for the note's information open up under the note list.
- Name
- The name can be the name of the note or a short description of the note.
- Status
- The status of the note defines what kind of note it is.
- Description
- The description includes the note itself that needs to be remembered.
- Assignee(s)
- Defines the people that are in charge of the note.
- Next alert
- Defines the date of the next alert. The alert sends an email notification to the people, who are added in the "Assignee(s)" field.
- Upload a file
- A note can have an attachment, which can be added here.
"Save changes" button saves the added note. New notes can be added after that by clicking the "Add" button again.
Attachments
You are able to add image files or other files to the user. You can see the filenames of the images- and files you have uploaded and and you can open a file by clicking it. The system will accept common image files and file types.
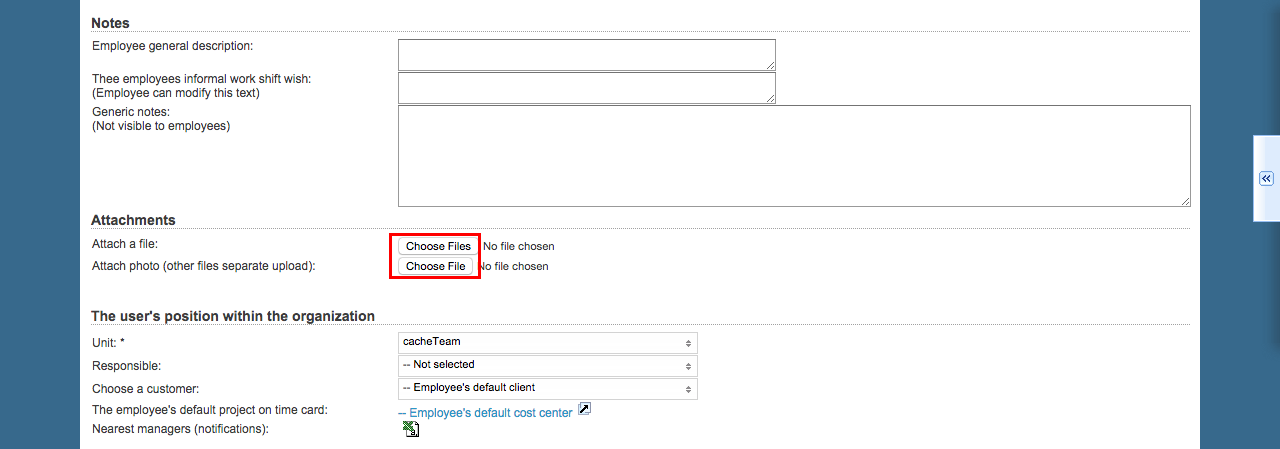
Attachments can be selected to be shown to the employee in his/her personal information. This is an easy way to share for example employment contract or payslip. Employee can't change or remove the attachments that are shared with him/her.

The user's position within the organization
At this part you choose an unit for the employee, you can also choose responsible person and a customer. You can also set a default project for the employee which will be visible at the employee's time card. Note: Responsible person is informative only, it does not have functional implications like supervisor status or such.
Nearest supervisors means the recipients of the messages about the employee, these kind of messages can be for example changes in vacations and forgotten time reports. The recipients are defined at the Units -tab at Supervisors and users' rights section.
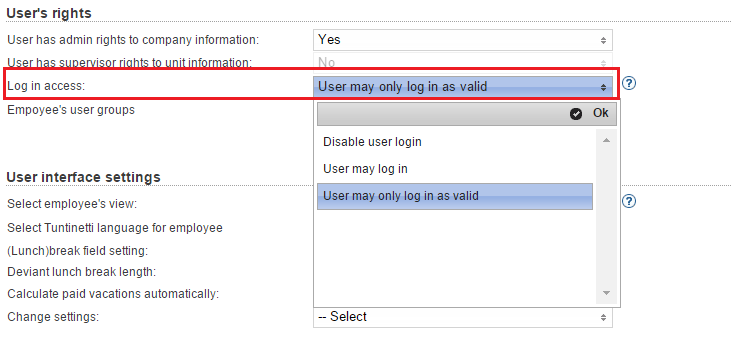
User's rights
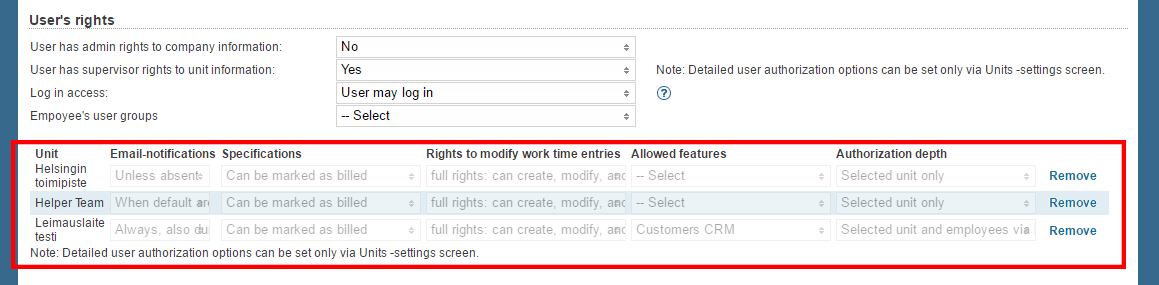
Users can be regular users or admins. The users log in access can also be defined for each user specifically. The log in access can be set to be depended on a valid contract or the user can have the access to log in even if he doesn't have a valid contract. If the access if given to other than own unit it should be defined at the units -tab or with the Unit wizard. The user can also be linked to user groups. More detailed user's right for specific unit can be managed only through the Units tab.
Unit list
All of the employee's units are listed under the User's rights section. Rights to a unit can be removed with the "Remove" button.
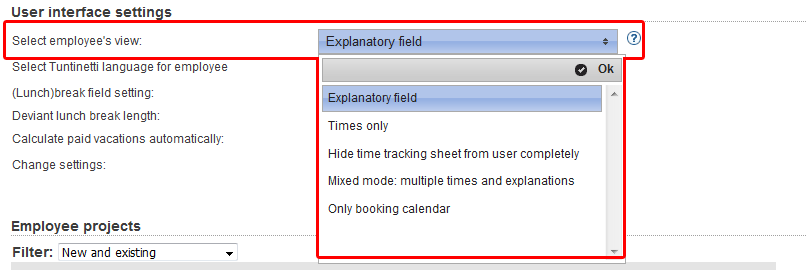
User interface settings
The user interface settings will show to the user as different functions or views at the system. The users view can be simple (times only) or explanatory (explanatory field). At the times only -view the user will only see the hours of each day. At the explanatory -view the user will see the hours broken down and is able to make multiple entries at different times.
The user interface language choices are finnish and english and at this part you are able to set the user specific language.
In the "(Lunch)break field setting" menu you can select how the lunch break is used in the time reporting view:
- Remember default
- Without default
- Not used
- Choose using checkbox
- Read only field
The length of the lunch break can be marked exactly in the "Deviant lunch break length" field, if it has been agreed to be a specific length.
You can specify the vacation earning years with the "Calculate paid vacations automatically" menu. Please note, that the paid vacations need to be separately activated on company or employee level. To be able to perform the vacation calculations, Tuntinetti's additional features must be activated. Two features relating to annual vacation calculation are "Annual vacation calculation" and "Rolling estimate of earned paid vacations". At least the first of these must be selected to enable vacation calculations to work.
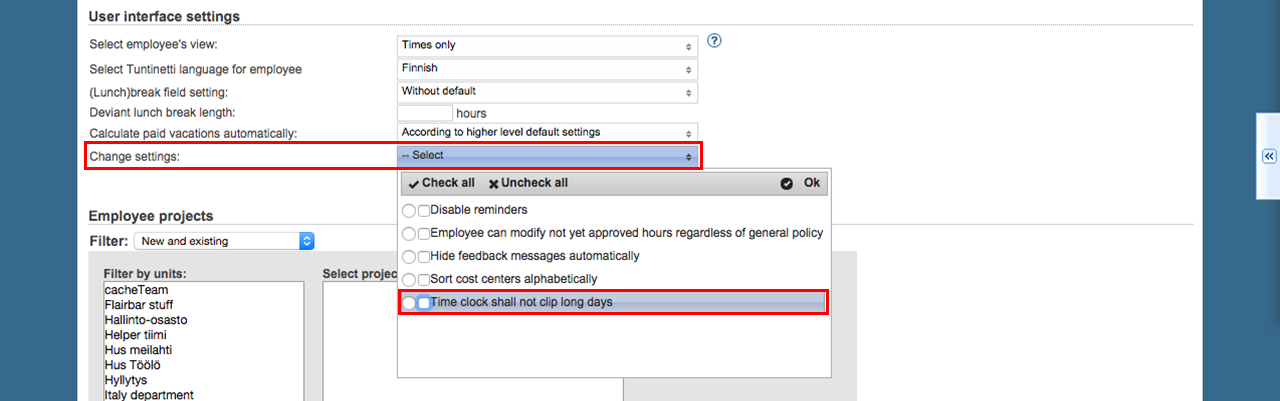
Change settings
- Disable reminders
- Employee can modify not yet approved hours regardless of general policy
- Hide feedback messages automatically
- Sort cost centers alphabetically
- Time clock shall not clip long days
The right for a longer work day about the time clock cuts you are able to choose from the Change settings -menu.
Employee projects
You can add a project for the user by first choosing the unit and then the project. You can see all the projects by choosing All, also outdated -option from the list.
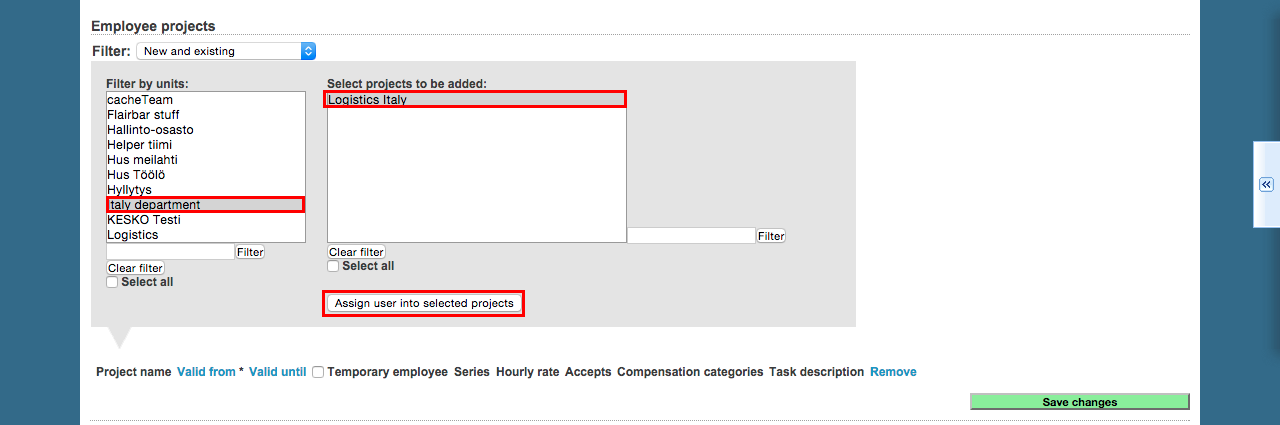
Below the project selection windows you are able to see a list of the employee's projects. In every project's row there are additional information:
- The valid time range defines when the employee is able to enter hours to that project.
- With the Temporary check-box you can define the employee as a temporary. A temporary employee is able to enter hours to the project, but the project is not selected by default.
- The series menu defines the project's labour agreement. The employee can have multiple labour agreements for the same employer. For example if an employee works the start of the week as a temporary driver and the rest of the week at a construction site.
- Hourly Rate or Pricing is used when information is transferred straight from Tuntinetti to a billing system.
- With the Accepts option the employee (for example a team leader) has a privilege to accept project's hours.
- By choosing the compensation categories the employee can accept "only superior" -type compensations.
- The task description is a free form description of the employee's task in the project.
You can remove a project from an employee by clicking the Remove -link.

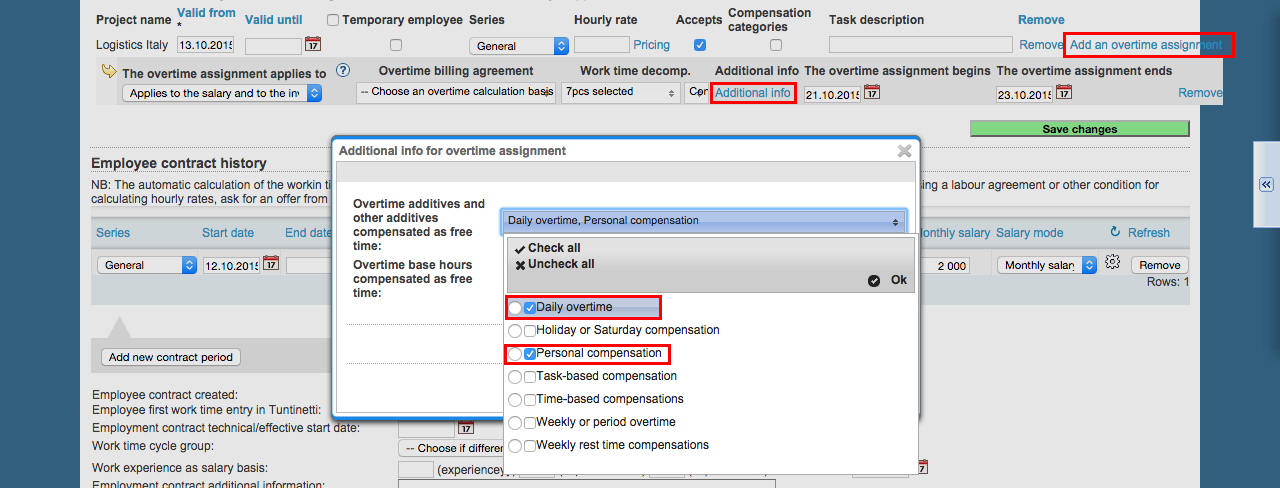
Overtime assignments
Add an overtime assignment opens the settings about the overtime assignment for the project. The overtime can apply to salary, invoice report or both. You need to choose a billing agreement, work time compensations and the valid period for the overtime. More information about overtime settings and the hierarchy of them can be found in the overtime assignments guide.

You can get more information about each part by putting your mouse over them. At the overtime's additional information you can define the overtime to be compensated as free time. Choose which additives will be compensated as free time.
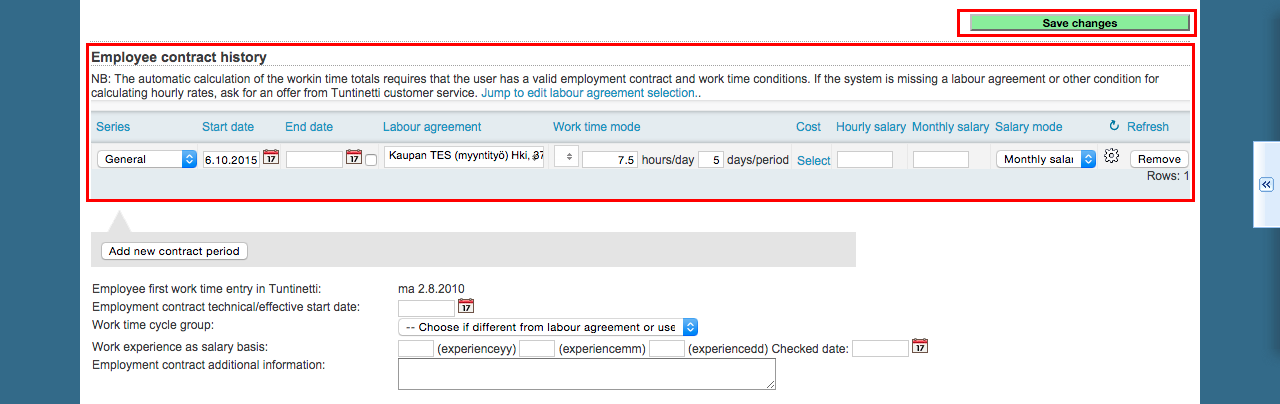
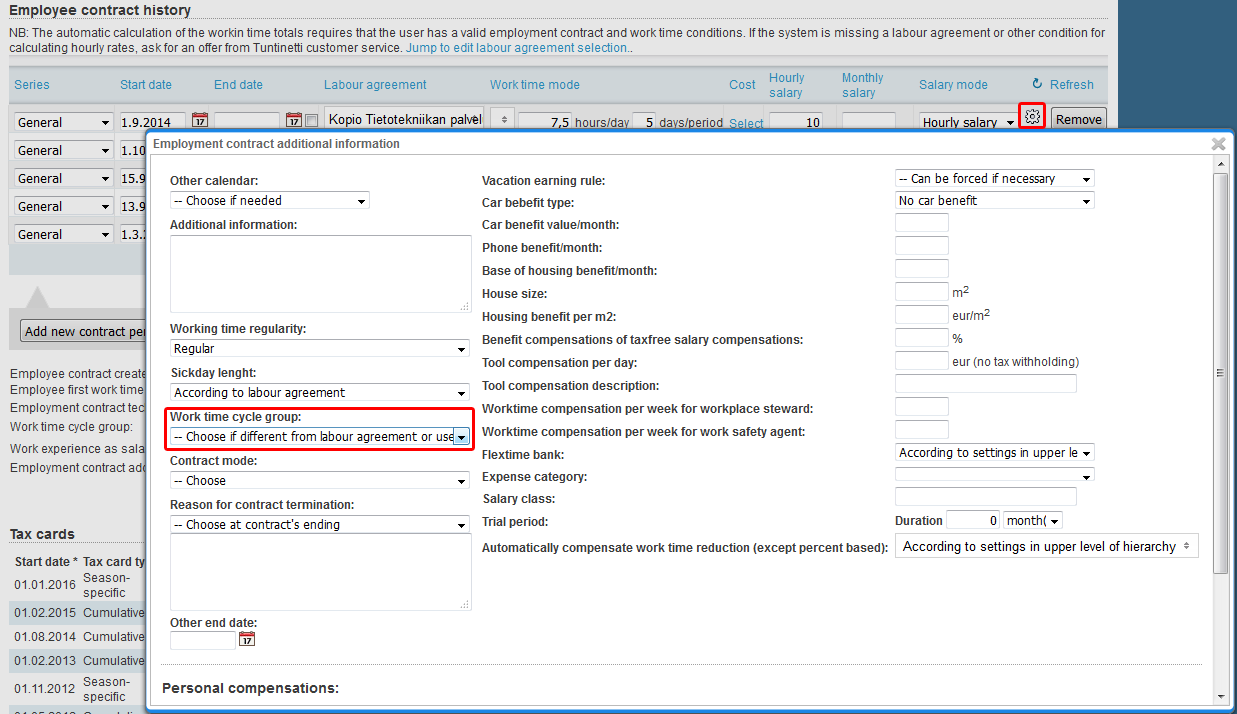
Employee contract history
In the contract history you can add new contract or modify informations of the old ones. Press "add new contract period" -button to create a new contract.
If the employee already has a contract you can choose if you want to start the new contract by copying the old one or if you start with a blank contract. When you have saved the contract you will see it in the contract history and then you can modify it.
Contract can be ended by setting "End date" and selecting a reason for it from the additional information .
.

The technical start date defines the start date of accumulation of rights such as annual leave. If the technical date has not been set, the accumulation of these rights are started when the employee's contract has begun. Or if the contract has ended with a ending reason and started again, the date is the start date of the newer contract. The technical start date is used when you want to differ from this Tuntinetti's default value.
Adding new contract period
- Select "Add new contract period" button. If employee has an existing contract, a window opens from where you can create new contract by copying old. This window won't be displayed, if there isn't any existing contracts.
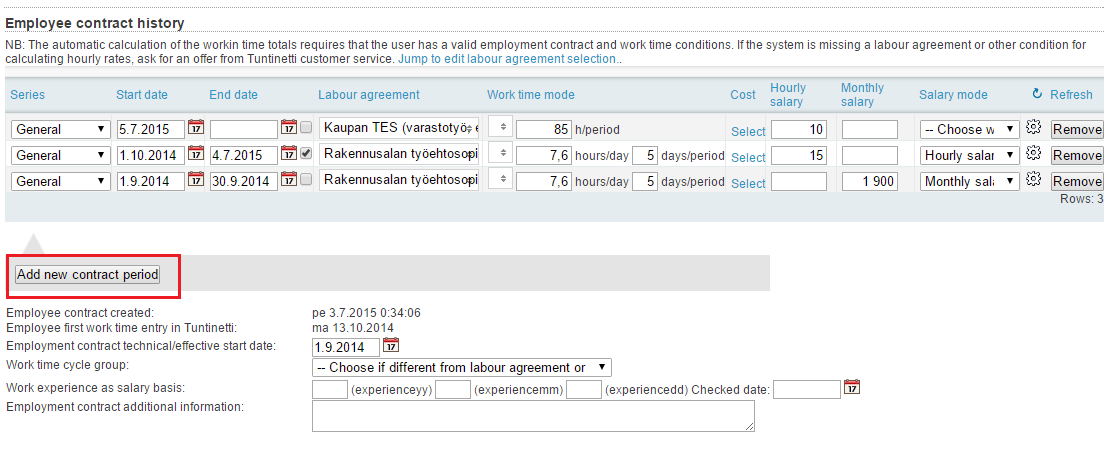
- Select suitable series from the "Series" menu. If needed, you can create distinct contracts for different projects.
- Fill in "Start date" and possibly "End date". End date is mandatory, if the contract is fixed-term. Fixed-term employment can be marked by selecting the checkbox next to "End date".
- For employees who have worked for the company before, but start as a new employee, start date can be entered in the "Employment contract technical/effective start date"-field. This means that if an employee has worked for a long time before, the start date is entered for calculatory reasons.
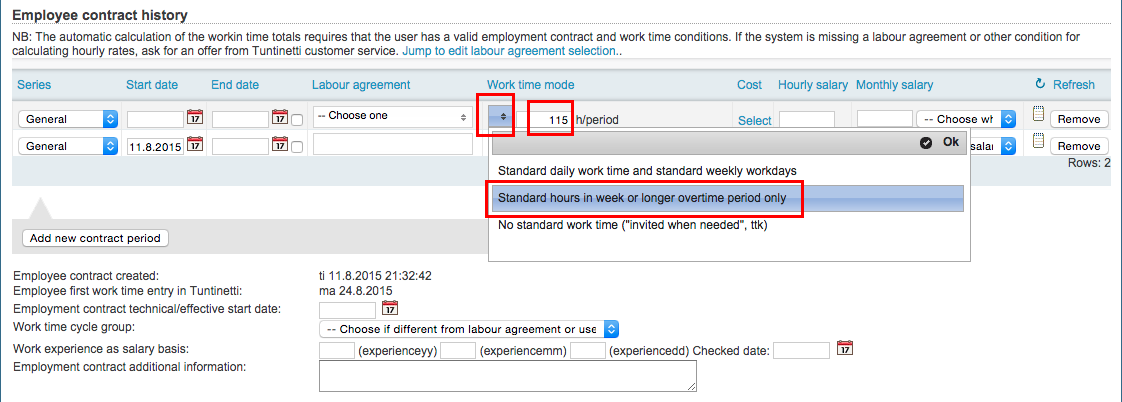
- Select suitable labour agreement from the "Labour agreement" menu. The automatic calculation of the workin time totals requires that the user has a valid employment contract and work time conditions. If the system is missing a labour agreement or other condition for calculating hourly rates, ask for an offer from Tuntinetti customer service.
- The program automatically suggests a length of the working day and the number of working days in a period. From the "Work time mode" menu you can select:
Standard daily work time and standard weekly workdays
Standard hours in week or longer overtime period only
No standard work time ("invited when needed", ttk)
No regular work time is set
- If necessary, you can select the cost price for the profitability calculations from the "Select" link. That opens price list window.

- When necessary, you can choose Bill, Hourly salary or Monthly salary as the salary mode. In the "Hourly salary" and "Monthly salary" fields you can write down the amount of money.
- Set the needed additional information for the contract from the gearwheel icon.
- Save the contract with "Save changes" button.
Additional information for the employment contract
Personal additional extras can be set in the additional information of the contract that is found under gearwheel icon. You can also check the details by moving the mouse on top of the icon. In the additional information you can among other things specify a variety of benefits, how workplace steward activities affect the working hours and pay as well as annual leave earning rule.
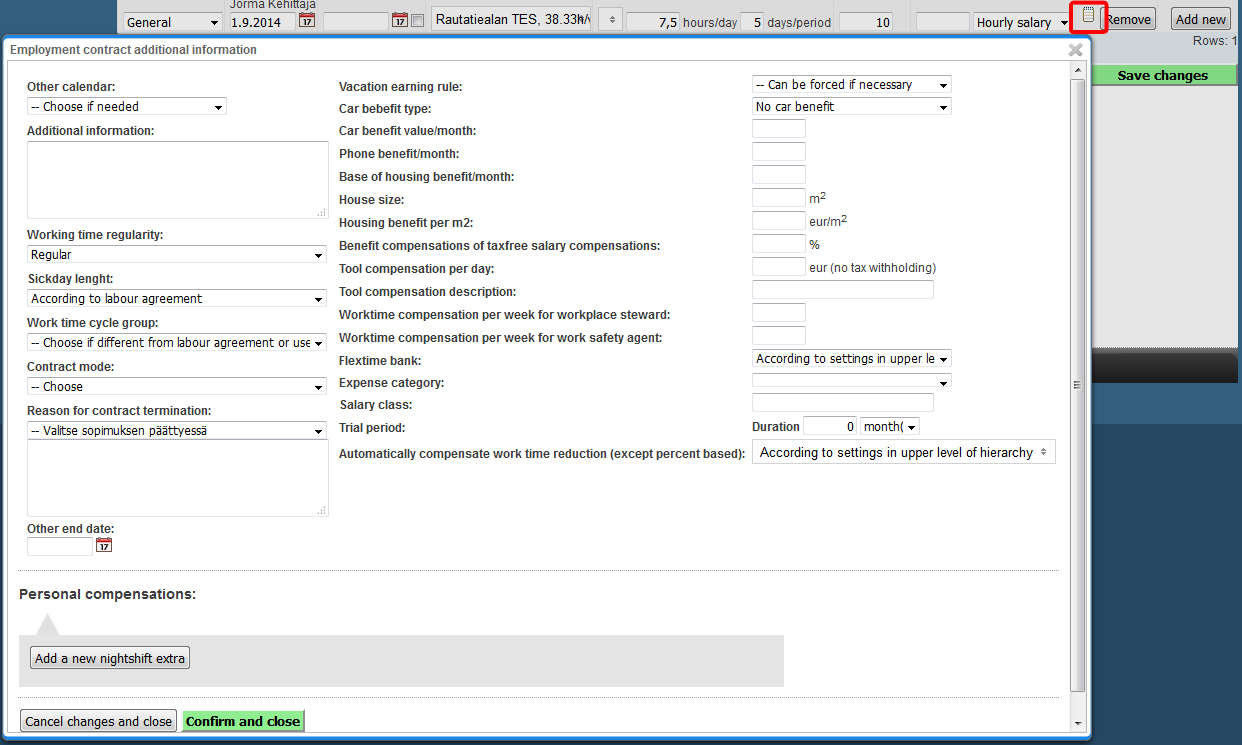
Choices in the additional information window:
- Other calendar
- If needed, you can select different calendar from the ordinary
- Additional information
- Working time regularity
- You can set how much working time is allowed to differ from the normal
- Regular
- May vary +/- hours
- Separately set the number of hours the working time may vary below and over normal working hours
- You can set how much working time is allowed to differ from the normal
- Sickday length
- According to labour agreement
- According to planned work shift
- According to contract hours
- Employee settings#Work time cycle group
- Choose if different from labour agreement or user's unit
- Contract mode
- If the contract mode is different from normal select here
- Apprenticeship contract
- Employment aid contract
- If the contract mode is different from normal select here
- Reason for contract termination
- Choose at contract's ending. A reason is mandatory if the contract has an other end date or if the contract is set to continue indefinitely but has an end date.
- If the contract is a fixed-term contract, check the check-box next to the "End date"-field.
- Additional explanations can be written in the text field below.
- Other end date
- This can be used e.g. when fixed-term contract ends before the set end date of the contract
- If this is set, you have to also give reason for the contract termination in the previous menu
- Vacation earning rule
- Can be forced if necessary
- 14 days
- 35 hours
- No vacation salary calculation
- Percentage compensation at the end of vacation earning year
- Percentage compensation with every salary
- Can be forced if necessary
- Car benefit type
- No car benefit
- Unlimited car benefit
- Car benefit
- Car benefit value/month
- Phone benefit/month
- Base of housing benefit/month
- House size (m2)
- Housing benefit per m2 (eur/m2)
- Benefit compensations of taxfree salary compensations (%)
- Tool compensation per day
- eur (no tax withholding)
- Tool compensation description
- Worktime compensation per week for workplace steward
- Worktime compensation per week for work safety agent
- Flextime bank
- You can set a different setting than in upper level of hierarchy
- Expense category
- Salary class
- Trial period
- Mark the duration of the trial period here
- Automatically compensate work time reduction (except percent based)
- You can set a different setting than in upper level of hierarchy
Personal compensations
Personal allowances can be specified in the additional information of the employment contract. There you can see a list of personal compensations for the contract. You can add new compensations with the "Add a new nightshift extra" button.
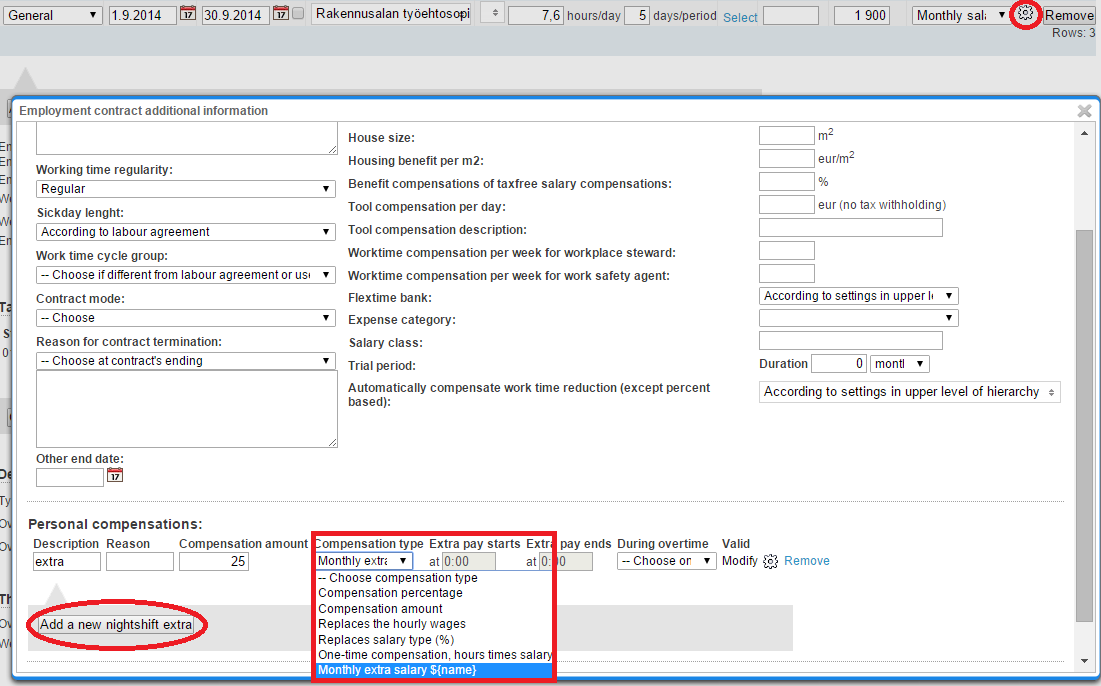
Settings for the personal compensations:
- Description
- Write down a name for the compensations, that is shown in the work time reports
- Reason
- Compensation amount
- Write down the amount of money or percent depending of your choice in the "Compensation type" menu
- Compensation type
- Compensation percentage
- Compensation amount
- Replaces the hourly wages
- Replaces salary type (%)
- One-time compensation, hours time salary
- Monthly extra salary ${name}
- Extra pay starts
- The time of clock from which point onward the compensation is valid
- Extra pay ends
- The time of clock when the compensation ends
- During overtime
- Here you can define how overtime affects
- No effect
- Not paid during overtime
- Overtime not paid
- Raised compensation
- Raised compensation also on sat/sun
- Normal: Compensation in addition to overtime also on sat/sun and time based ratio compensations
- Not scaled during overtime, but compensate sat/sun and evenings
- Overtime not paid, sat- and sun -extras paid separately
- Here you can define how overtime affects
- Valid
- Select "Modify" to define on which days the compensation is valid: Weekdays, Months, Holidays, etc.
- Additional settings
Additional settings for time based compensation
- Remove
Part time employment
You can add a part time employee contract under Employee contract history.
Open the work time mode -window and choose the Standard hours in week or longer overtime period only and write the hours. Fill the rest of the contract like you would with a normal contract.
This can be applied for example to a maternity leave. Lets assume that the employee's maternity leave ends at 31.08.2015 and that she/he will start working part time (80%) at 01.09.2015.
In this case you can make a new contract for the employee that starts at 01.09. Then you can count the work hours for it to be either week- or period hours based on the 80%; as period hours if the period work collective agreement is in use or as a relative week hours amount if it is a weekly working hours.
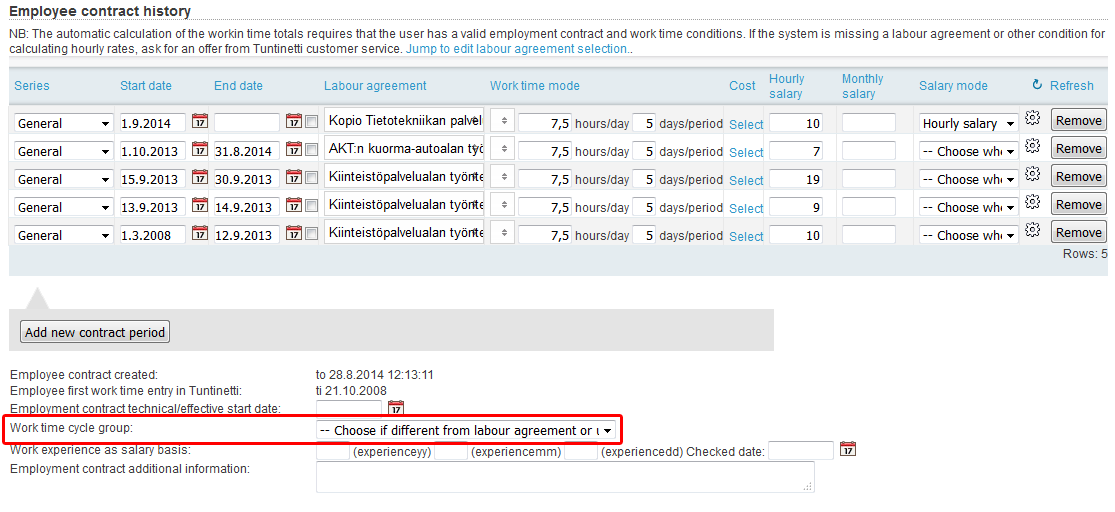
Work time cycle group
The default length for the workshift cycle is set by labour agreement. Typically, the length on the labour agreement level is 1, 2 or 3 weeks. When you need to set deviant workshift cycles, the lengths of the period is set in: the company's basic information for company level, the unit settings for unit level and in employee's contract settings for employee level. Settings are inherited from the unit's settings to unit's employees, either on the grounds that the employee is positioned to the unit in question or that the unit has been selected in the "Work time cycle group" in the additional settings of the employee's contract.
You can select a work time cycle group, differing from labour agreement and user's unit, for the selected employee. If work time cycle group is selected from any of employee's contracts then employee's work time cycle group selection is disabled.
From the "Employment contract additional information" window, you can select a work time cycle group differing from labour agreement and user's unit, for the employment contract. Selecting work time cycle group from employment contract will disable employee's work time cycle group selection.
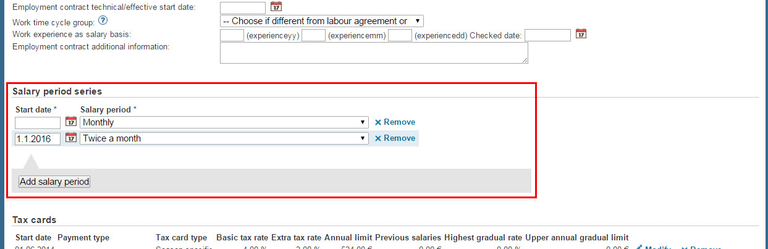
Salary period series
As default, employee doesn't have any salary period series so company's default is used instead ("Default salary period" -setting in "Company's basic information" -page). Company's default setting can be overridden with employee's "Salary period series" -settings. Multiple salary periods can be assigned to salary period series but only one salary period is active at any given time. Active salary period is determined by salary period series's start date. First of salary period series can without start date which means that it active until next salary period series is activated.
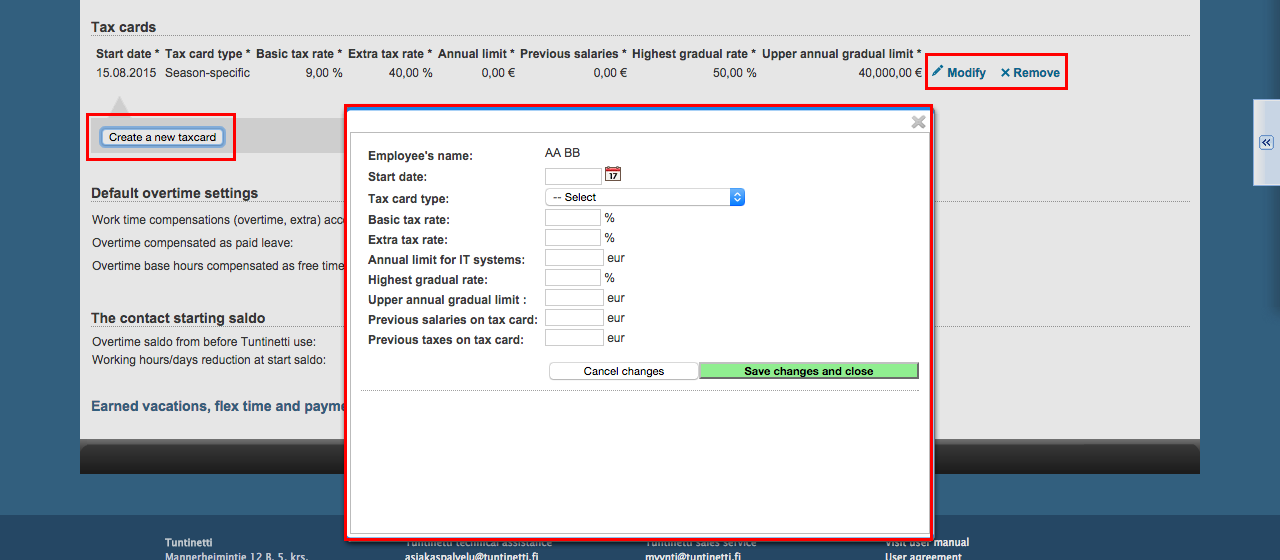
Tax cards
The employees tax cards are showing if they have been set for the employee. You are able to create a new tax card by clicking the "Create a new tax card" -button. You can also modify existing cards or remove them.
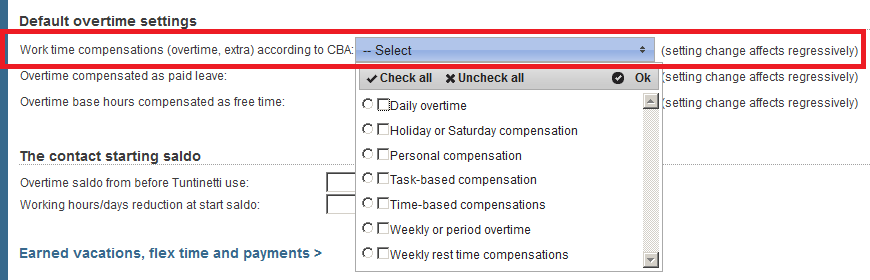
Default overtime settings
At the Default overtime settings you are able to define which additives can be entered and which additives can be compensated as free time.
- Work time compensations (overtime, extra) according to CBA
- This menu defines which compensations are paid differentiated according to collective bargaining agreement. This setting also affects the next two menus below.
- This menu defines which compensations are paid differentiated according to collective bargaining agreement. This setting also affects the next two menus below.
- Overtime compensations as paid leave
- Here you can choose which of the extras defined in the previous menu are compensated as paid leave.
- Overtime base hours compensated as free time
- Here you can choose which base hours of the overtime defined in "Work time compensations (overtime, extra) according to CBA" setting are compensated as free time.
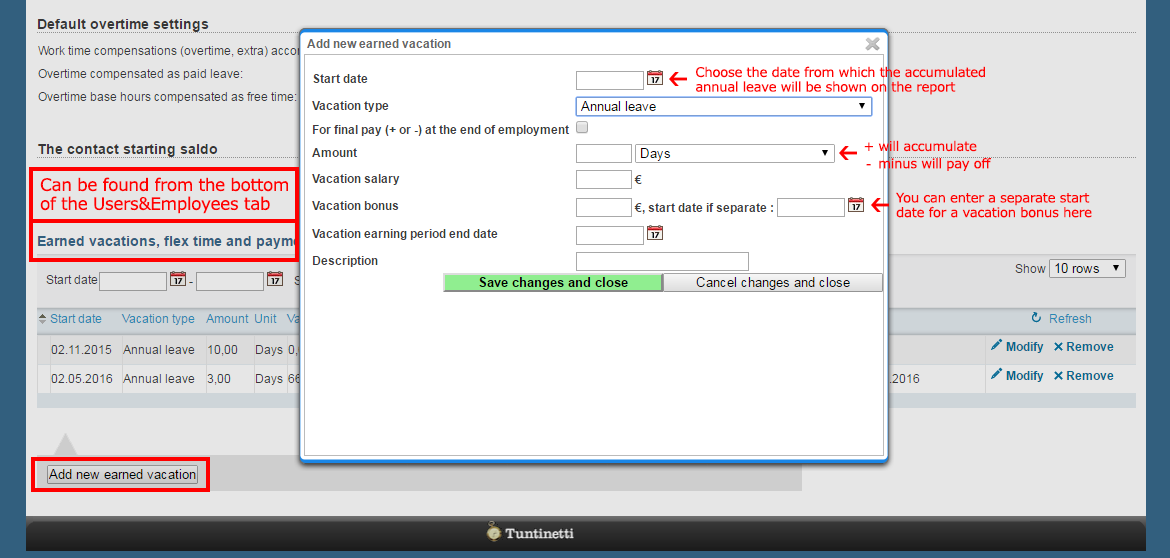
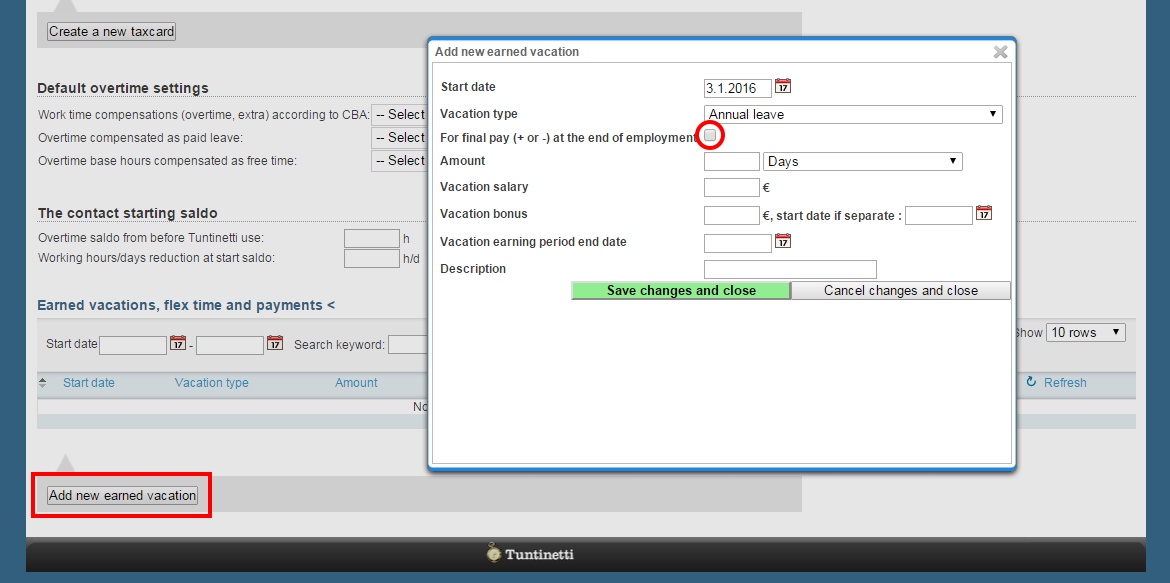
The contract starting saldo
You are able to define a starting saldo for the employee, which he or she will have at the beginning of the employment.

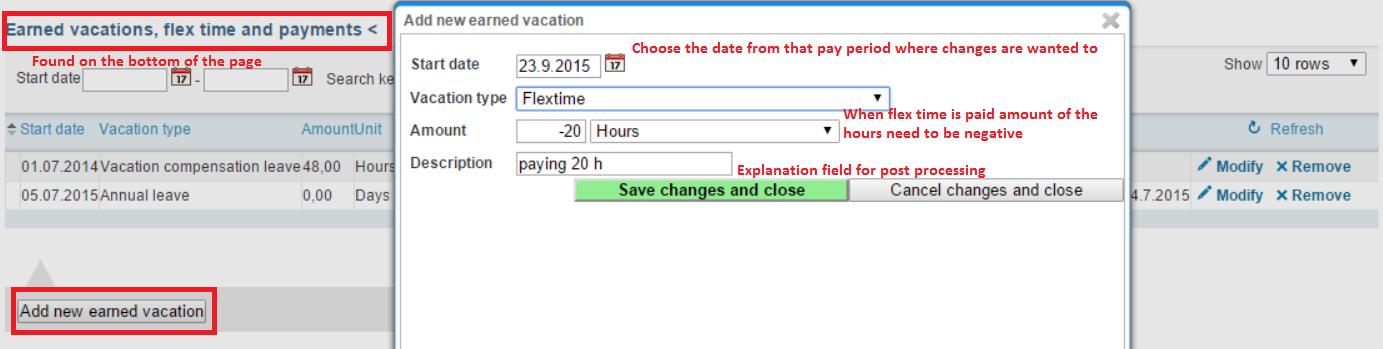
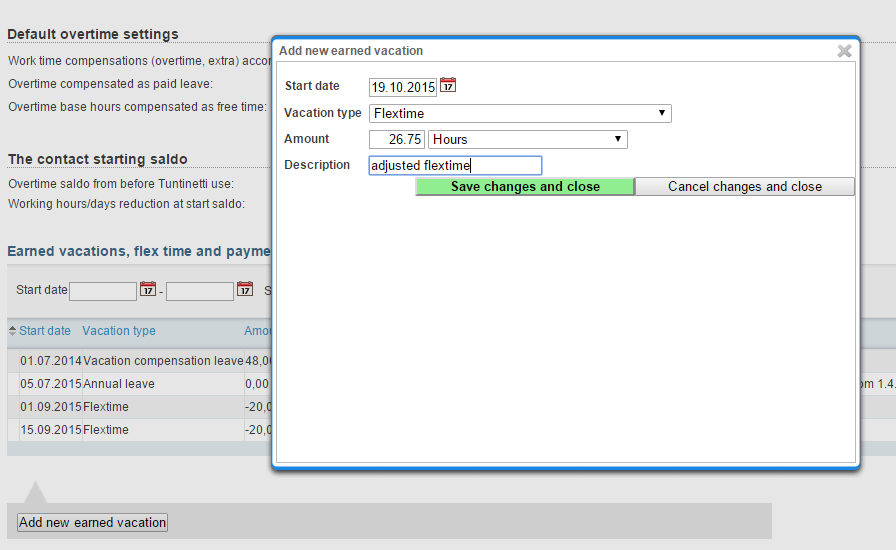
Earned vacations, flex time and payments
You can manage employer's earned vacations, flex time and payments by clicking similarly named header. When paying saldo hours rememer to give the hours negative.
If you intended to make cumulative changes to saldos, the best place to record deductions (-) and additions (+) so that a history of changes remains, is in "Earned vacations, flex time and payments"-section.
From Vacation type menu you can choose:
- Annual leave
- Day off for employees without paid vacation
- Flextime
- Holiday worktime reduction
- Overtime leave
- Postponed leave
- Salary or bonus converted to leave
- unpaid worktime reduction vacation
- Vacation compensation leave
- Work place steward's work time compensation
- Work safety work time compensation
- Work time reduction leave
When you are paying saldos, the amount of hours must be entered as a negative sum.
Adjusting a saldo.
Use the + sign to accumulate saldos and - sign to pay them out. You can enter also a separate start date for a vacation bonus if needed.
You can select a checkbox "" to mark the payment to be for final pay at the end of employment.
Adjusting overtime period's saldo
- Choose the start date and end date for the overtime period in the Time reports tab.

The overtime period's starting date is an underlined Monday in the time report.
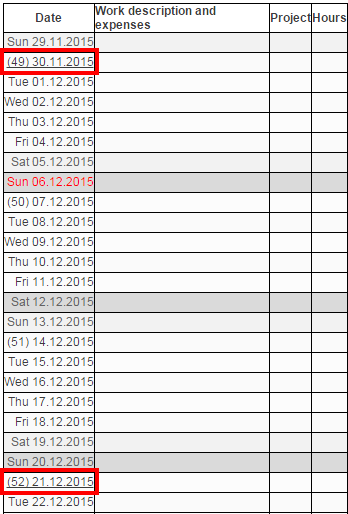 If every Monday is underlined, the employee is not in the according group.
- The selected range's saldo (Positive is marked with a plus-sign and negative with a minus-sign) will be shown under Flextime: saldo {The ending date of the selected timerange} as Undershoot during period or Overshoot during period.
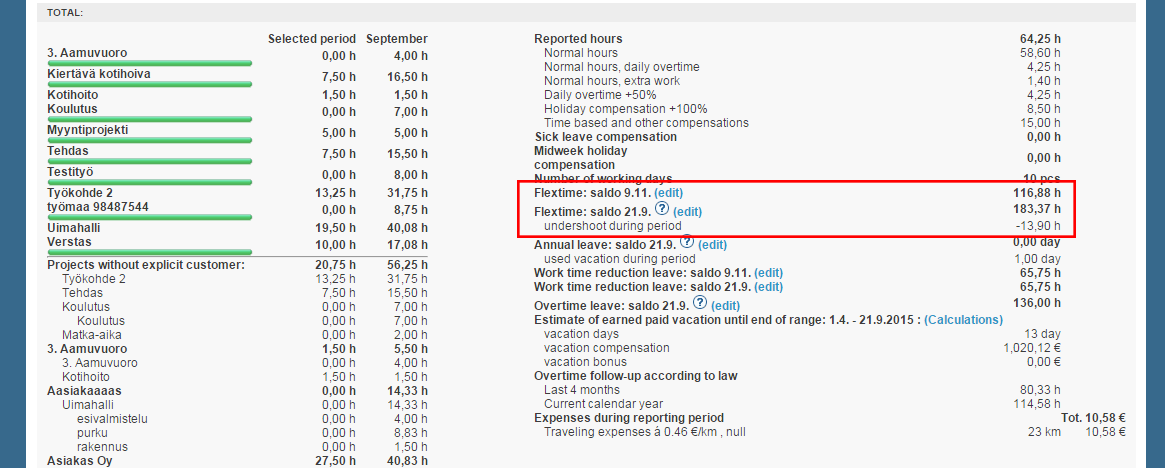
- The saldo is transfered to the next period by default. If you want to adjust the saldo, you must add a counter entry for the last day of the overtime period. Counter entry can be done in the Users tab in the section Employee settings#Earned vacations, flex time and payments.
Needing guidance or training? Give us a call +358-(0)9-6898 8221. |
||
Technical support +358-(0)9-6898 8222 tuki@tuntinetti.fi |
Sales services +358-(0)9-6898 8221 myynti@tuntinetti.fi |
|