Work shift planner
- Developer
- Support
- Admin
Work shifts > Work shift planner
The following explains how to use Work shift planner and the different functions and settings related to it. In work shift planner, you can create work shifts to selected projects and customers, as well as offer the work shifts to employees or give the shift directly. You will be able to distribute regular, recurring or single shifts to your employees. You can distribute shifts according to a project or find suitable employees for different clients or task groups. When a shift is assigned to an employee, it can be easily edited. For example it is possible to make it a recurring shift or to change the assigned employee or the project. The shift planning view shows overtime and flextime saldo.
There is also a demo video on how to use Work shift planner: Work shift planning - Tuntinetti
Filter and view settings
Quick search
With quick search you can search the project's name or depending on the settings also customer's name. In additional options you can activate "Quick-search finds via project customers".
Filters
- First filter menu
- All, also oudated
- New and existing
- Only valid
- With markings
- Without markings
- Second menu filters by units
- Third menu filters by projects
- Fourth menu filters by customers
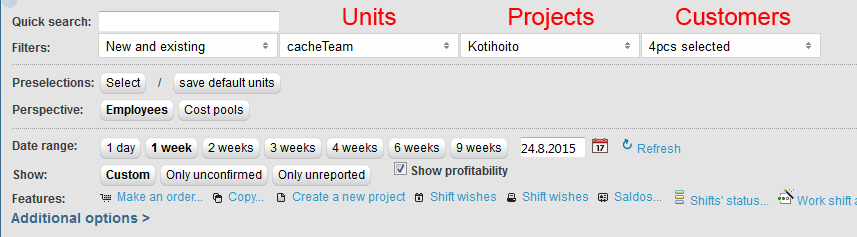
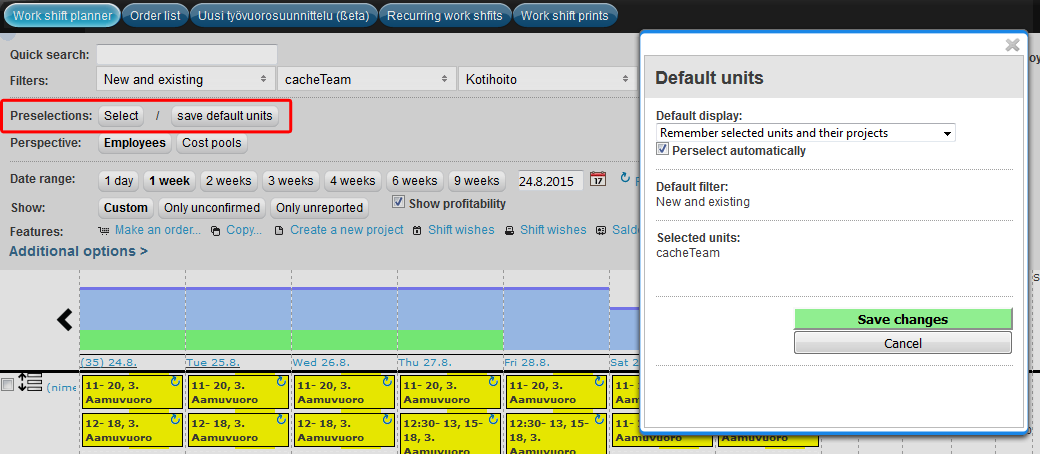
Preselections
With "Modify preselections" button, you can save the most used units to preselections. Default filter is also saved. If "Preselect automatically" is selected, preselections are activated as soon as you open work shift planner. If it isn't selected you can activate preselections with "Select" button.
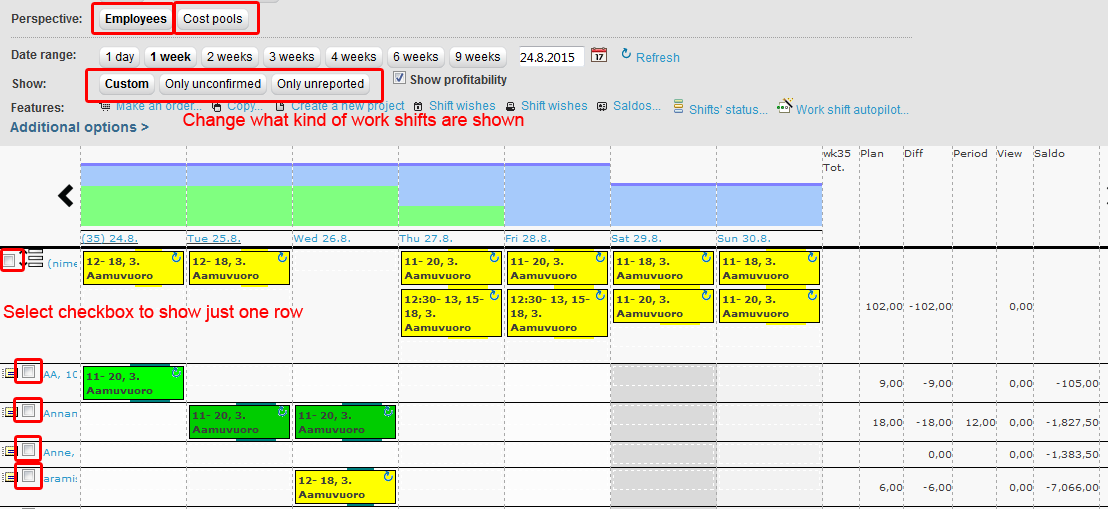
View
Perspective can be changed between "Employees" and "Cost pools". By selecting individual employee's checkbox from the left side of the view, you can make just that employee visible.
Employee and Cost pool perspectives both have the same grouping changes:
- If all of the employees are under the same heading (or without a heading) in the employee perspective, all of the projects are also under the same heading.
- If employees are under multiple headings in the employee perspective, the projects are also itemized by the same headings.
Displayed employees can be chosen from the menu opening from (anonymous work shifts) link, in the work shift planning view. From there you can also add an overtime assignments.
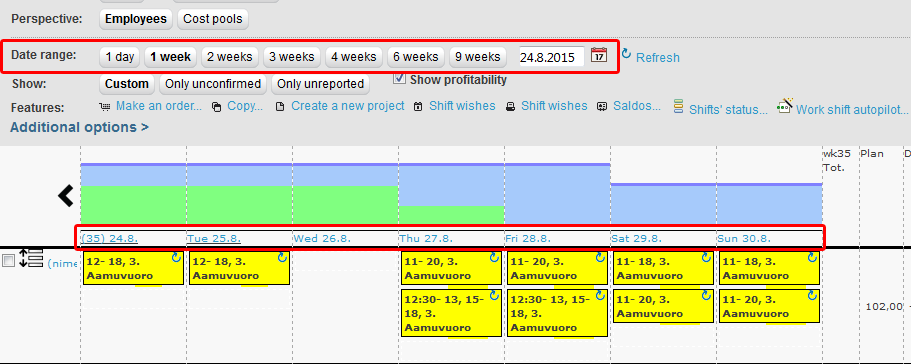
Date range
Shift planner views length can be changed between 1 day and 9 weeks. Starting date can be selected from calendar button or write it to the text field.
Showed shifts
You can change what shifts are shown with show options:
- Custom
- Only unconfirmed
- Only unreported
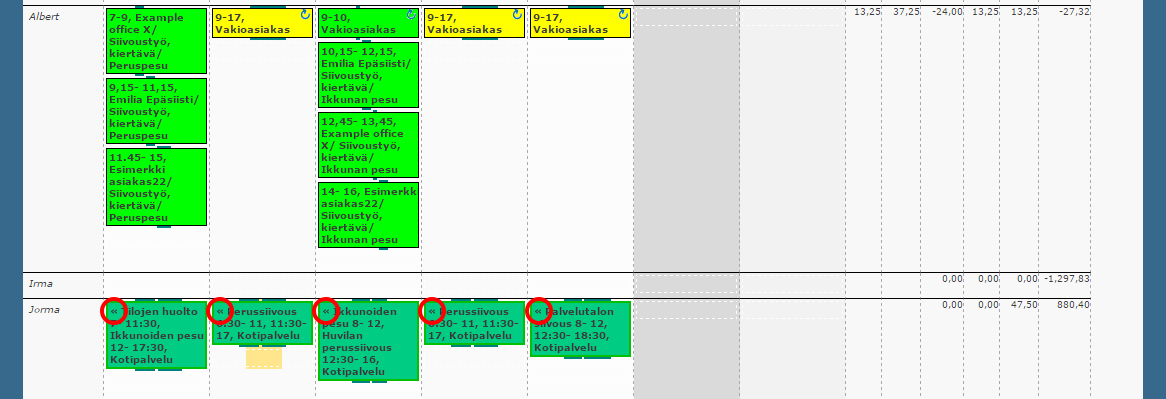
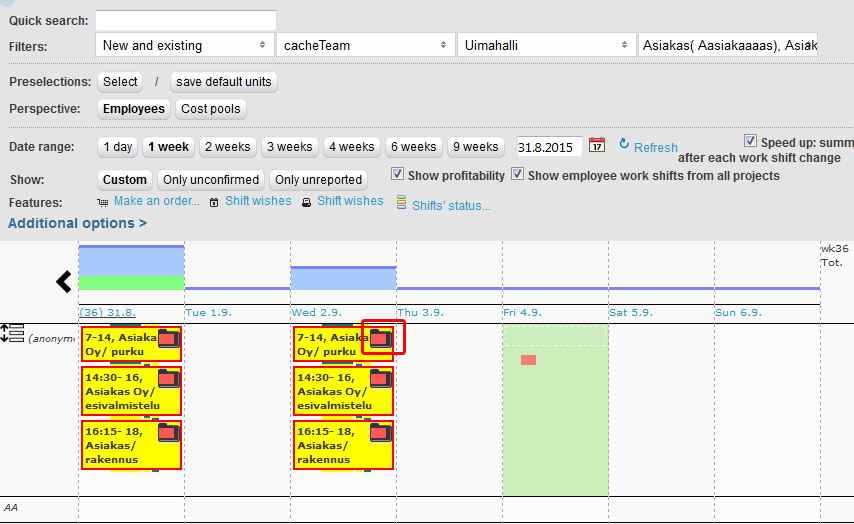
Employees' shifts in other projects can be set visible, by selecting the "Show employee work shifts from all projects". This setting should be used with caution. It can make especially a new user think that the shifts that are visible are from the selected projects. But in reality they can be from other projects.
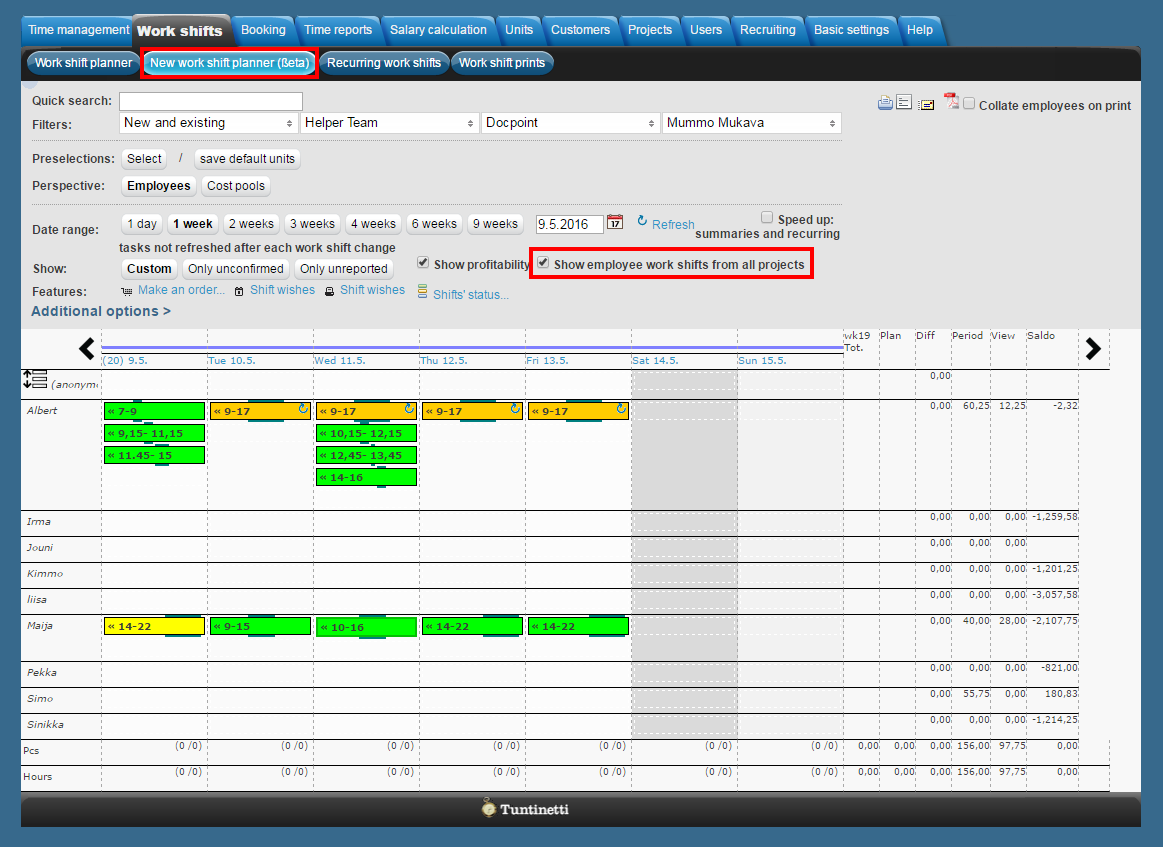
Shifts from other projects have a marking («) in the shift field.
More settings that affects filters and view, can be found from Work shift planner#Additional options.
Adding shifts
Shifts can be added in several ways.
Single shift
Single shift is added by selecting employee and date, clicking wanted place in the shift planner view.
Single shift can be added like this:
- Click in the shift planner view the place you want to add the shift
- Choose cost center
- Set workshift, e.g. 7-15
Choose a work shift state
Work shift state can be left unselected, in which case the shift's state will be set as "Booking" (Isn't visible for the employee)
Shift state can be selected from the "Choose a work state" menu
- Save work shift
- New work shift is now shown in the shift planner view
- Work shift can be modified by clicking it
Single work shift can be confirmed for the employee in question, by changing the state of the shift into "Work shift confirmed". Work shifts states can also be changed with the "Shifts' status..." button, which enables you to change multiple shifts states at once. This way you can confirm all of the employees and shifts in the end, after you have finished planning the work shift list.
More information about shifts various settings can be found from Work shift planner#Work shift settings section.
Single shift using the Inline function
You are able to add open shifts to employees or an anonymous work shift by moving your mouse cursor over the desired employee's available day. This opens up the most used shifts, where you can select the desired work shift. An anonymous work shift can be created in the Employees perspective and in the Cost pools perspective on the top row, Anonymous work shifts or Work shifts of cost pools.
Notice that the Inline function only works if there is only one project where the new work shift can be created.
Inline works if there is only one project selected which has not more than one tasks or customers. Or if the setting Suggest the same project for new shifts when possible is selected.
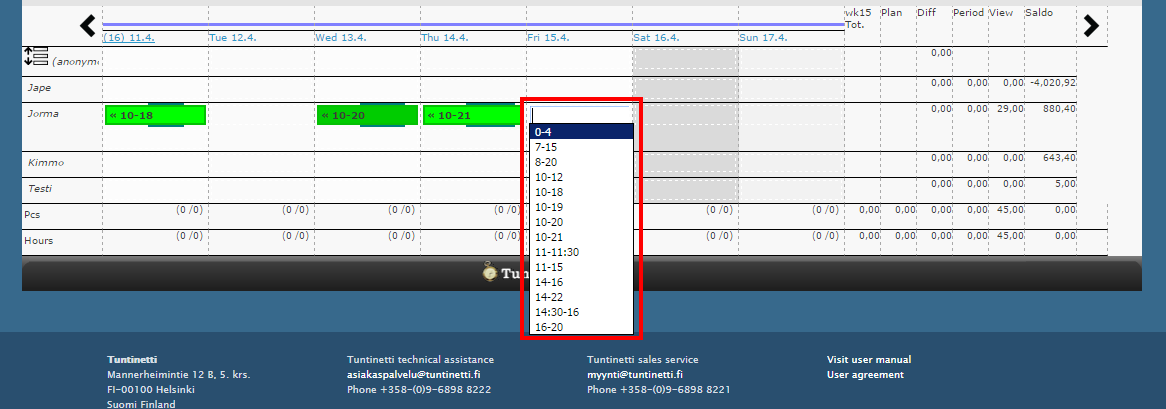
- Move your mouse cursor over the desired employee's available day.
- You can select the desired work shift from the list that appears under the cursor or you can enter a work shift with you keyboard.
- If you select a shift from the list, it will be automatically updated to the employee as an open work shift.
- If you enter the work shift with keyboard, you must press the Enter key. After that the work shift will be automatically updated to the employee as an open work shift.
- Work shift can be modified by clicking it.
Anonymous work shifts
Work shifts can be added without knowing the employee. Open shifts can be added, by clicking the wanted date in the "anonymous work shifts" line.
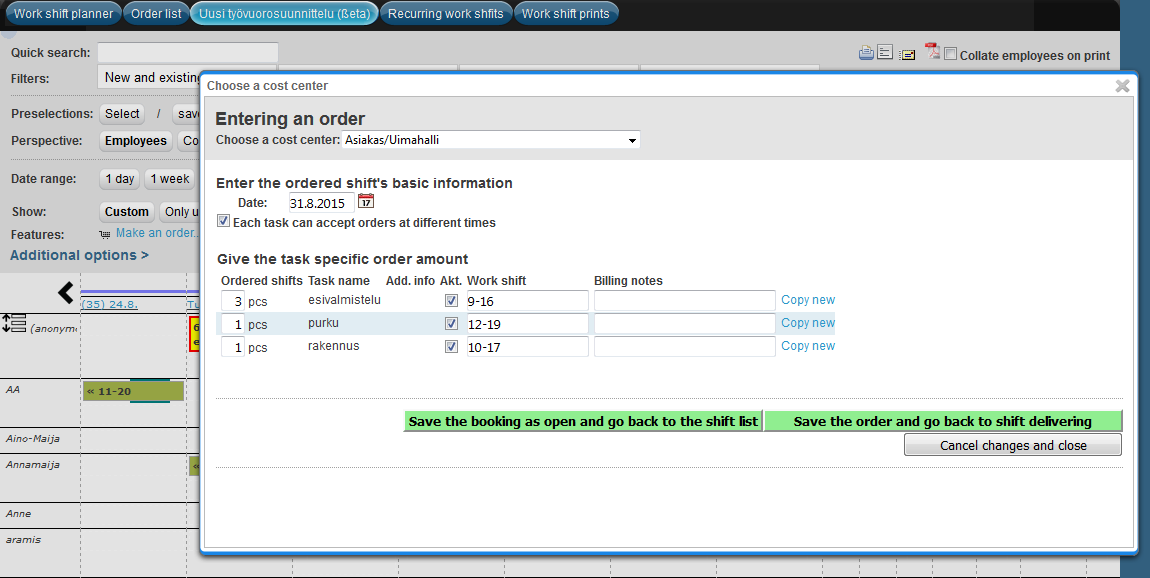
Multiple shifts all at once
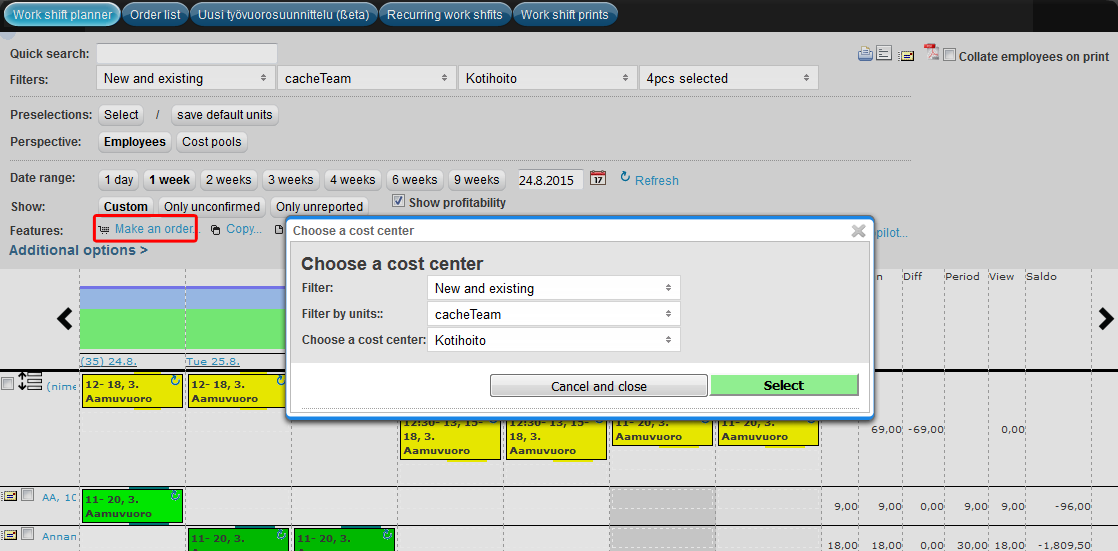
With "Make an order..." function:
- Click "Make an order..."
- New window opens
- Select wanted filters and cost center
- Click "Select"
- New window opens
- If there is option to select more accurate cost center, choose it from "Choose a cost center" menu
- Set date
- Select "Each task can accept orders at different times" checkbox, if you want to give shifts different times
- Set time in the workshift text field, e.g. 7-15
- Set the number of shifts you want to create
- Click "Copy new", if you want new line
- Either save as open or save and go to shift delivering
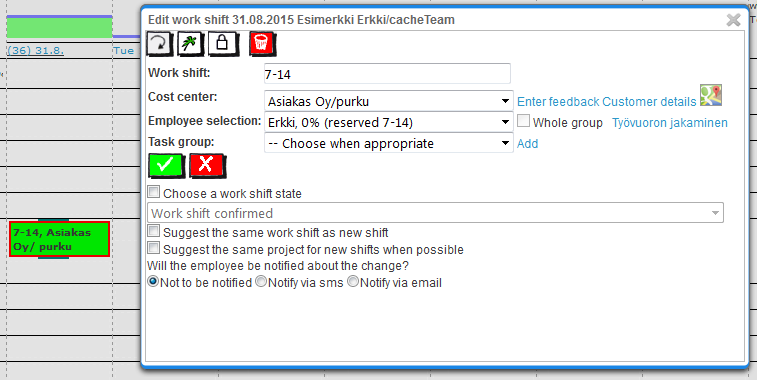
Work shift settings
The following introduces various settings and functions, that can be found in the Edit work shift window. You can enter the Edit work shift window by clicking a desired work shift in the work shift table.
If Tuntinetti informs that "Work shift transfer is not allowed", when clicking a work shift, the internet browser misinterpreted mouse's movement and thinks you want to move the shift. Jus click the shift again and it you should be able to enter the Edit work shift window.
Tuntinetti is recommended to be used with Mozilla Firefox browser. Other internet browsers may have slight problems with work shift planning feature.
All information can be changed. Also cost center or employee, which transfers the shift to new employee.
Recurring shifts
Recurrent shifts can be set from Edit cycle settings window, which can be opened by selecting first the work shift and then clicking the modify recurrence settings button (![]() or
or![]() ).
).
Adding recurring shift:
- Select work shift
- "Edit work shift" window opens
- Click modify recurrence settings button (
 or
or )
)- "Edit cycle settings" window opens
- Change the workshift time, if needed
You can write additional information in the "Work shift" field, e.g. "8:30-15:15 Remember to lock all the doors"
- Set start and end date
- Set cycle
- Allowed days for the shifts can be filtered from "Select" link
- Here you can filter out e.g. holidays or weekends
- Save recurrence settings with "Ok" button
- Work shifts are now visible on the days in accordance with the recurrence settings
- Repeated shifts can be recognized from the sign (
 ) in the upper right corner
When necessary, recurring shifts can be deleted by pressing the "Remove" button in the "Edit cycle settings" window. You can do this in any of the recurring shifts and it will remove all of them. Also all other changes that has been made for one of the recurring shifts, affects all other recurring shifts in that cycle.
More information about recurring shifts and another way to create them can be found from the Recurring work shifts tab's instructions.
"Planned shift" field
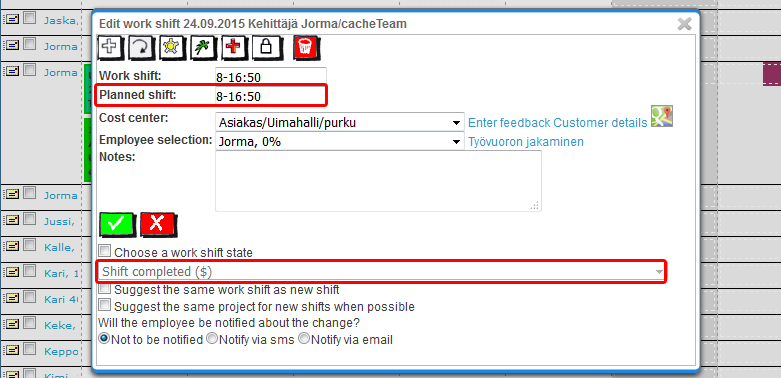
If "Overtime only if exceeds planned time" setting has been enabled in the project settings, "Planned shift" field is also visible on the work shift. Changing work shift state to "Shift completed" unlocks the "Planned shift" field. "Work shift" field shows the realized work shift and "Planned shift" field shows the planned time for the shift. (Projects > Select the project you want > Work time settings > Additional options > "Overtime only if exceeds planned time" enabled)
Adding absence
Next to recurring shift button is add absence button (![]() ). From there you can add also a longer absence. With "Add new vacation plan" button you can create new abcence. Absence can be added also from the Cost center menu in edit work shift window. In the menu you can find several options to choose from.
). From there you can add also a longer absence. With "Add new vacation plan" button you can create new abcence. Absence can be added also from the Cost center menu in edit work shift window. In the menu you can find several options to choose from.
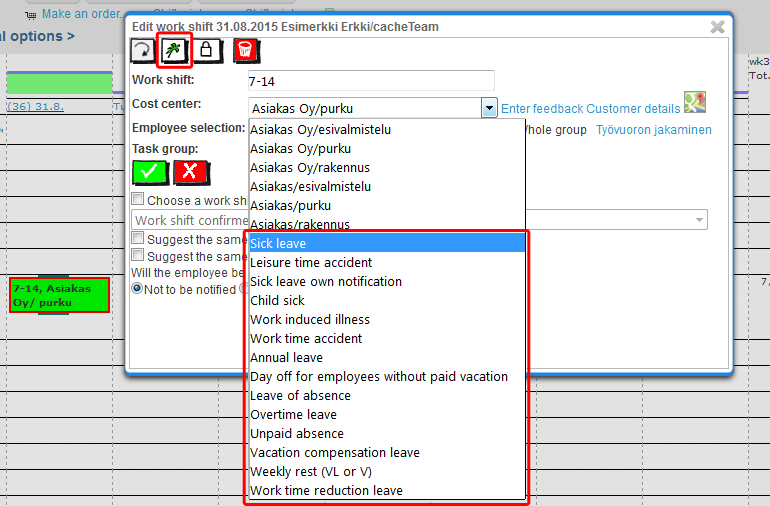
You can change a whole shift or part of it into sick leave, with  button, and also create a replacing shift for the cancelled work shifts.
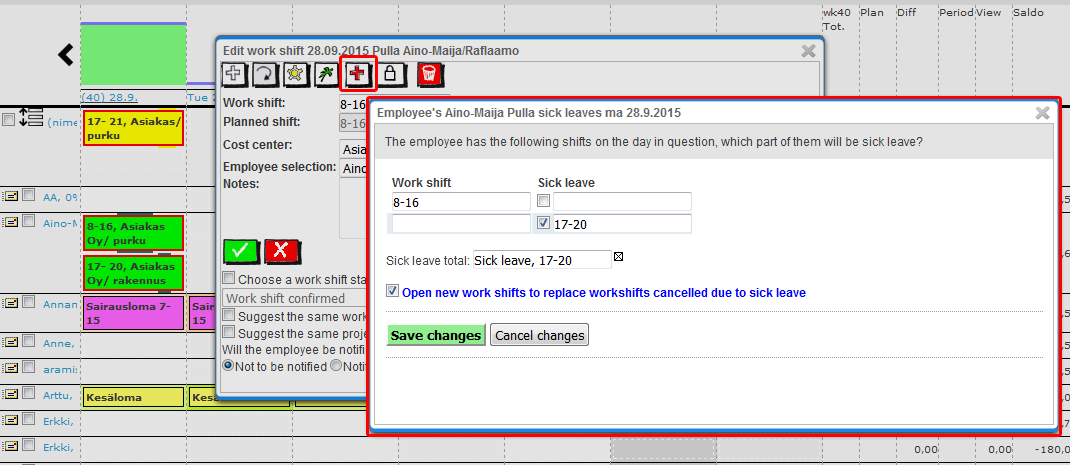
Part of the shift can be marked as sick leave while some of it still remains as completed. Mark the time of sick leave in the "Sick leave" text field and change the completed work shift in the "Work shift" text field. For example, when original work shift is 8-14 and you want to mark sick leave for 1h: 8-13 in the "Work shift" field and 13-14 in the " Sick leave" field, in addition select the checkbox. In this case, the completed part of the work shift will be displayed as ... and the rest of the shift changes into sick leave. The whole shift can be changed into sick leave by simply selecting the checkbox, next to the work shift.
You can also set up substitutes to replace the canceled shifts by selecting the "Open new work shifts to replace workshifts cancelled due to sick leave" checkbox. After saving, a new window opens, where you can change the settings of the canceled shift. Work shifts can be appointed directly to employees or saved as anonymous.
Lock date
Lock dates for the work shifts can be changed from the lock button (![]() ) in the edit work shift window. Color of locked shifts changes. Locked shifts can't be modified, unless you unlock the shift.
) in the edit work shift window. Color of locked shifts changes. Locked shifts can't be modified, unless you unlock the shift.
Setting task group
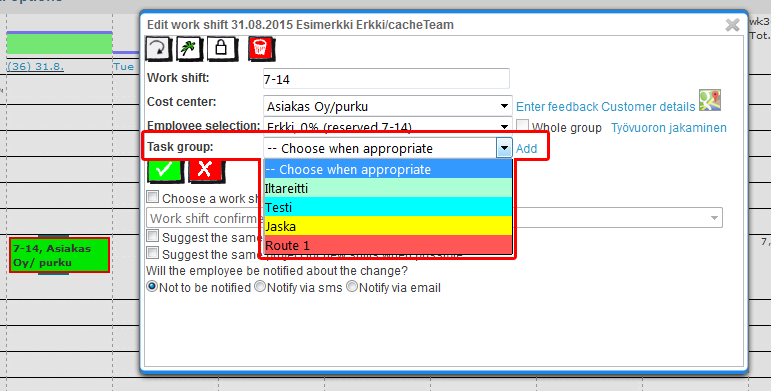
Task group can be set from the "Task group" menu and new task group can be created with the "Add" button. Shifts in the same task group can be recognized from the same colored folder icon in the upper right corner.
Entering feedback
Feedback can be given regarding the shift with "Enter feedback" button, if a customer has been set for the project.
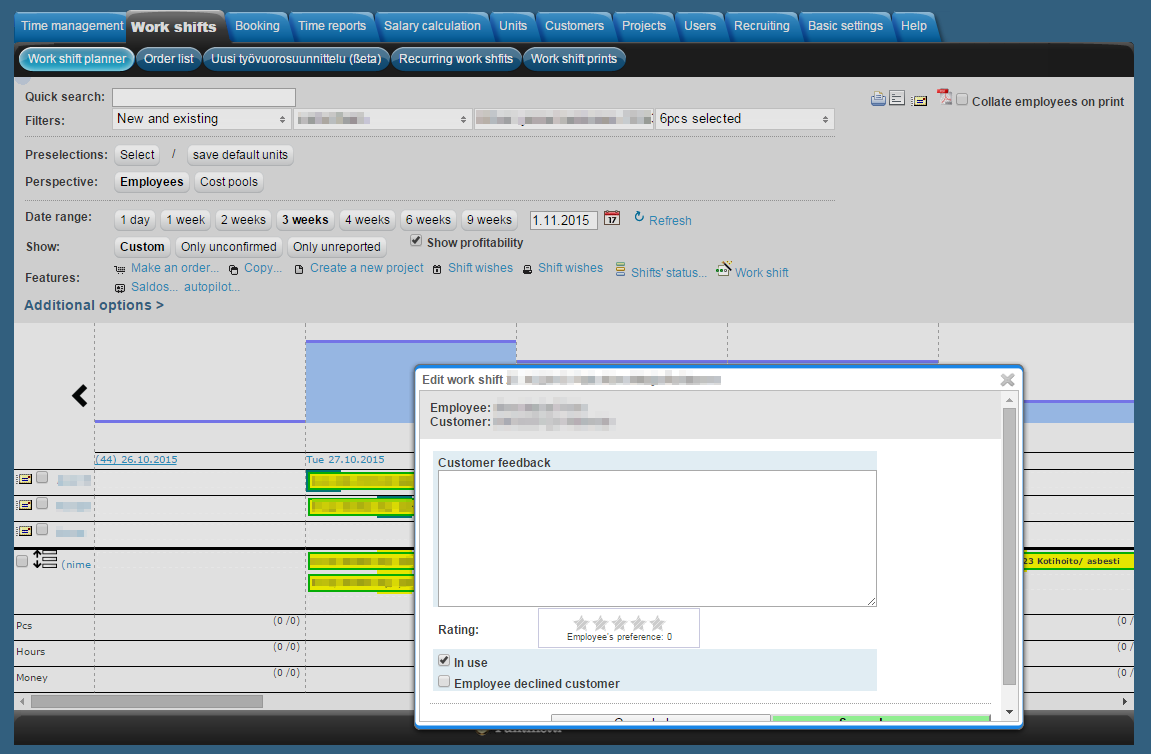
You can uncheck the In use -check-box, if a customer has told not to use the employee for this project for some reason.
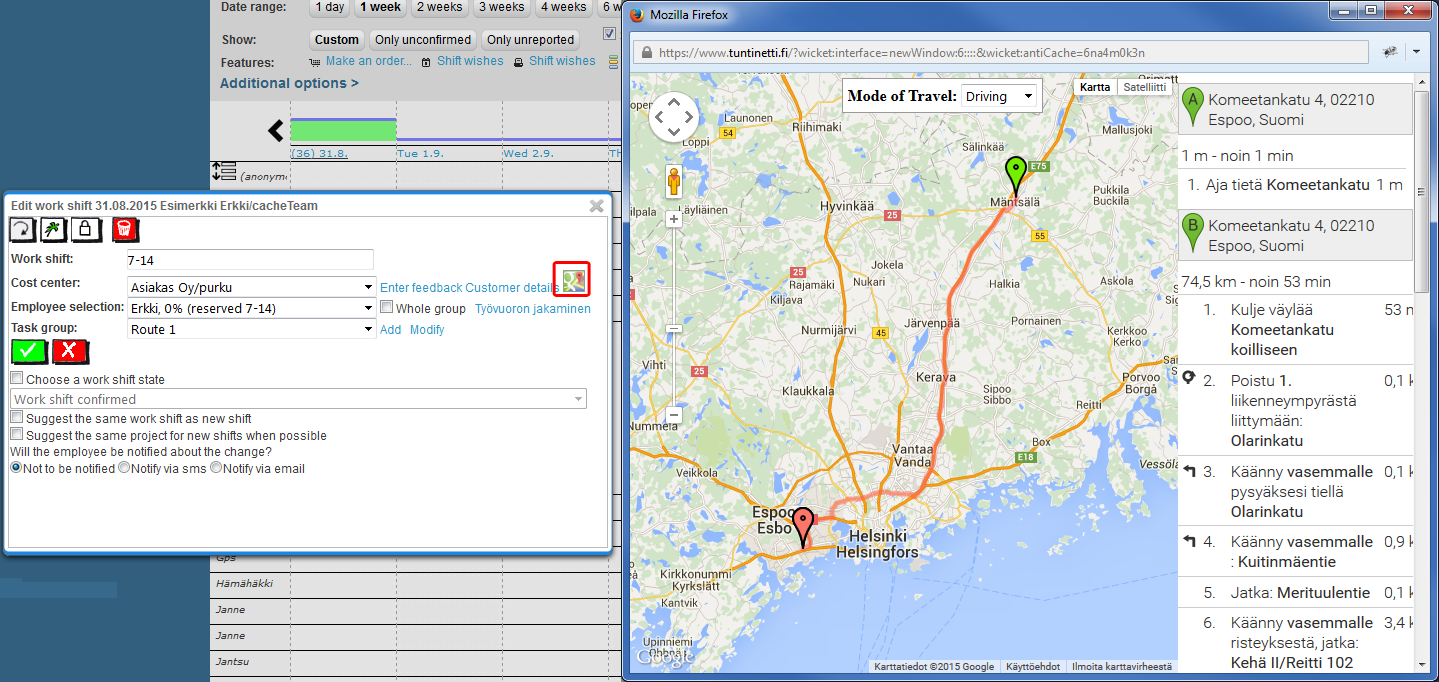
Customer details
Customer's basic data can be viewed and edited from "Customer details" link, if a customer has been set for the project.
If street address has been set in the customer details, customer is displayed on map. Also if employee has several work shifts on the same day, he can see a route between them on the map. Map can be viewed from the map icon in the edit work shift window.
Adding notes
"Notes" text field is useful, when you need to enter other than work time data to a project. "Notes" text field can be set visible by selecting "Yes" from "Field for additional information in use when logging for this project" menu in Projects tab's reporting settings. Projects > (Select the right project) > Reporting settings > Field for additional information in use when logging for this project -menu.
Changing work shift state
Work shift's state can be changed by first opening the work shift and then selecting "Choose a work shift state" checkbox. Then you can choose from the menu a new state for the shift. To change the state of several work shifts at once, you can use the mass function, "Shifts' status..." button. This enables you to confirm multiple shifts at once.
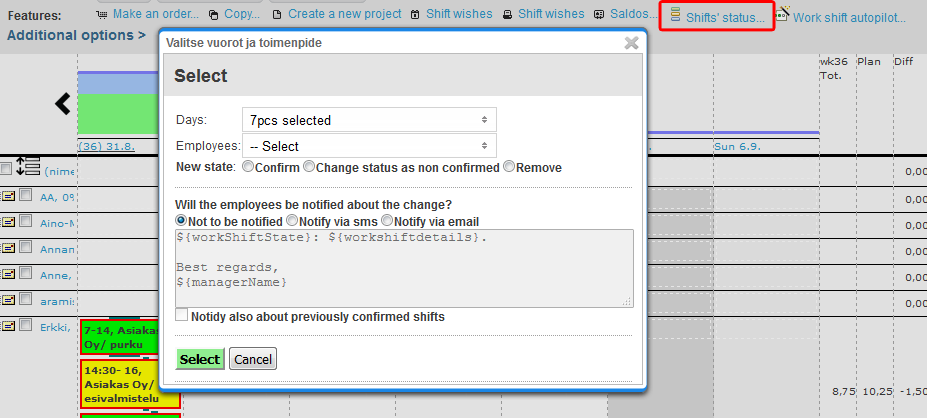
" Shifts' status..." function:
- Select days
- Select employees
- Seletct new state
- Confirm
- Change status as non confirmed
- Remove
- Choose, if you want to notify the employees about the change
- Not to be notified
- Notify via sms
- Notify via email
- Choose, if you want to notify also about previously confirmed shifts
- Save changes with "Select" button
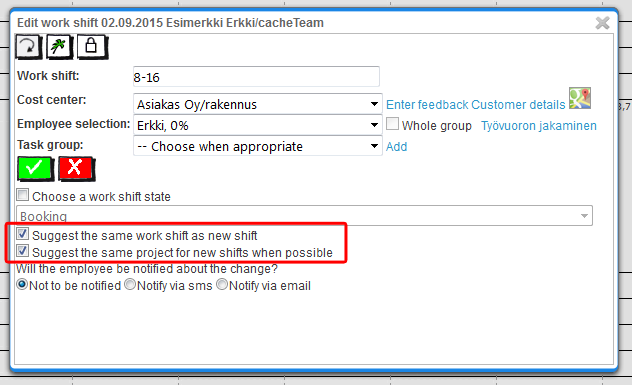
Using work shift's settings also for the next shift
You can save work shift's settings with "Suggest the same work shift as new shift" and "Suggest the same project for new shifts when possible" checkboxes. This way program will offer the same settings prefilled for the next shift. This is particularly useful, if you have to create manually several similar shifts.
Notifying about changes in the work shift
Employee can be notified about the changes concerning the work shift. This can be done by selecting "Notify via sms" or "Notify via email" in the edit work shift window.
Shift delivering
Open work shifts can be distributed manually or offered to employees, so that they can pick the ones they like. Individual shifts can be simply dragged to wanted employee or open the work shift and choose employee from the "Employee selection" menu. Several shifts and individual shift can be distributed conveniently with shift delivering function. Work shift distribution window can be opened by opening shift and from there "Shift delivering" or during work shift ordering choosing "Save the order and go to shift delivering". At the same time, you can distribute all open shifts from that day.
In the work shift distribution -window you can:
- Filter the employees to be offered
- Additional options makes it possible to offer the work shifts also to those not in the project
- Modify the order
- You can change date, add more shifts or delete the order
- Copy the order as basis for a new order
- Change your phone number, where notification messages are sent
- Change notification settings
- Choose the employees to whom you want to offer shifts
- Confirm the selected employee's shits (Confirm the shift -checkbox) or offer the shifts to employees
- Offered in some other way
- Employee won't be informed about the open shift. However the new shift appears in the employee's calendar as an open shift
- Offered via email
- Employee will be notified via email about the open shift. The new shift appears in the employee's calendar as an open shift
- Offered via sms (work shift auction)
- Employee will be notified via sms about the open shift. Employee can only get the shift by answering the message
- Offered in some other way
- Modify auction settings
- Confirm the shift distribution
Filtering
You can filter the employees that are offered in many ways:
- New and existing
- Only Valid
- With markings
- Without markings
- No shift in other project
- Not offered earlier that day
- Work shift wish
- Show only those who have sufficient skills
- Only if the work shift's customer is the employee's default customer
Additional options:
- Offer work shifts also to those not in the project
- Filter according to alternate skill
- Choose the skills that are needed from a drop-down list.
- Make a rule that requires all or a sub set of skills
- Filter according to employment contract's minimum duration
- Choose the units of which the employees are available for open shifts
Work shift auction
More about work shift auction and distributing open shifts can be found from its instruction page and in Work shift auction's demo video.
Work shift autopilot
If Work shift automation additional feature has been enabled, you can start Work shift autopilot from "Work shift autopilot..." button. Work shift autopilot will automatically fill in the shifts according to the staffing plan, taking into account requirements and rules of labour agreements, employment contracts, tasks, skill requirements, and employees' own wishes.
The work shifts that the work shift autopilot uses or the staffing plan can be created with single open shifts or with planned recurring shifts. Work shift autopilot plans the unconfirmed work shifts, and if you are satisfied with them, you can confirm the planned work shifts.
The deployment of the work shift autopilot may require company specific calibration. If you need help, contact the Tuntinetti customer service.
Modifying the work shifts
Work shifts can be moved, copied, swapped and removed in many different ways.
Moving, copying and swapping
Work shifts can be moved, copied and swapped with:
- "Copy..." feature
- Copy or move several shifts from several days at once
- Drag & drop
- You can move, copy and swap individual shifts or task groups by dragging the shifts in the work shift planner and dropping then to new day or employee
- Work shift transfer, swap or copying -function

- Can be found next to (anonymous work shifts) text
- By selecting work shift and changing the employee, which transfers the shift to that employee
![]()
![]()
Drag and drop
Shifts can be moved, copied and swapped by dragging the shifts in the work shift planner view and dropping then to new day or employee, which opens Work shift transfer -window. In this window you can choose to move, copy or swap the shift. There can be found the instruction on how to use the short keys, which makes this function much faster to use.
![]()
Transfering task groups
A particular day's and the employee's same task group's shifts can be moved by dragging from the folder icon. Another way to move these shifts is to:
- Choose one shift from the task group and open the edit work shift window
- Select "Whole group" checkbox
- Choose an employee to transfer the shifts to
- Confirm the action as normally
![]()
Deleting
- Single shift can be removed by selecting the shift and the remove button (
 ) in the edit wrok shift window
 - With "Shifts' status..." feature you can delete several shits at once
- Recurring shifts can be deleted by pressing the "Remove" button in the "Edit cycle settings" window. You can do this in any of the recurring shifts and it will remove all of them.
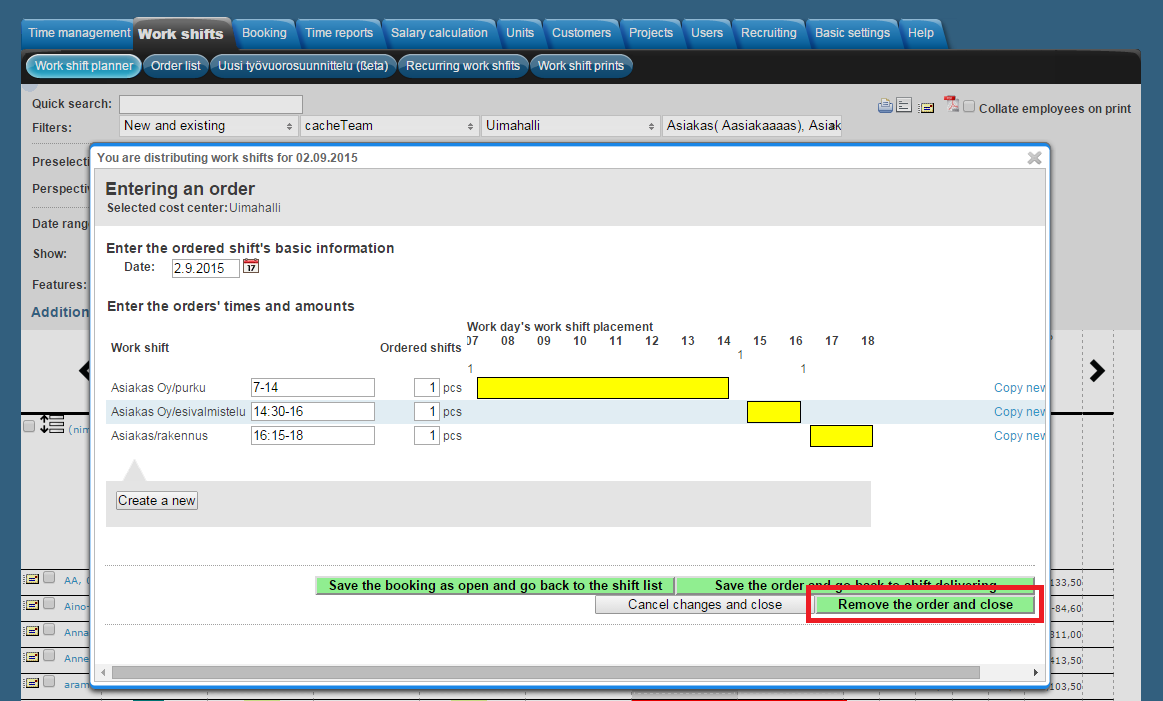
- Whole orders of work shifts can be removed by clicking the "Modify the order" link in the shift distribution window. There should be "Remove the order and close" button
Other features
Several useful functions can be found in this section.
Creating a new project
New project can be created with the "Create a new project" button. This will take you straight into the Projects tab to create a new project. If you notice for example a need to create a new project for a customer, you can do it in the Projects tab. There you can also attach customers to existing projects.
Shift wishes
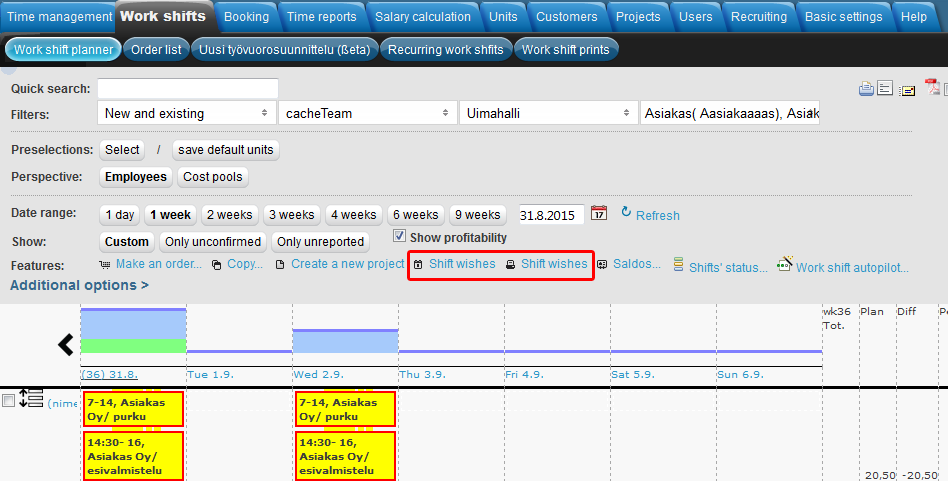
The first Shift wishes button lets you view and edit employees' shift wishes. From the second Shift wishes button, you can download employees' shift wishes in xls file (e.g. to Excel).
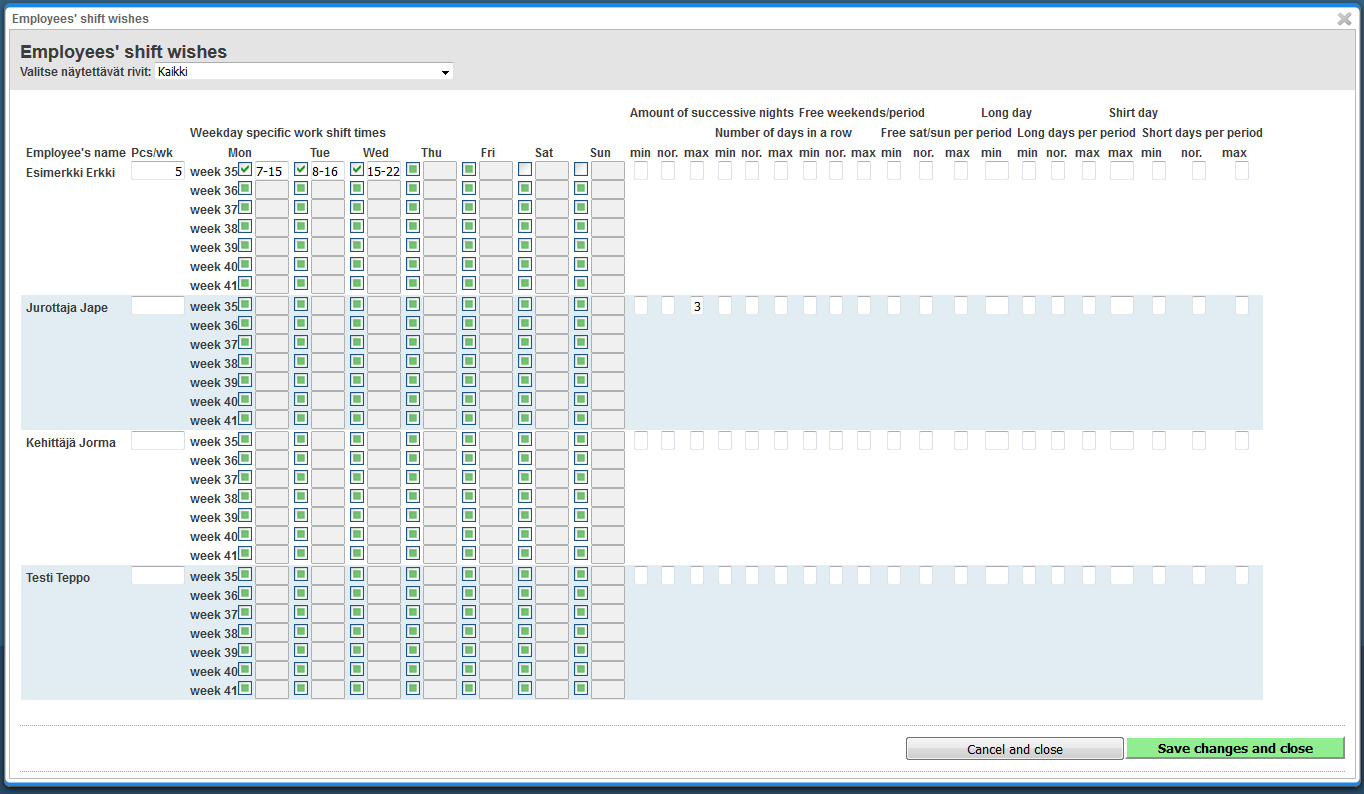
Employees' shift wishes window:
In this window you can set a wide range of shift wishes. You can set how many Pcs/wk you want.
- A green box
 means that you have not yet decided whether you want to work on the given day or not.
 - If you check a day
 without entering a specific time, it means "the entire day is ok".
 - Checked day with entered time (e.g. 7-15) means "preferred work time".
- Not checking
 a day means "no shift for this day".
In this window, you can also give wishes in min nor. max text fields:
- Amount of successive nights
- Number of days in a row
- Free weekends/period
- Free sat/sun per period
- Long day
- Long days per period
- Short day
- Short days per period
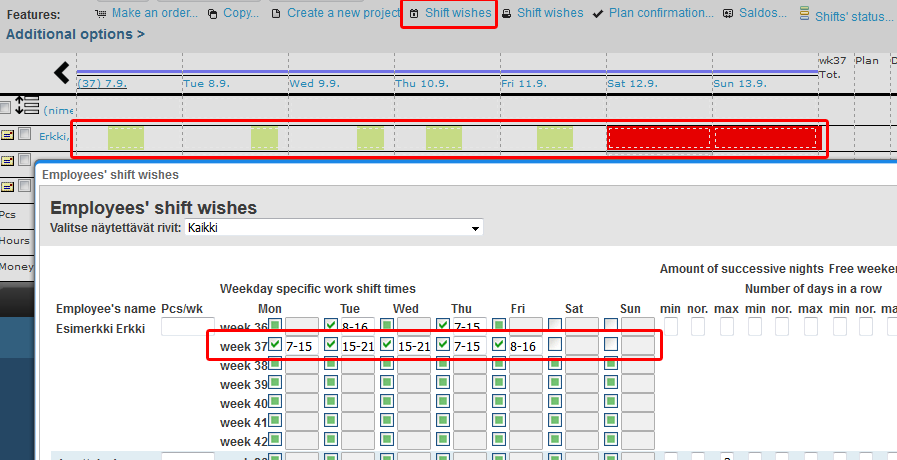
Work shift wishes appear in the work shift planner view at selected times and days. The days on which employee didn't want any shifts are displayed red.
Shift wishes can also be viewed, edited and downloaded to Excel in the Users tab. Selected employee's shift wishes can be edited with "Shift wishes" link. From the "Show search results>" link, you can view and edit the shift wishes of the selected employees, with the "Shift wishes" button. Shift wishes can be downloaded to Excel with the second "Shift wishes" button.
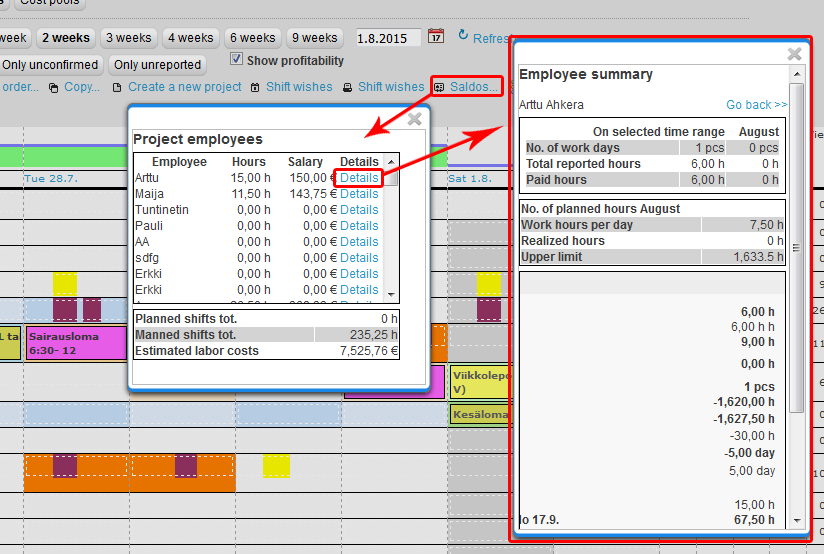
Employee summary
You can view employees' saldo's details from "Saldos..." button.
Plan confirmation
If Planning mode is activated in the Additional options menu (Editing mode), you can change the confirmation date with "Plan confirmation..." button.

Profitability
If "Show profitability" checkbox is selected, profitability percent is shown next to employees' names in the work shift's Employee selection menu.

Turning off the auto-refresh
When you want to make a lot of changes to the shifts, moving shifts around can be speed up by selecting "Speed up: summaries and recurring tasks not refreshed after each work shift change" checkbox. If it's selected, program won't auto-refresh all information after every change you make. In that case, you can use the "Refresh" button to refresh the information when needed.
Refresh function
If the auto-refresh is turned off, you can manually refresh changes with the Refresh button.
If you are having temporary technical problems, you can refresh the page with the Refresh button. This usually helps with temporary problems for example with internet browsers.
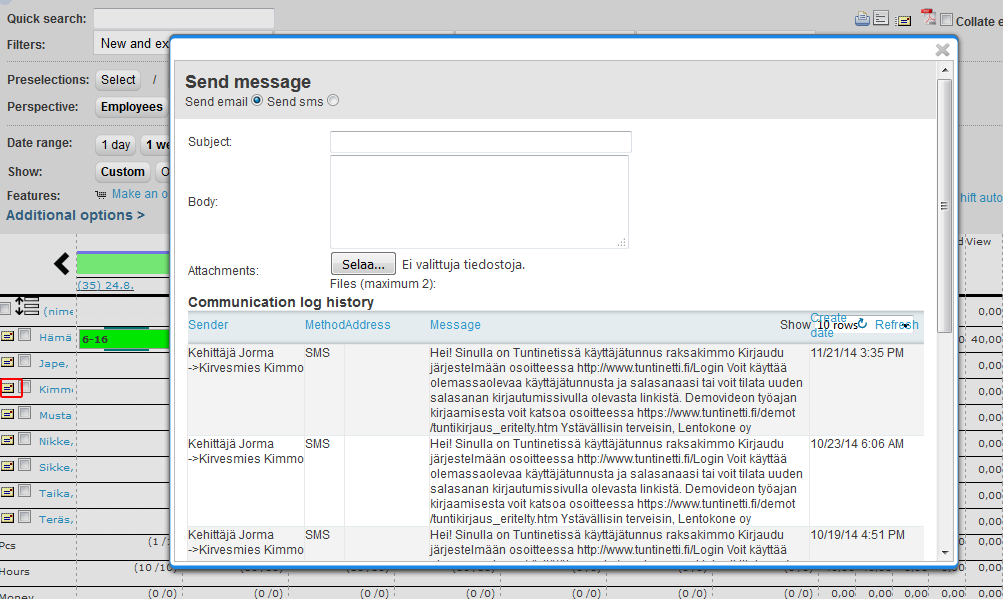
Sending messages to employee
The button to send messages to employee can be fround in the work shift planning view's left side, next to employees names (Envelope icon). From here, you can send email or sms messages and view communication log history.
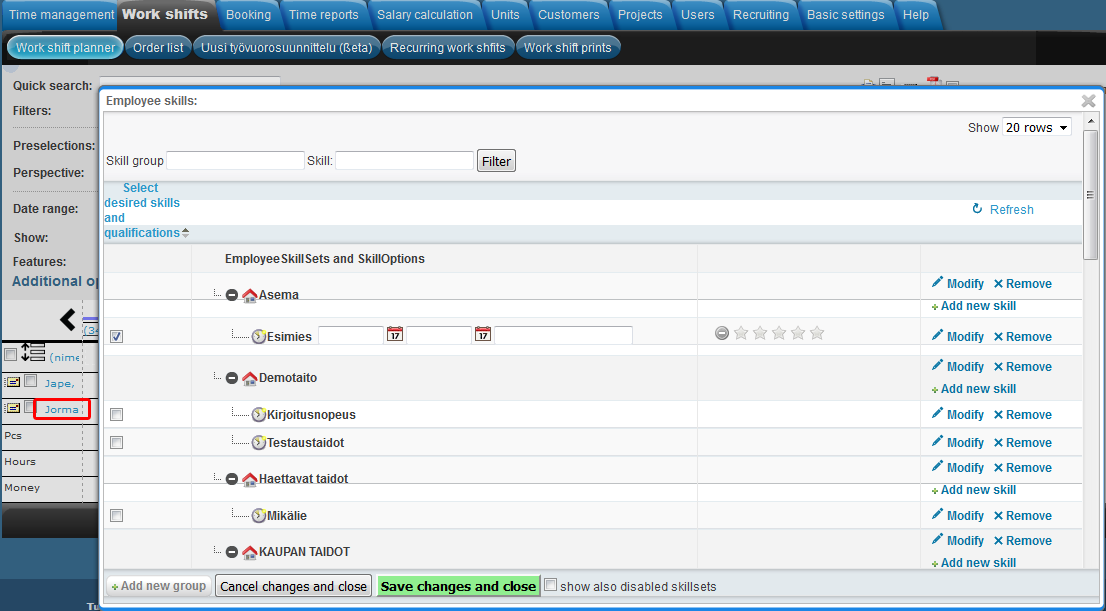
Employee skills
List of skills and qualifications can be viewed and edited by selecting the employee's name in the work shift planning view's left side.
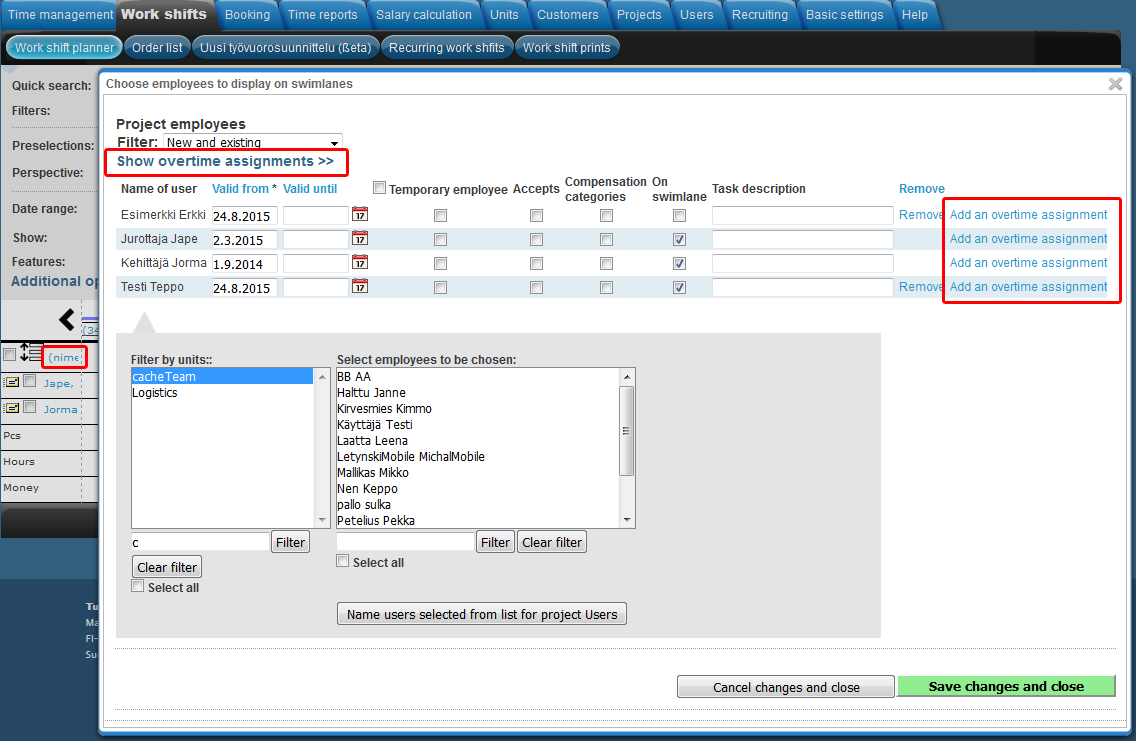
Adding an overtime assignment
By clicking the (nimettömät vuorot) link, you can open a window, from where you can add overtime assignments.
Sending, downloading and printing work shifts
Work shifts can be sent, downloaded and printed with the buttons at the upper right corner. More work shift prints can be found in the Work shift prints tab.
- Work shifts can be opened for printing, with the print button (
 )
) - Work shifts can be opened for printing, grouped by customers, with the second button (
 )
) - Customers' work shifts can be sent via email, with the message button (
 )
) - Work shifts can be downloaded as a PDF file, with the PDF button (
 )
) - With the "Collate employees on print" checkbox, employees can be set to show together or itemized
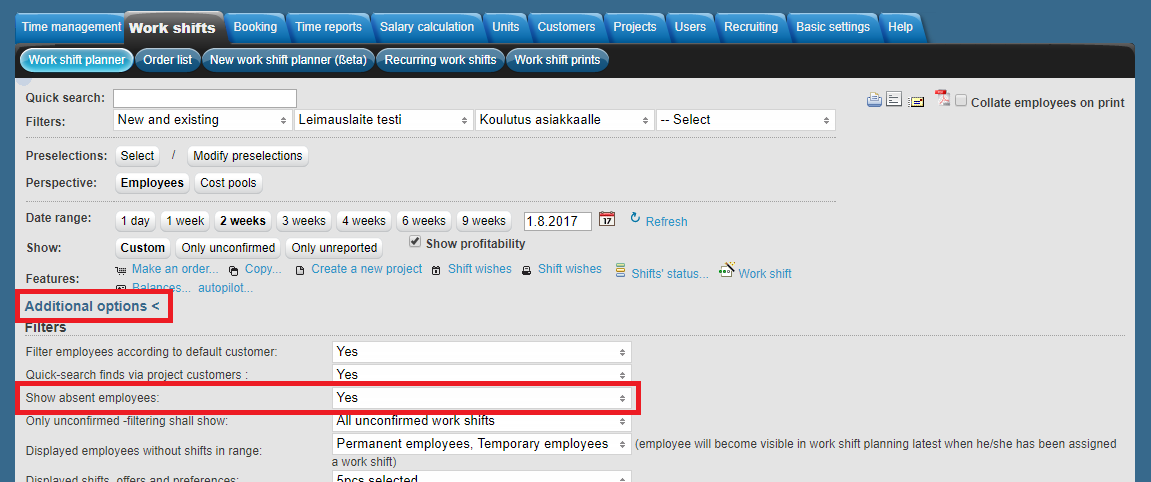
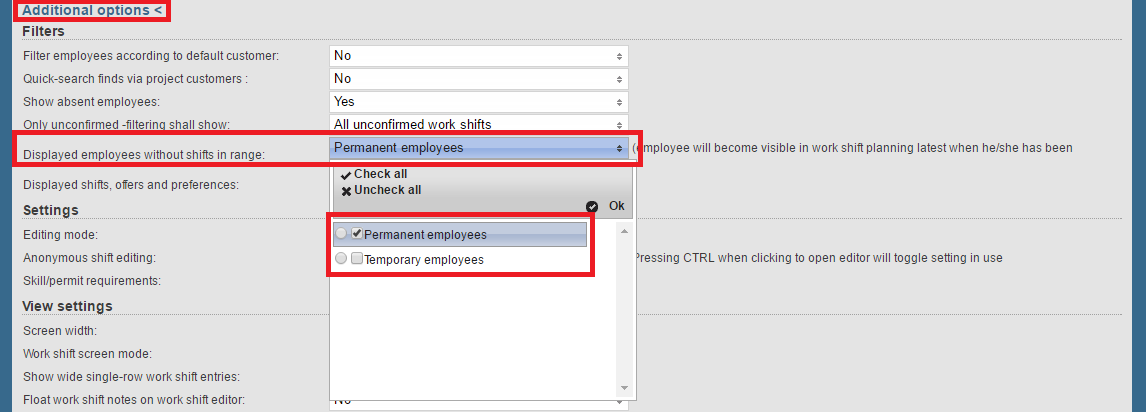
Additional options
There are various filter, view and saldo settings as well as work shift color explanations in the Additonal options menu.
Filters
- Filter employees according to default customer
- Quick-search finds via project customers
- While this is turned on, quick-search can be also used to search with the project's customer's name
- Show absent employees
- Only unconfirmed -filtering shall show
- Displayed employees without shifts
- Displayed shifts, offers and preferences
Settings
- Editing mode
- Regular mode
- Planning mode
- Inline work shift addition
- Anonymous shift editing
- Skill requirements
View settings
- Screen width
- Stretch work shift planning view to fit the whole browser window or keep it in standard width. Whole screen mode can be useful, when you want to see many weeks at the same time and your display is wide enough
- Work shift screen mode
- Choose whether you want shifts to be displayed as small boxes or bigger
- Show wide single-row work shift entries
- Float work shift notes on work shift editor
- With this, you can change the separate Work shift notes tab to a floating work shift notes on the left side of the screen. This can be very useful, if you need the Work shift notes a lot
- Anonymous shift positions
- Work shift list start date
- Group by work tasks
- Customer specific grouping
- Group is shown only if it has work shifts
- Show time lines on order creation
- Show time lines on work shift list
Saldos
- Select weekly saldos to be displayed
- None
- Realized
- Realized vs. planned
- Realized and overtime
- All
- Select daily saldos to be displayed
- Pcs
- Hours
- Money
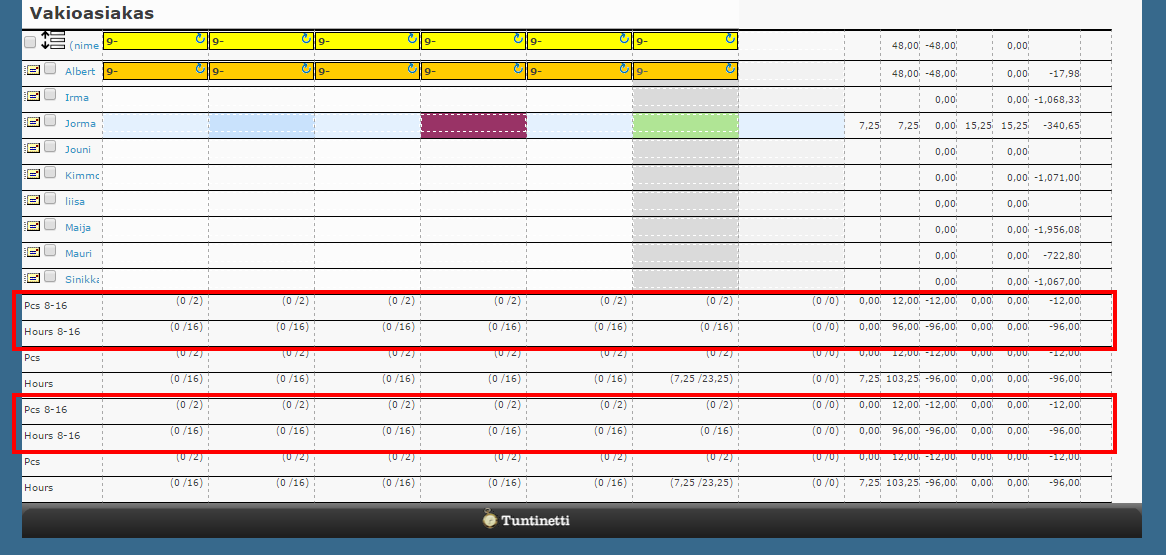
- Show shift strengths in graphs
- These graphs are displayed on the top of the work shift planning view
- Show flextime in work shift planning
- Show cumulative period saldo in work shift planning
- Show total hours in selected view
Color explanations
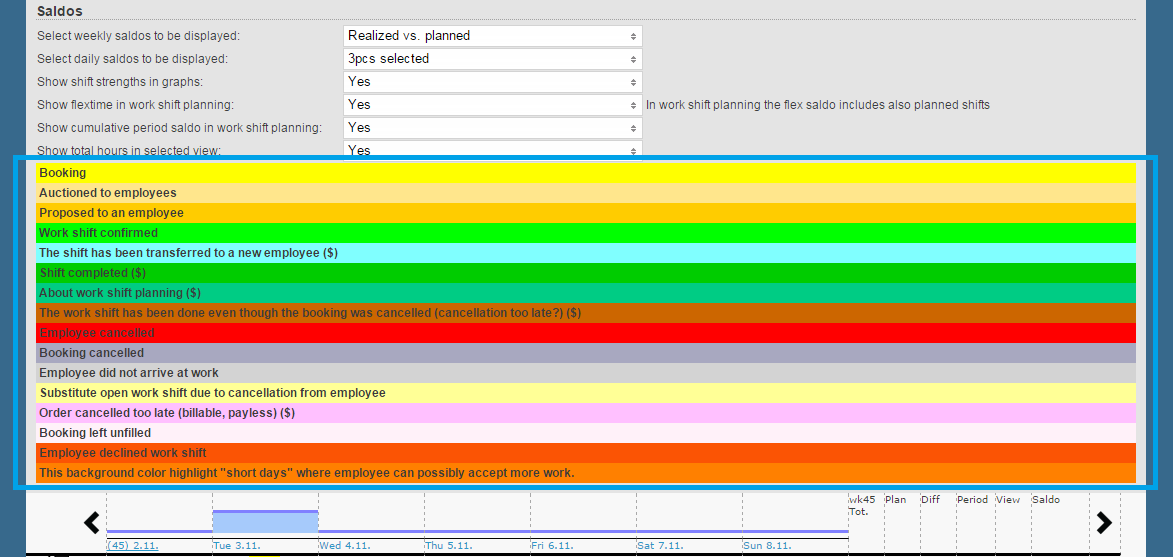
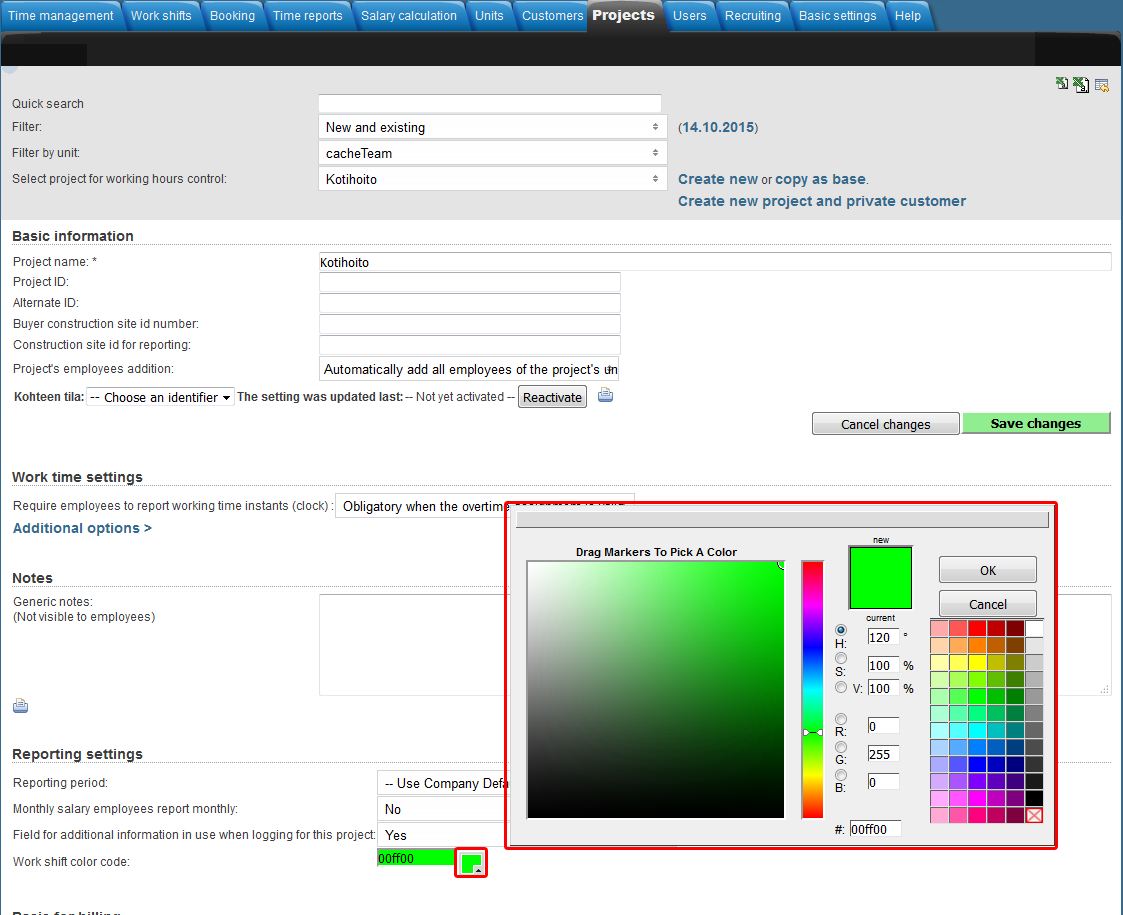
Work shift color code
Project's work shifts can be surrounded with chosen color, by selecting it from Projects tab's reporting settings. Projects > (Choose the right project) > Reporting settings > Work shift color code.
Hiding absent employees from work shift planning
Employees who are absent can be hidden from work shift planning in two different ways:
- You can set employees who are absent for a longer period of time (for example on a vacation) to be hidden from work shift planning with the "Show absent employees" additional option.
- Open up the Additional option in the Work shift planner tab by clicking the "Additional options >" button.
- Set "No" to the "Show absent employees" setting. This hides absent employees from work shift planning.
- When an employee's absence ends, he or she will return to the work shift planning view.
- Another way to hide employees is to set their projects to have an ending date. The employees are no longer visible in work shift planning after their projects aren't valid.
- Select the desired employee in the Users > Employees tab.
- Set an ending date to the desired project to the "Valid until" field in the "Employee projects" section.
- When the employee returns to work, you must remove the ending date so that the employee would return to work shift planning.
Temporary employees in work shift planning
You can define employees as Temporary employees in employee information in project settings.

The temporary employees are not visible by default in the work shift planning, if they haven't got any shifts. You can set temporary employees visible with the Displayed employees without shifts in range setting in the additional options. This way you can view the temporary employees only when you want to add shifts to them.
Selecting the editing mode
You can select the Regular mode or the Planning mode as the editing mode.
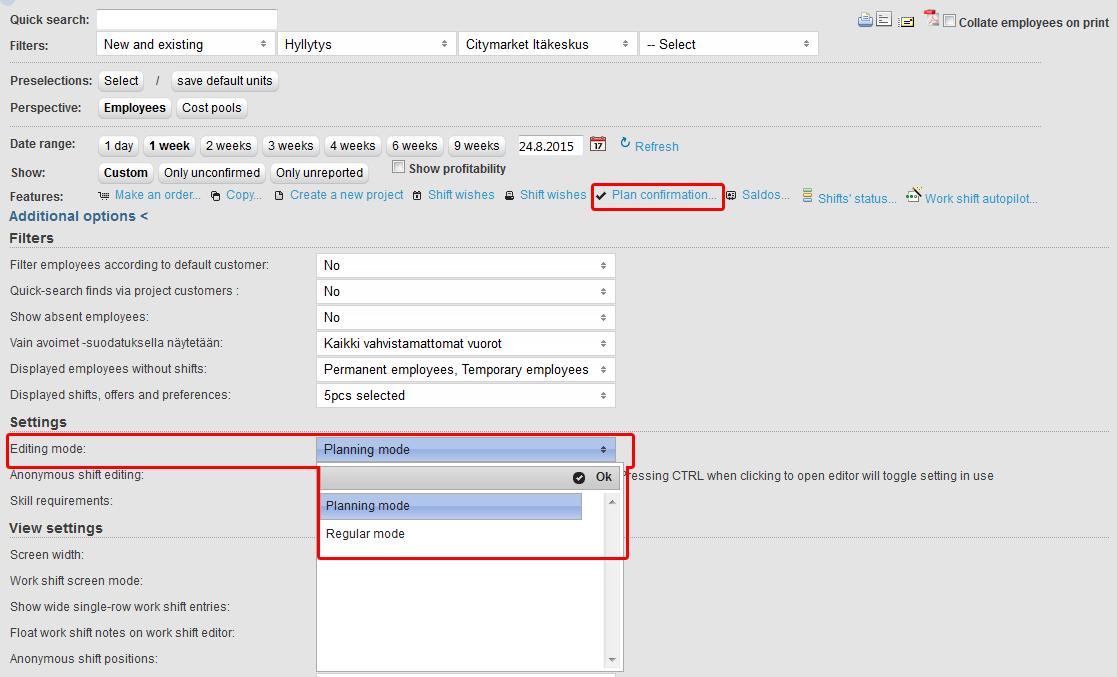
- Regular mode
- Changes made to the work shift lists in the Regular mode will be updated as the changes are made, until the shift has been marked as Shift completed.
- Planning mode
- In the Planning mode you can confirm the shifts for a desired date with the Plan confirmation button. You can come back to the Planning mode and view the original state of the planned shifts.
If the plan is changed in the Regular mode before the shift is completed, the original confirmed plan can still be viewed in the Planning mode. A plan can be confirmed in the Planning mode even before completing the work shift if needed with the Plan confirmation function.
Time and attendance late arrival alerts - paid features
When using HourSmart time and attendance clocks, you can confirm the employee visits the required target at required time and the supervisor receives alerts from late arrivals and if necessary has time to seek for a replacement.
Your customers can rely on your customers deliveries.
The feature us charged based on the number of employees that have workhour entries or made salary calculations for the calendar month.
How do the time and attendence late arrival alerts work on Tuntinetti?
Messages go to the supervisor or supervisors of the project´s unit if there are more than one. If the unit does not have supervisors then the alerts goes along to the unit hierarchy.
Related content
Needing guidance or training? Give us a call +358-(0)9-6898 8221. |
||
Technical support +358-(0)9-6898 8222 tuki@tuntinetti.fi |
Sales services +358-(0)9-6898 8221 myynti@tuntinetti.fi |
|