This manual demonstrates with examples, how to start using Tuntinetti and how it's basic functions work.
...
- You may either enter the start date manually or use the calendar menu.
- Choose the labour agreement. There are lots of choices but if the suitable one is missing, you can choose (Jos muu niin kerro mikä, voimme lisätä toivomuksesta), this means "If something else, tell us what", and enter the name of the labour agreement that you need. Our customer support will add it to Tuntinetti and send you email when it's available.
- The work time mode fields will be pre-filled based on the selected labour agreement. They can be modified as needed.
- Next you can enter the salary information. If you don't find it necessary to use the Tuntinetti's payroll functions, it's sufficient to fill the Salary mode -field (bill / hourly salary / monthly salary).
- From the gear -icon you can set additional information as needed, such as employee benefits.
...
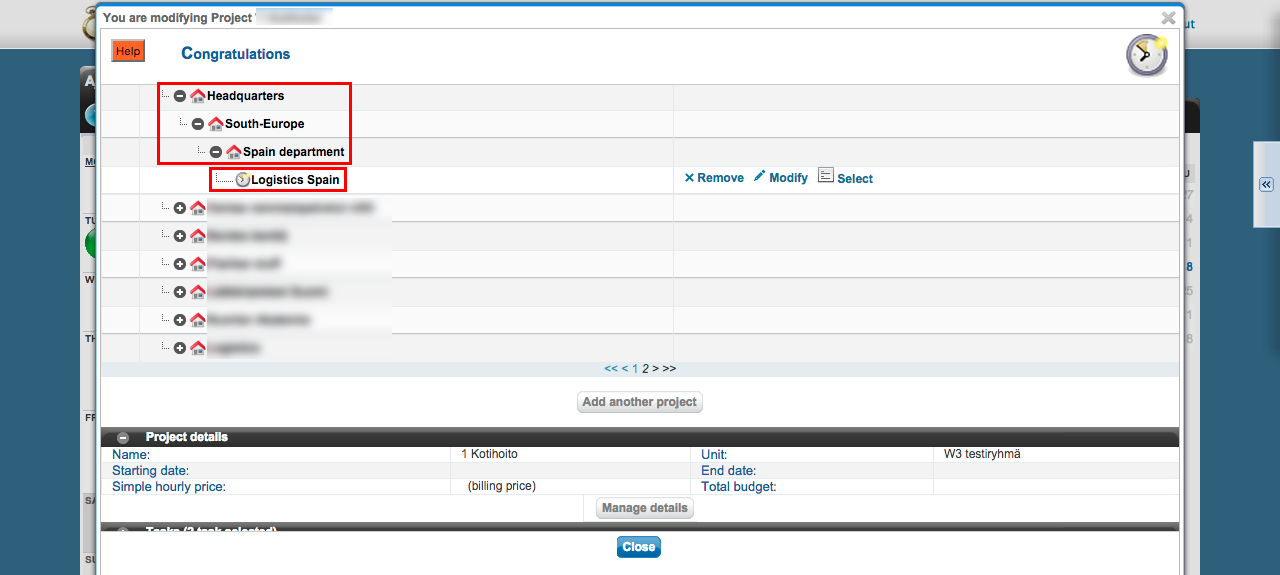
On top of the wizard there is a diagram about the company's units. It also shows the projects below each unit. You can move the projects from one unit to another simply by dragging them.
Creating a new project
Lets create one example project by clicking Add another project -button.
...
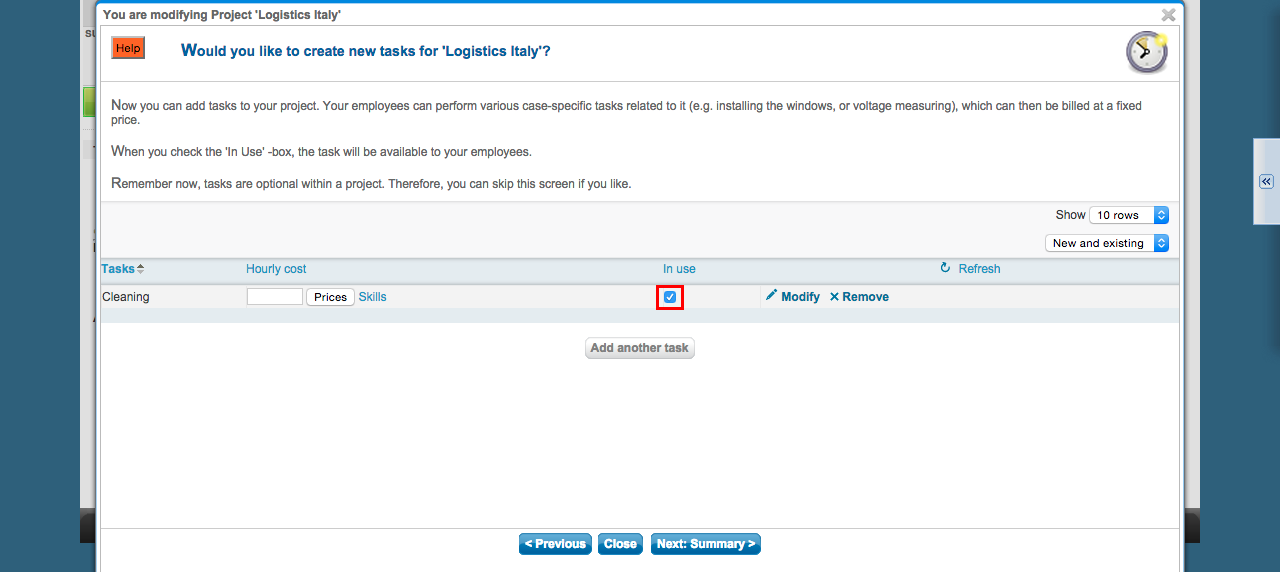
The task will be placed with the checkboxcheck box.
Lets move forward by clicking the Next: Summary > -button.
...
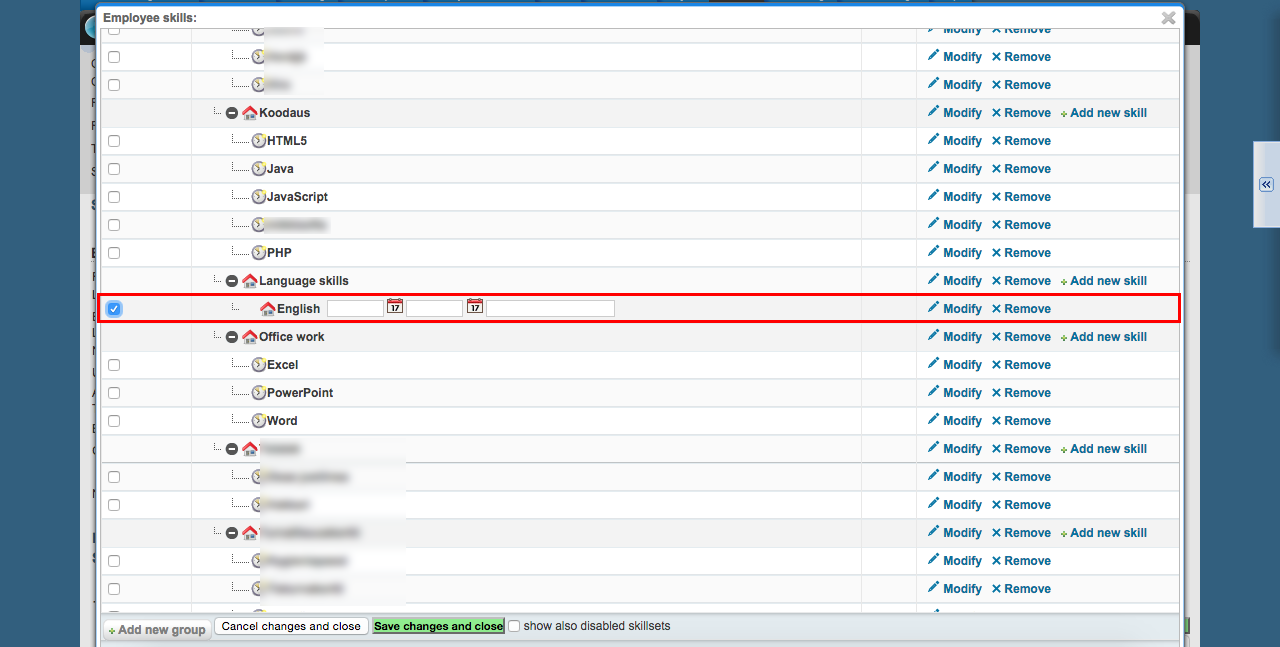
The skill can be applied to an employee by checking the checkbox check box next to the skill.
The notes contain notes about the user. They can be for example notices or repeating reminders about the user. The notices are visible and the reminders will be sent to the persons that are marked in the email field (typically the supervisors).
...
Lets change the application status to "Recruited".
When the Employed checkbox check box is checked, the employee is shown also at also visible on the Users -tab.
Work shifts in the Work shift planning view
Creating
...
an anonymous shift
Creating work shift in Tuntinetti is easy in the work shift planner (Work shifts > Work shift planner). Shifts can be created even if the worker is unknown.When this is the case, you should when we don't yet know the employee doing them.
To create an anonymous shift, choose a day from the "nimettömät vuorot/anonymous shifts" lane in the planning view.
In the window that opens up popup you are able to create an open shift with desired parameters.
...
Creating a recurring shift
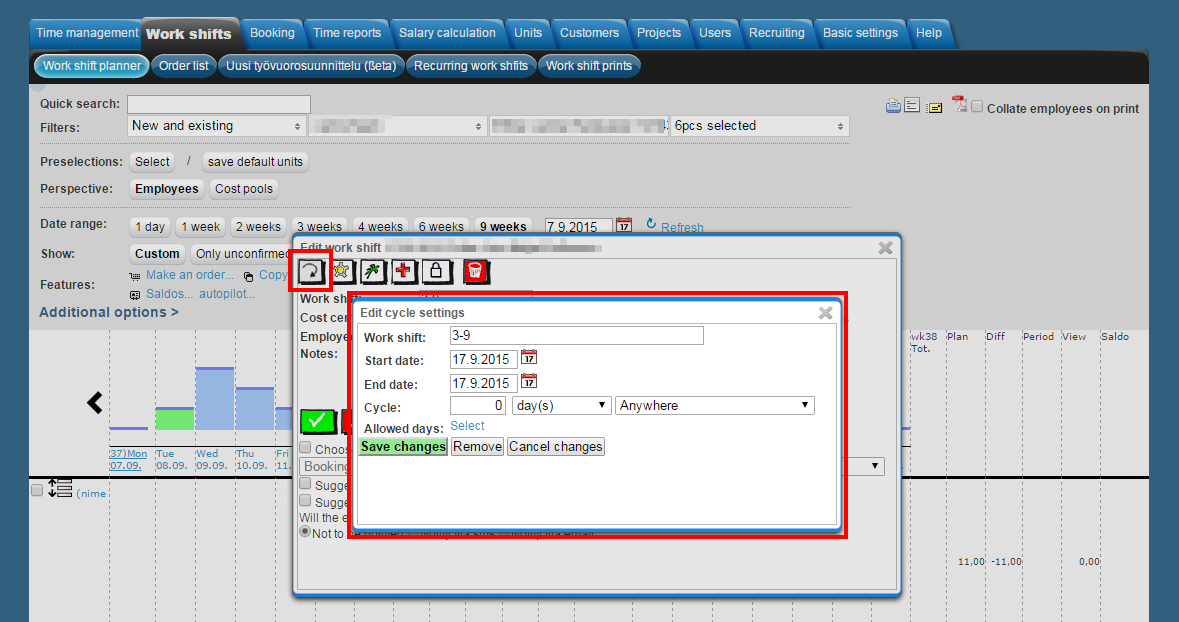
A shift can be set as recurring in the shift's recurrence settings.
...
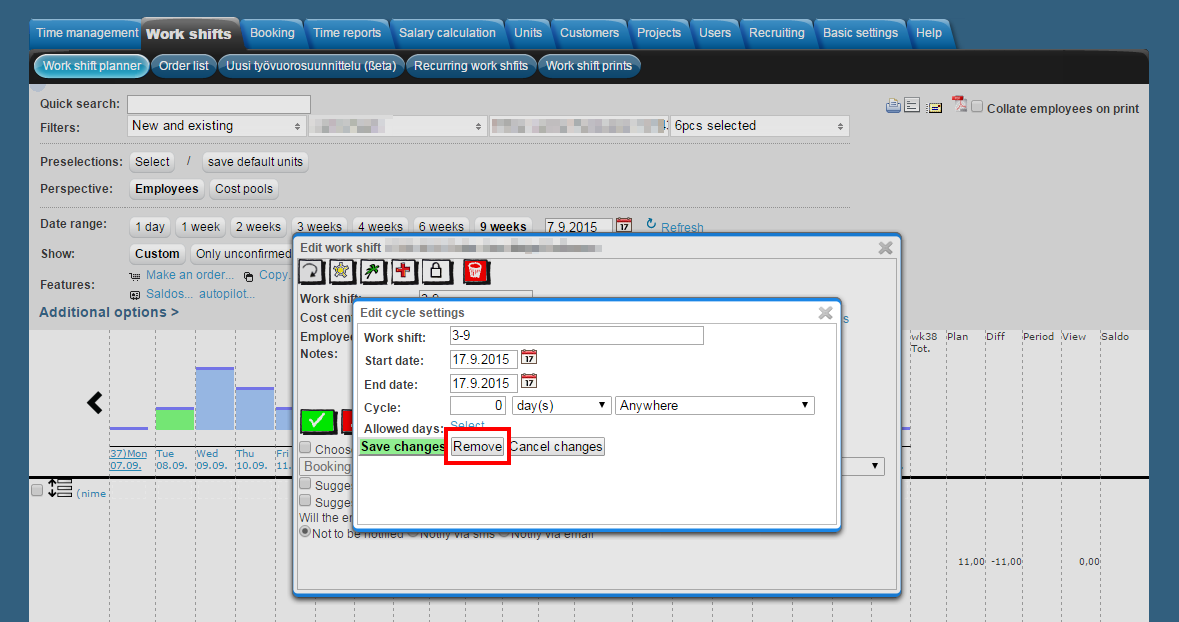
- Set the Work shift. You are also able to write down enter notes in this field, for example "8-16 Remember to lock the doors"
- Set the Start and End dates.
- Set the recurring work shift's cycle in the Cycle-section.
- In the Allowed days-window you are able to can set the shift's exact validity.
- For example with this you are able to set , you may define that the shift won't be on during holidays.
- Save the changes with by clicking the Save changes-button
The work shift is visible on the days that it is set to be on.
Recurring shifts have an arrow-icon on them ().
Recurring shifts can all be removed at same time with the "Remove"-button . You can remove them all from a single in the shift's settings. Any alterations made in changes to a single shift's settings affect in all of the rest shifts instances of the recurring shift.
More information about recurring shifts and another way of creating them can be found in the Recurring work shifts-guide.
...
In Tuntinetti work time is entered by projects. So that you are able to enter Before reporting work time, you must first create the needed projects and assign employees to them.
Creating a new project
Here is explained how you can In the following section we'll create a new project and look at the settings that you can set to a project. In addition here is also explained available project settings. We'll also show how you can add customers, employees and tasks to a project.
...
After opening "Projects" tab you can search for already existing projects and examine their information, or create entirely new projects. Here are the search settings found on top of the page:
...
- Project name (Mandatory information)
- Project ID (Here you can fill in the timecard time card ID)
- Alternate ID
- Buyer's construction site number
- Construction site id for reporting
- Project's employees additionAdding employees to the project
- To be selected one by one
- Automatically add all employees of the project's unit
- Automatically add project's unit's and subunits all employees
- Add all employees automatically (This means all the employees in your company)
...
Save the new project by clicking "Save changes" button. After doing this the program might give you a notification indicating that there are no employees attached to the project.
Tuntinetti may bring up a notification indicating that there isn't any employees added to the project.
Adding an employee to a project
Next we'll go through the employee settings and how to add emloyees employees to a project.
This can be done under the "Project employees" title where you'll also find all the employees that are already attached to the project. If there are no employees added to the project, the field is empty.
To add new employees, simply select them from the list in the gray box below the project's employees. You can filter employees by their unit and use keywords to find the employees faster. You can select multiple employees simultaniously simultaneously by dragging them with the left mouse button pressed down or clicking them with shift or ctrl button pressed down.
...
| Info |
|---|
| Note that you can only add already existing employees to a project. You can create new users from the Users tab. |
...
- Valid from (The date from which the employee is able to log work hours for the project. Mandatory information)
- Valid until (The date from which the employee is no longer able to log work hours for the project. By pressing the title above you can invalidate all employees at once)
- Temporary employee (Crossing this marks the employee as temporary. Crossing the box next to the title does the same for all employees on the list)
- Series (This setting is useful if the employee has multiple ongoing contracts with the same employer)
- Hourly rate (Hourly price for the work conducted by the employee. If you need more complex pricing, press the "Pricing" link)
- Pricing (Sets a more complex pricing for the employee. Use this if you, for example, want the price to change according to weekdays)
- Accepts (Crossing this means the employee can accept the work hours of other employees on the project)
- Compensation categories (Crossing this allows the employee to enter "only superior" -type compensations)
- Task description (Here you can add a description af the task, or other extra information)
- Remove (Removes the employee from the project. This can be done only if the employee has no hours logged for the project)
- Add an ovetime assignment (Opens up settings for adding the overtime assignment. The setting settings appear below the employee's settings)
...
If the project has only one customer, you can select the customer in the "Project's customer"-field.
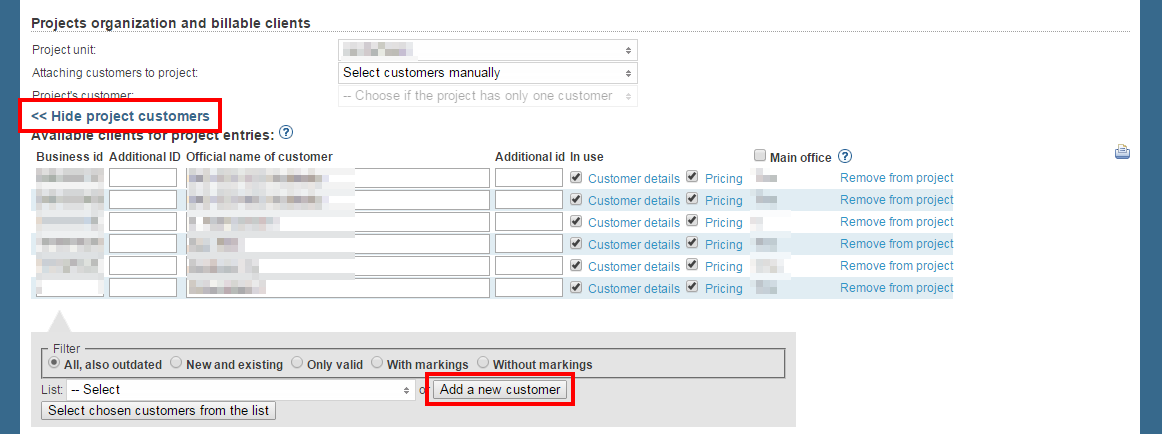
You can view all of the project's customers by clicking "Customers" in the "Projects organization and billable clients"-section.
...
Adding a new customer to a project
You are can also able to create a new customer. For this the "Customers"-section should be openopened.
Customer ID
Info This field can't be empty. So if the customer doesn't have an ID, a hyphen can be entered instead. ( - ) - The customer's cost center ID can be entered in the "Additional ID"-field
- Official name of the customer
- A time stamp id can be entered in the "Additional id"-field
- By default the customer is in use. A customer can also be marked as inactive by unchecking the "In use"-check-box.
- The "Customer details"-button opens up a window, where you are able to can enter detailed information about the customer.
With the "Pricing"-button you can modify the customer's pricing.
Info More information about pricing can be found in the Billing and pricing-guide. - Main offices can be modified if the check - box next to the heading is checked.
...
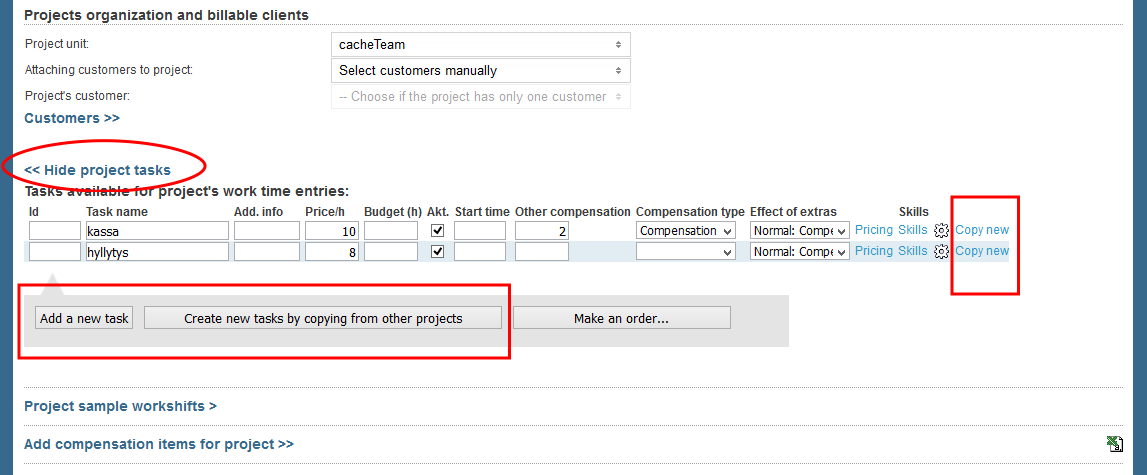
A new task can be created by clicking the "Add a new task"-button.
- You are may also able to copy the skills and qualifications that are joined to the task.
- Confirm the selection.
The added tasks should be visible in the tasklisttask list.
Adding a compensation item to a project
...
- After opening the wizard, select the unit of the project 's unit and press the plus -icon next to it.
- Press "Select" -link next to the project you wish to add the compensations to.
- Project 's information are is now open visible below the unit list. Select "Organisation costs".
- Press "Manage organization cost".
- Now you can see all the compensations that are already created. You can add these to the project by crossing the square under "Organization costs" -title. Another option is to create new ones by pressing "Create a new organization costs".
...
- Press "Create a new organization costs".
- Enter the information to the opening page. Name is compulsorya mandatory field. After doing this, press "Next".
- In the next page, fill in the pricing information. Short name is compulsorya mandatory field. It allows the program to identify the compensation based on it's short name, thus making it easier to enter the compensations.
- Press "Next" again. This saves the organization cost and you can now add it to the project like any other cost.
...
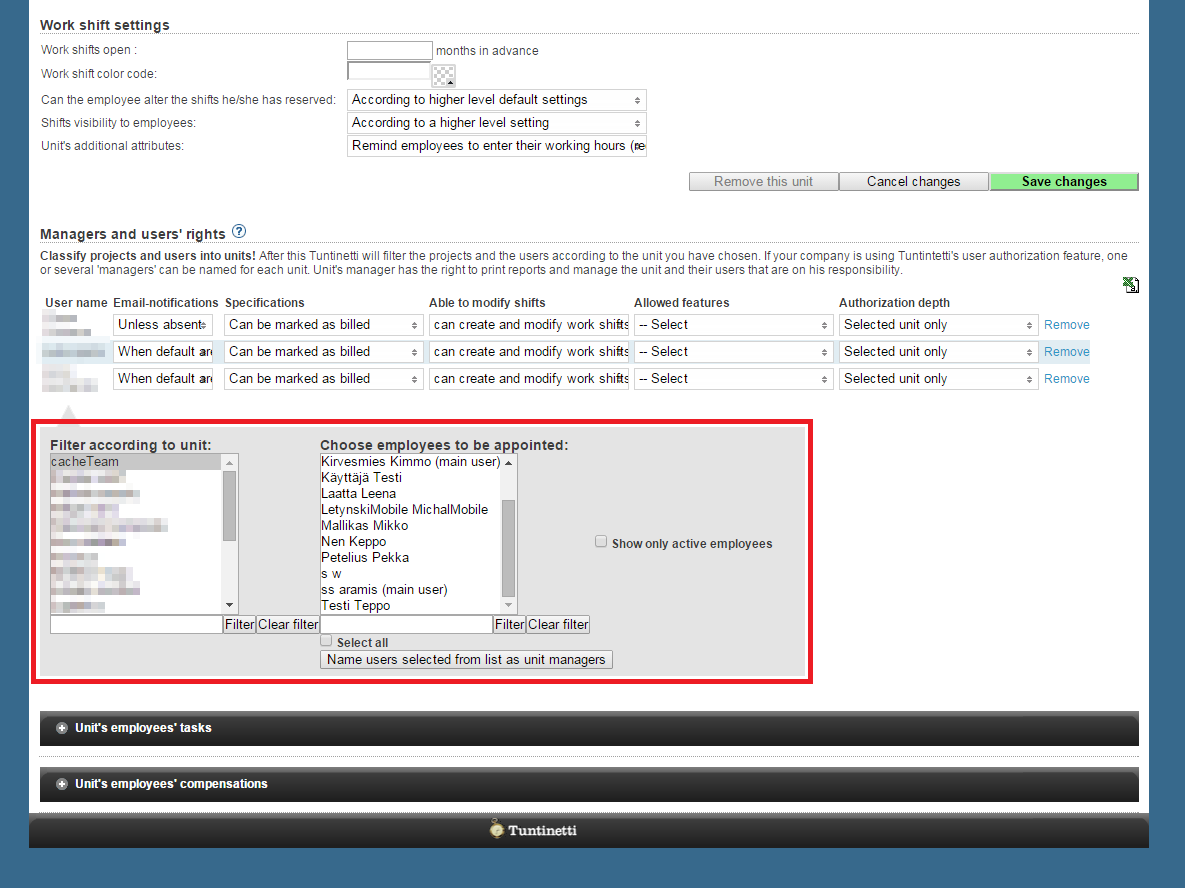
A list of the current managers are is visible in the unit's information in the "Managers and users' rights"-section. New managers can be named in from the windows selection boxes below the manager-list.
You can filter desired employees according to unit and then choosing choose them in the right side selection windowbox. You can select more than one employees with the CTRL-button and consecutive rows with the SHIFT-button. The selected employees can be named as managers by clicking the "Name users selected from list as unit managers"-button.
You can also remove managers with the "Remove"-button.
More information about units can be found in the Units-guide.
...
Adding a new customer starts with clicking the "Create new"-button next to the keyword search. "Add new customer and detail" creates a new customer with a detail at the same time. If you know that you're going to add a detail to the new customer you're creating, that is a simple way to create both at the same time. Of course you can always Even if you click "Create new"-button, you may still add details to customers afterwards alsoat any time.
When creating a new customer Tuntinetti informs that the official name of the customer and the business id are the only obligatory fields. We advice recommend to enter all the information about the customer that is possible to enter. If you want to fill some information later that is left empty in the creation phase at the beginning. However, you can always come back and fill in or modify the customer's information by selecting it in the search result list. The Detailed help about customer 's information are listed and gone through information can be found in the Adding a customer-guide.
...
You can add a contact person by clicking "Add a contact person". This opens up blank user contact information and customer information. The obligatory field mandatory fields in user contact information are first name, last name and personal e-mail address.
...
When you have added the contact person's information you can add the customer 's info. Write the customer's official name of the customer and choose it from the list that appears under the field. By choosing the customer its information is automatically update updated to the page.
More information about Contact persons-tab's functions can be found in the Contact persons-guide.
...
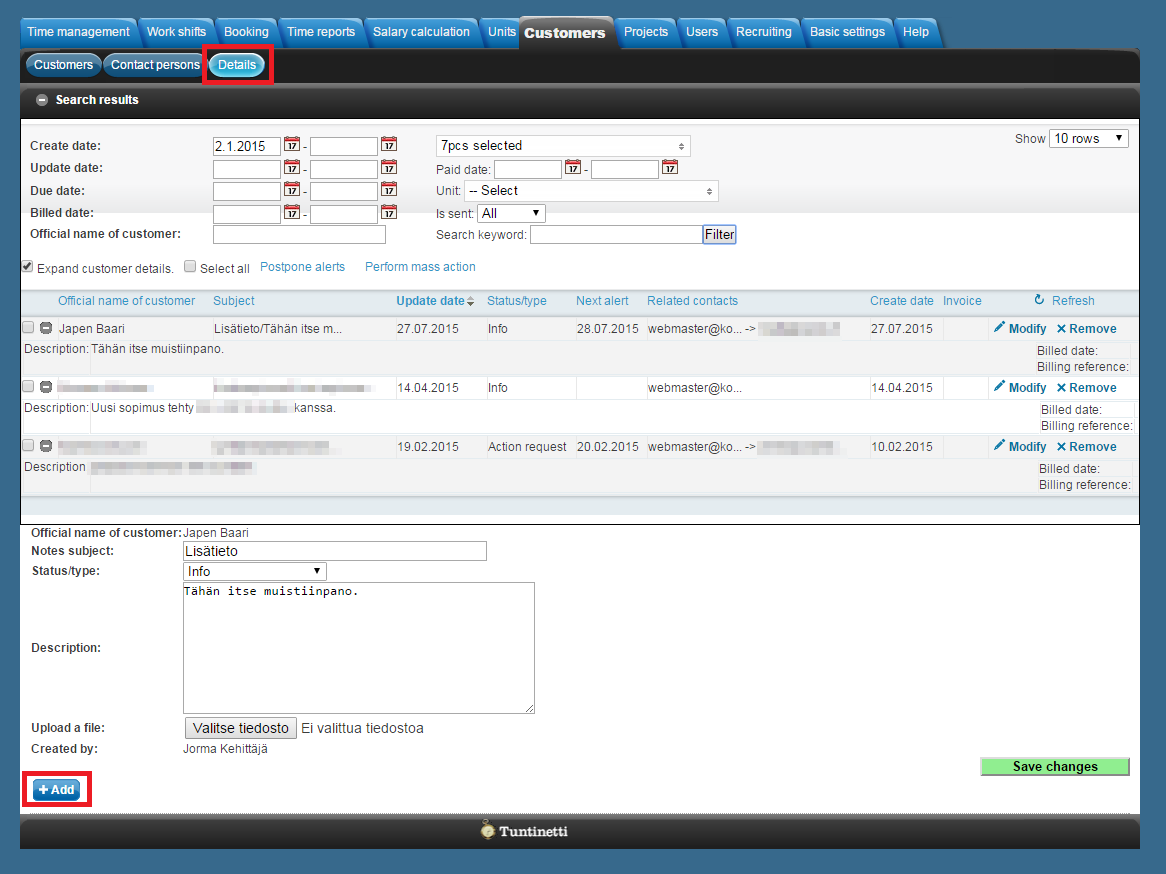
To add a new detail you must click "Add" on the bottom of the page. This opens up a section where you are able to write down the information of the new detail. Details are customer-specific and it is possible to add alarms and topic related notes.
More information about Details-tab 's functions can be found in the Details-guide.
...
With Tuntinetti you can handle the salary calculation easily and Tuntinetti is able to can factor in the terms of collective labor agreements automatically. More information about salary calculation can be found in the Salary/Wages calculations-guide.
...
First you must select a time period and desired employees. When these have been selected the "Select salary sheet" drop-down list will be updated to have the desired salary sheets. There you can choose a certain specific salary sheet.
You can filter employees by their salary mode, labour agreement, or payment date. "Create salary advice for monthly salary employees with" -menu allows you to choose how the calculation is done for employees with monthly salary.
...
New salary calculation can be created in the Salary/Wages calculations-tab. The following explains only the creation of the calculation. Not There are other operations that need to be done also, like approving work hours (They need to be approved that the calculation would have content.)before this, for example the work hours must be approved so that the hours can be included into the salary calculation. More information about the salary calculation steps can be found in the Salary/Wages calculations-guide.
...
A new calculation can be created by clicking the "Create new"-button.
The Some information that is possible to enter to a can be entered on salary calculation:
- Pay period title
- Payment date
- Salary template
- Salary period in taxation
- Tax card information (A new tax card can be added with the "Add"-button.)
- Annual reporting payment type
- Salary payment account number
- Labour union account number
- Garnishment account number
A summary of the work hours can be viewed by hovering your mouse on the question mark icon (). By clicking the button you can view more detailed information about the work hours.
Payment data
Before you are able to can download payment data, you must enter a payment id in the company's basic information. This can be done in the Basic settings > Company's basic information-tab in the "Payment ID"-section.
...
...
When salary information has been transfered transferred to payroll in the Salary/Wages calculation-tab, they can be formed into period reports in the Period reports-tab. The period reports can be printed or transformed into files that are needed for example useful in account programs and in taxation.
...
You can also filter according to employees' employee skills.
Select checkbox check box or "Select desired skills and qualifications" link to open the skill window.
Choose the skills you want to use for filtering, by selecting checkboxes check boxes next to the skill names.
This filter can be deactivated by unselecting the "Filter according to employee skills" checkboxcheck box.
Select unit(s)
Select employee(s)
...
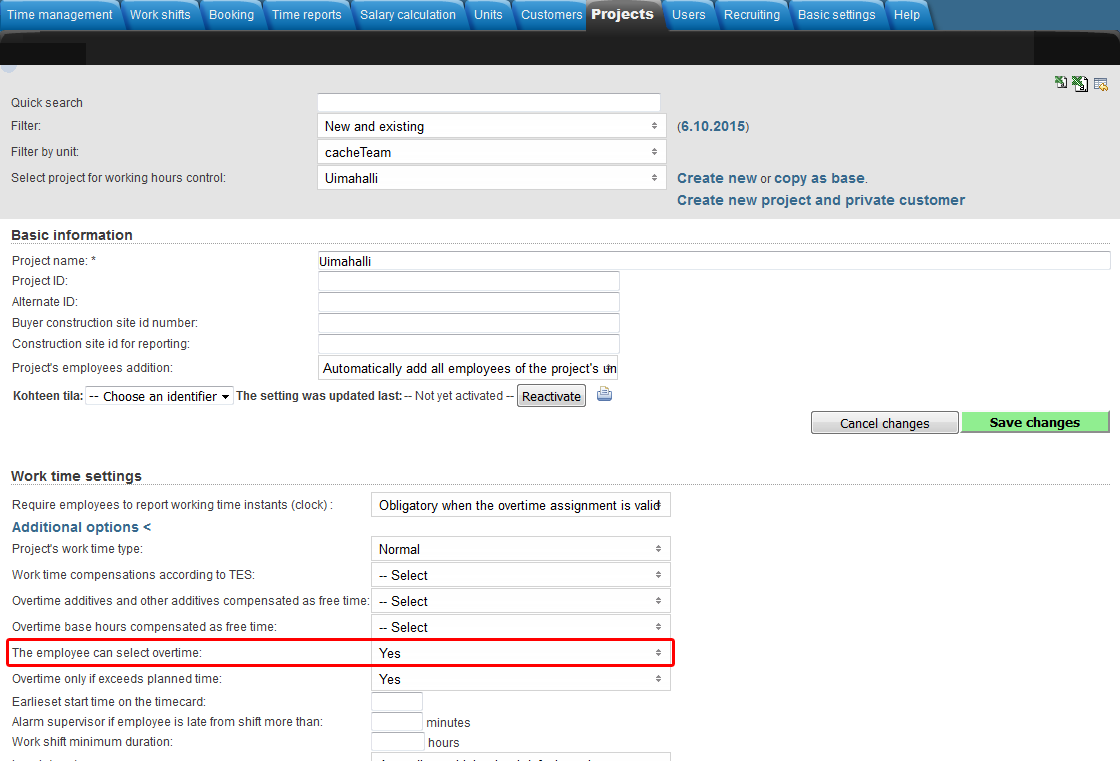
Adding an overtime assignment on the project level takes place in the Projects-tab.
Make sure that you have selected the desired project in the "Select project for working hours control"-drop-downlist.
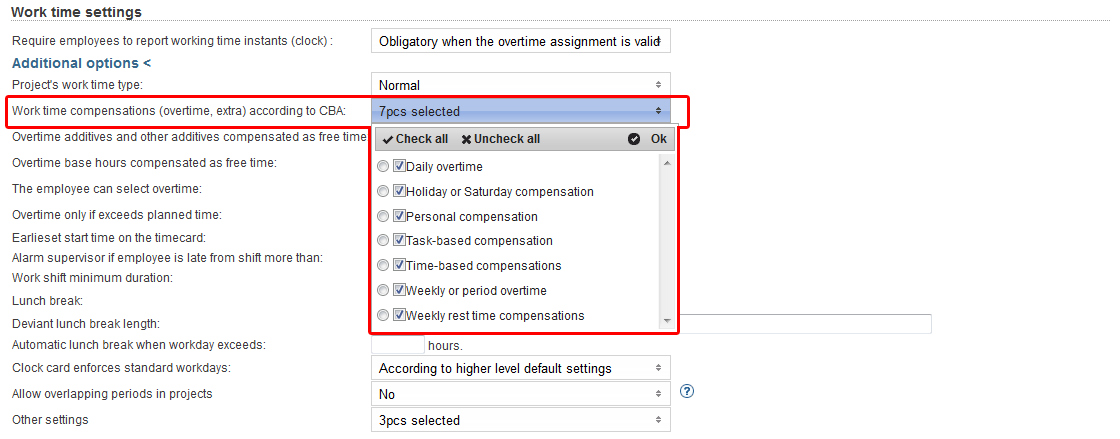
Overtime settings can be found in the "Work time settings"-section and clicking the "Additional options"-button.
You can select from "Work time compensations (overtime, extra) according to CBA" menu which overtimes and extras are going to be itemized in the time reports for payroll (Projects > Work time settings > Additional options).
From "Overtime additives and other additives compensated as free time" and "Overtime base hours compensated as free time" menus you can select which overtimes and extras will be compensated as free time.
A tooltip of each field can be viewed by hovering your mouse over the headings.
You can select "The employee can select overtime", which allows employees to set overtime assignments for themselves.
From "Other settings" menu, you can select the project work time decomposition setting to override possible employee work time decomposition settings.
...
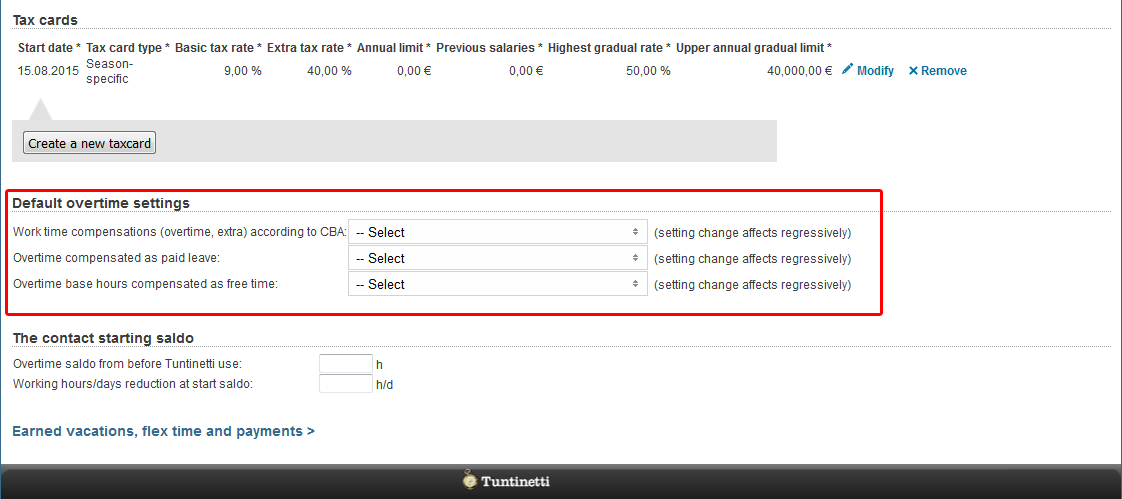
Adding an overtime assignment on the employee level takes place in the Users > Employees-tab.
Make sure that you have selected the desired employee in the "Select user to edit"-drop-downlist.
Default overtime settings can be found in the "Default overtime settings"-section.
You can select from "Work time compensations (overtime, extra) according to CBA" menu which overtimes and extras are going to be itemized in the time reports for payroll (Users > Employees > Default overtime settings).
From "Overtime additives and other additives compensated as free time" and "Overtime base hours compensated as free time" menus you can select which overtimes and extras will be compensated as free time.
A tooltip of each field can be viewed by hovering your mouse over the headings.
More information about overtime assignments can be found in the Overtime assignments-guide.
Pricing
Setting up a pricing for a project
...
- Employee's price in a project
- If a project has a customer and the pricing checkbox check box for it has been selected:
- Price of the task
- Price of the project
- Price of the project's unit
...
