Tuntineeti's paid features > Flextime bank
With Tuntinetti's Flextime bank additional feature employees can accumulate overtime hours which can be used later as overtime compensated leave.
Tuntinetti's Flextime bank
Activating Flextime bank
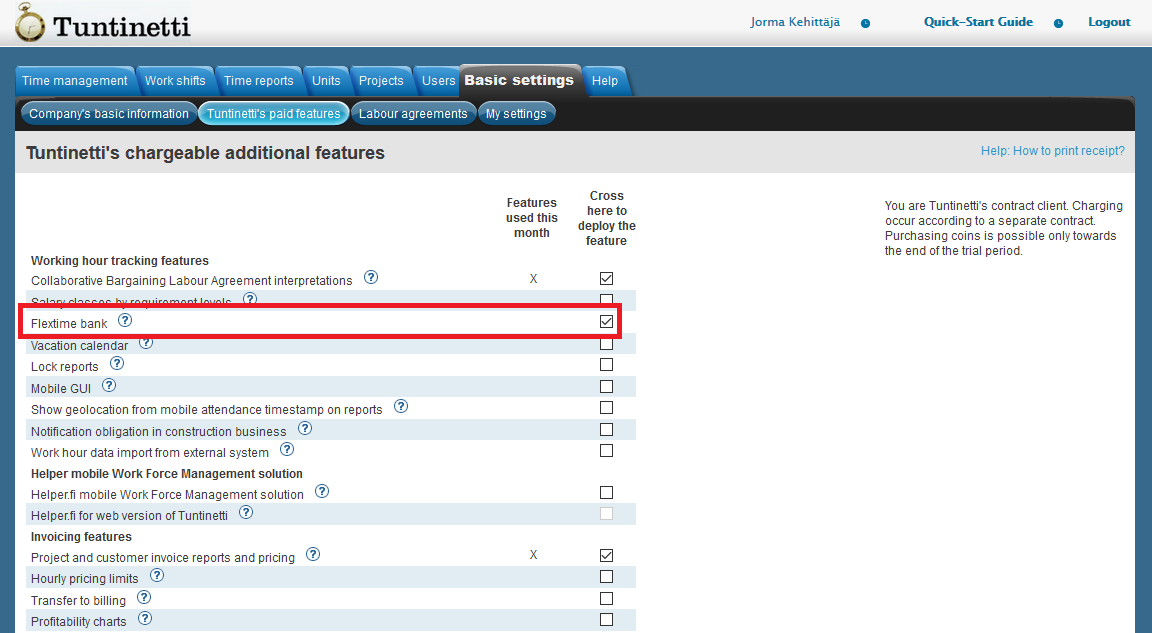
With Tuntinetti's Flextime bank employees can accumulate overtime hours and the accumulated hours can then be used as overtime compensated leave. To use this additional feature it must be activated in the Tuntinetti's paid features. This can be done by checking the Flextime bank check-box.
Compensating overtime as free time using overtime assignments
Overtime assignments can be used to define which hours are calculated as overtime compensation leave. More information about overtime assignments, settings and how to add them can be found in the Overtime assignments -guide.
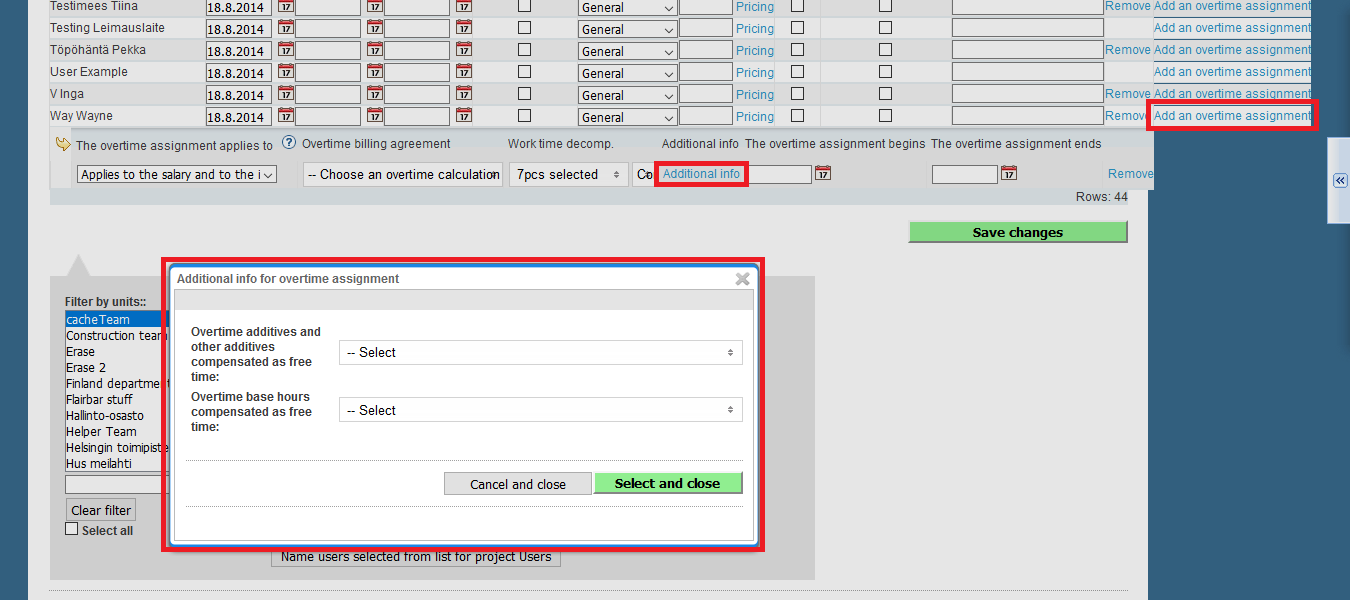
You can define which of the overtime base hours and overtime additives are compensated as free time in the overtime assignment's additional information. There are two drop-down-menus, "Overtime additives and other additives compensated as free time" and "Overtime base hours compensated as free time", where you can select the desired hours and additives.
Modifying overtime assignments in the time report view:
You are able to modify overtime assignments by clicking the "Manage employee overtime assignments" link next to the employee's name. This opens up a new window where all of the employee's projects are listed. Below each project is its overtime assignment if there is one.
Overtime can be compensated as free time followingly:
- Click the Additional info link on the employee's overtime assignment row.
- Select the overtime types which accumulate hours to flextime bank with the two menus ("Overtime additives and other additives compensated as free time" and "Overtime base hours compensated as free time") in the new window.
- Confirm the selections with the button.
- Do this process for other work days with overtime when needed.
- Press the Save changes and close button. This saves all of the changes that were made to the overtime assignments.
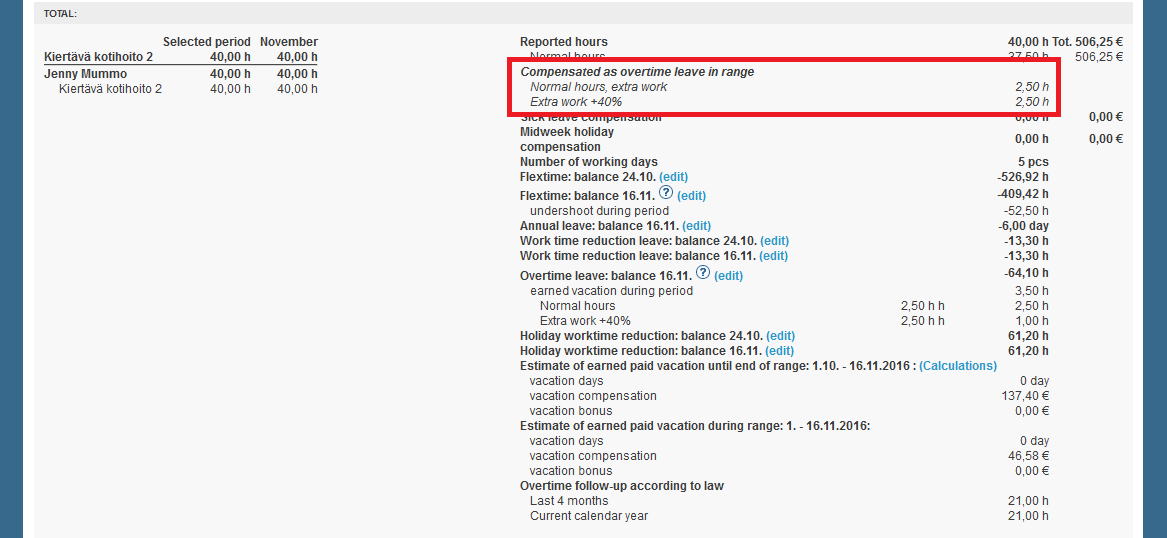
Selected overtime hours will be visible on the employee's report summary.
Using Overtime compensation leave
There is an absence type that can be used for overtime compensation leave. You can use the right absence type when making a work time entry.
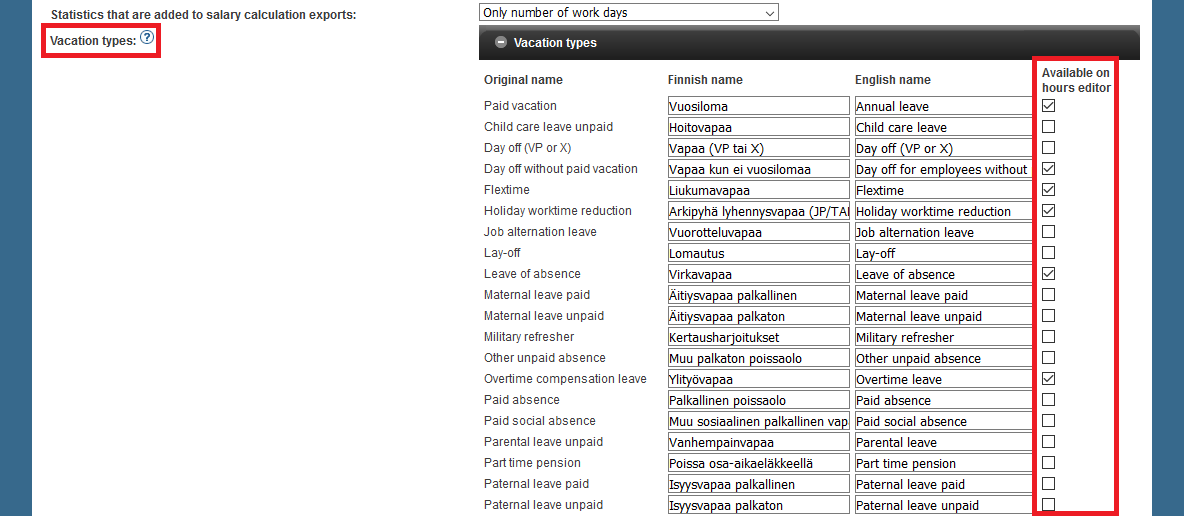
Overtime compensation leave must be first set available. This can be done followingly:
Open the Vacation types bar in the Basic settings in the Company's basic information tab.
Overtime compensation leave can be selected by checking its check-box. Here you can also change its English and Finnish name.
PSOP integration
Electrical servicesedel- and purchasing service programme (PSOP) is a new, national solution to support arranging welfare services and reform of operating model. Material transfer from Tuntinetti to PSOP programme is possible with an integration.
Before using you should control Basic settings-page that your company’s ID is the same that is in Digia programme.
And create to PSOP-programme a separate userID for Tuntinetti integration, for example integration, that is used by the integration with machine language. You do not need to create a user equivalent to this in Tuntinetti.
Obligatories in PSOP-programme
In PSOP-programme every company's unit has an obligatory of service producers code, this is also needed in Tuntinetti with integrationuserID (these are manually defined). In the beginning customer deliveres these ID’s to Tuntinetti customer service.
Serviceproducers code
Serviceproducers code goes to Units-page as Unit ID to the field on the right side. Serviceproducers code should be created also in PSOP-programme. If serviceproducers code is wished not to be used, it can be left empty. This field should be empty also in those Units that are outside of the integration.
PSOP-customer number in Tuntinetti
Customers PSOP-customer number should be saved in Tuntinetti’s Customers page in Customer id-field (other can be used if several customer ID fields, in picture belov Transfer ID). Customer ID can include numbers, letters and other marks.
Transferring material from Tuntinetti and identification of purchasing power
Starting to move material from Tuntinetti to PSOP-programme is launched at Billing reports by customer screen with PSOP-button:
When you click the button, you will get a screen where you fill in Tuntinetti the customers projectbased identifications of purchasing power.
Transferring material from Tuntinetti, linking together identifications of purchasing power
When the identifications of purchasing power are confirmed, opens a view, where in Tuntinetti you link servicebased salarycodes that match purchasing power includings in PSOP-programme
To note: With PSOP integration you can only add new, succesful and real events. Possible interruptions, cancellations and changes can only be done in PSOP-programme itself. With the electrical integration you can’t fix, delete or update events you have already sent.
Transfer is started by clicking “Save and send” and programme gives possible errors and feedbacks on the screen. When you are ready, choose “close window”. To note: Test by transferring a small material first at a time so you can be sure that it works as expected.
Examples
- If a customer has parallel identifications of purchasing power, you should create own project to Tuntinetti for each of them. In updatewindow of identification of purchasing power is specified which project it matters.
- If a customer has several identifications of purchasing power in a row for the same project, you change a new identifications of purchasing power in use when it begins (and all the previous materials have been transferred and closed). In the programme there can’t be saved an identification of purchasing power at the same time with one that is valid.
NOTE! The same material cannot be transferred twice even if you have deleted the earlier transferred material from PSOP before transferring the material again.


