This manual demonstrates with examples, how to start using Tuntinetti and how it's basic functions work.
...
When you log in to the system for the first time, Tuntinetti will start with show you a wizard , which that helps you to get started quickly. The wizard will guide you with adding the first information to the system. If you need to stop the wizard, you are always able to return to it later. All the information will be saved instantly, but at any time you can go back to and change things and you are also able to . You can also jump between all the different parts of the wizard. You can always click the Help -button, when you want in depth instructions for a particular screen.
Unit Wizard
In unit wizard you can determine your company's structure. In Tuntinetti the company consists of units, which can represent for example your company's headquarters and their departments. Units can be ordered under each other, how ever it's logic may be structured in the hierarchy that makes sense from your company's point of view.
...
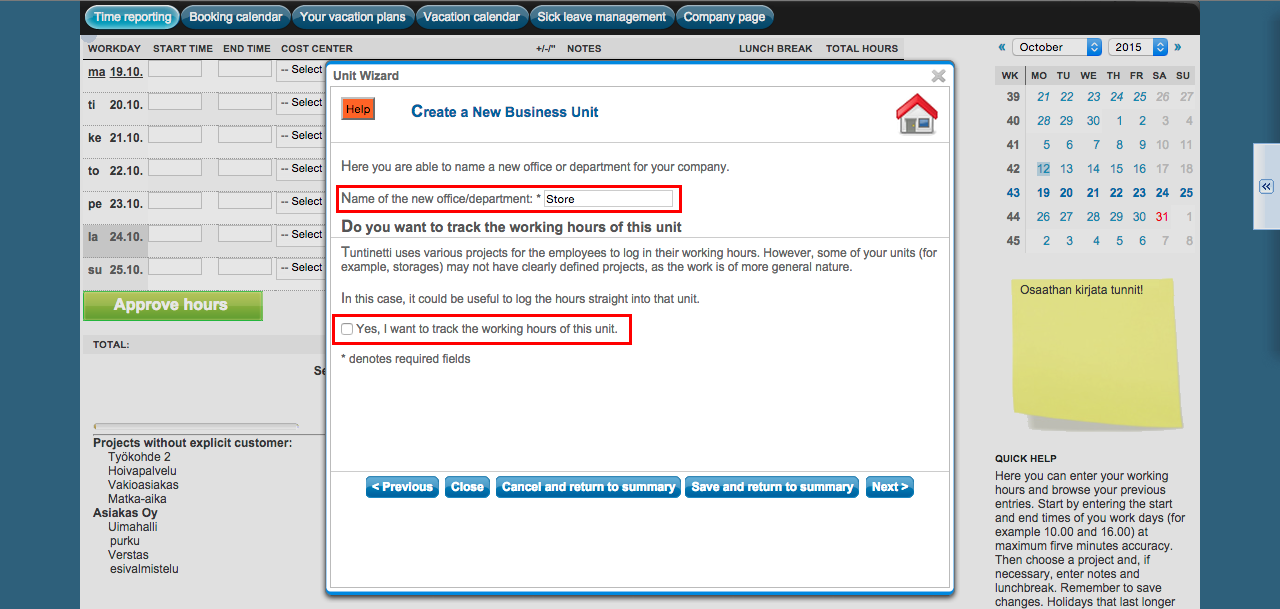
Lets create a new unit. The Create new unit -button start starts the process.
First write the unit's name and choose whether you want to enter the hours straight directly into that unit or not.
Move forward by clicking the Next -button.
...
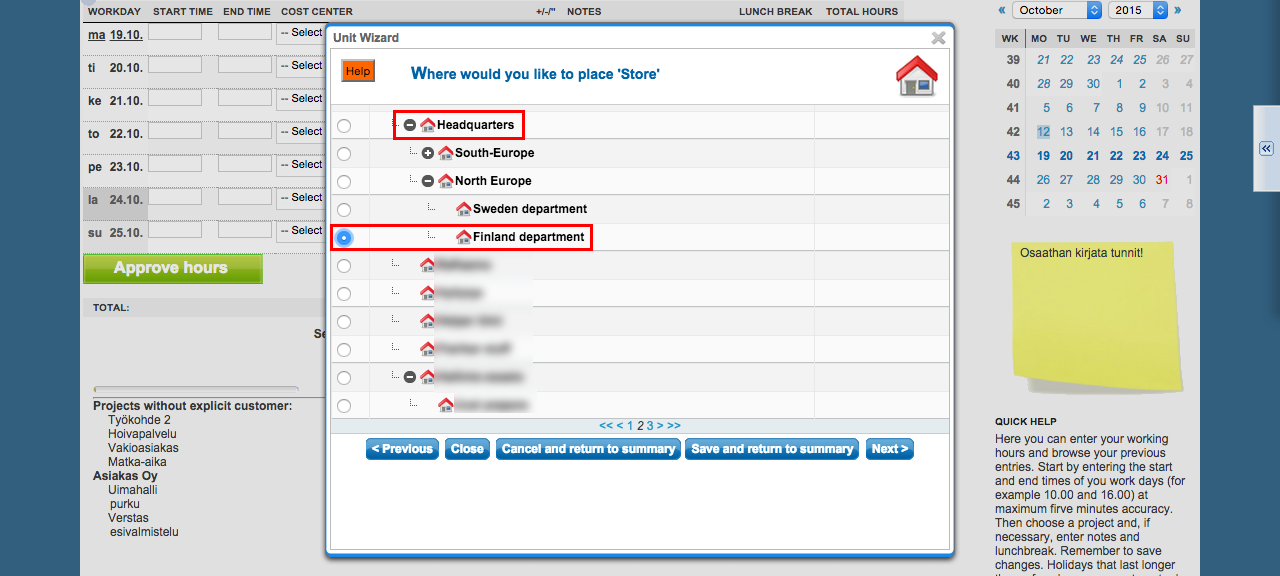
Tuntinetti has automatically created one basic unit to the structure's base level. The unit's name is the company's name. Other units can be created under this unit or next to it to on the base level.
Click the radiobutton You can create the unit hierarchy by clicking the radio button next to the basic existing unit . Now under which the new unit will go under itshould be placed.
Lets move forward by clicking the Next -button.
...
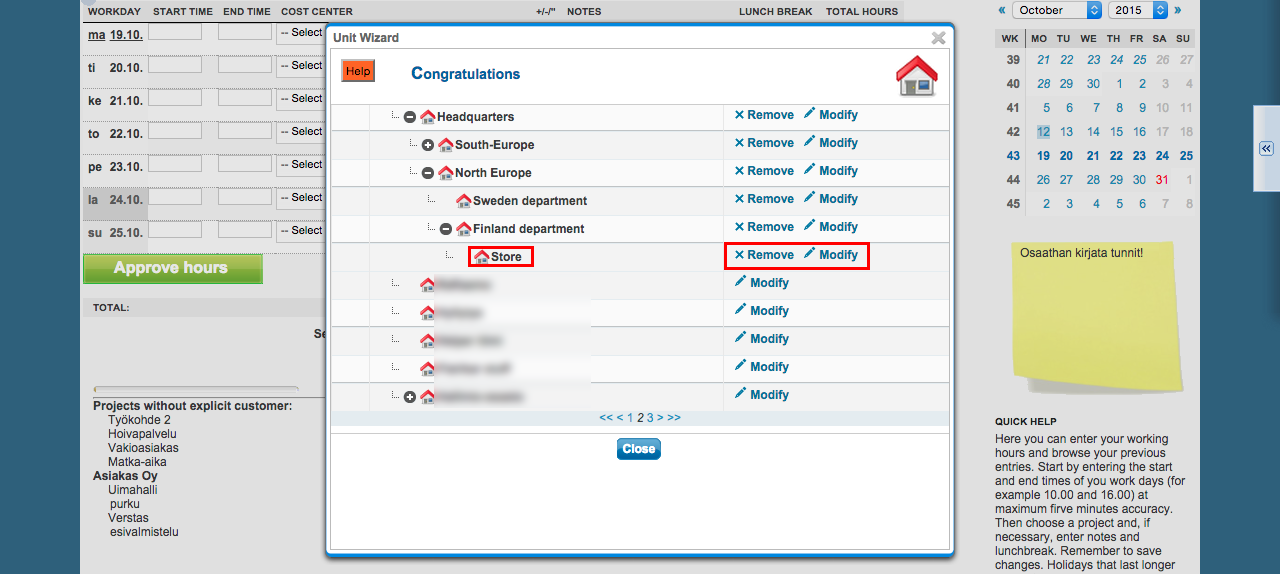
You can also modify and remove existing units using the highlighted buttons.
Employee wizard
At The employees you add with the employee wizard you are able to add employees who also become Tuntinetti's are also automatically created as Tuntinetti users.
Tuntinetti has already created an employee which has been named based on the registration information.
Add a new employee
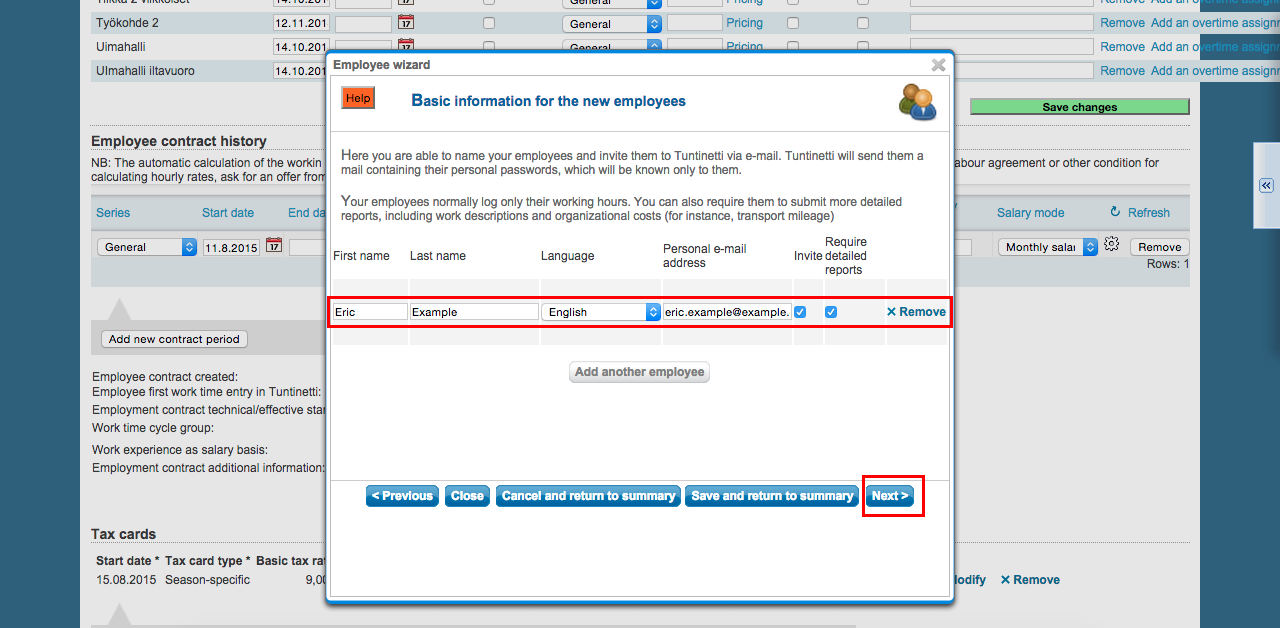
You are able to can create new employees with the Add new employee -button. In the first stage of the process you must write down the employee's basic information:
...
First you need to enter the basic information of the employee:
- Enter the employee's name.
- Choose the user interface language , which suitable for the employee will use in Tuntinetti.
- Add the employee's email address.
- You can may immediately send an email invitation for the employee to use Tuntinetti to the employee immediately.
- At the Require detailed reports -part you will may choose if the employee will need to specify work tasks and possible expenses. Otherwise the system will only ask the working hours which . This is more suitable for routine like jobs.
You are able to add more than one employee may create additional employees with the Add another employee -button and remove them with the Remove -button.
...
When the basic information is filled, move the the next page by clicking you can click the Next -button to continue.
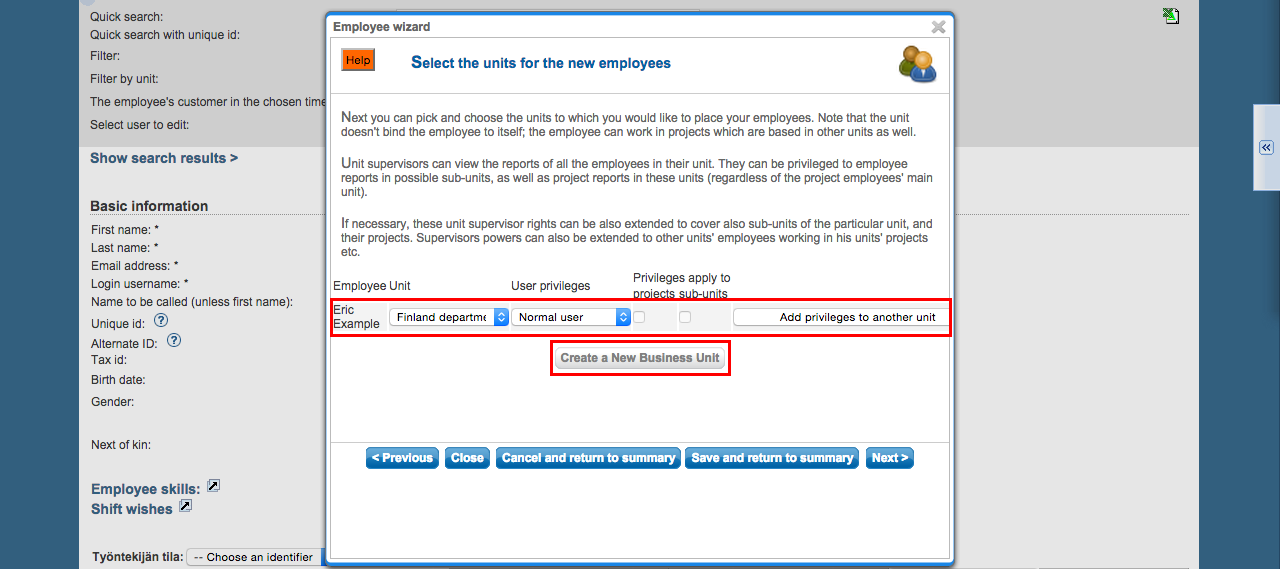
At this page the employees will be placed to units. Be aware Note that the placing this is done mostly for structure and that employees don't always have to work at their own unit's projects. You will Here you may also set the User privileges for the employeeemployees.
Lets select an unit for the employee. By clicking Create a new business unit -button you can also create a new unit.
The employee 's privileges can be may have the privileges of a normal user, administrator or unit manager or administrator. Normal user is able to control his own time reports, vacation plans and personal settings. Unit manager can normally usually control those same things on the whole unit level possibly including it's subunitssub units. Administrator is able to control any all the information in Tuntinetti. From the User privileges menu you are able to choose either You can select normal user or administrator administration privileges for the employeethe user from the User privileges -pull down menu. Unit manager privileges can be set by first choosing normal user privileges and then setting it from clicking Add privileges to another unit -button. Unit manager privileges can be set to multiple units for the same person and they can may later be modified in detail. Choose the user privileges and move forward by clicking Next -button.
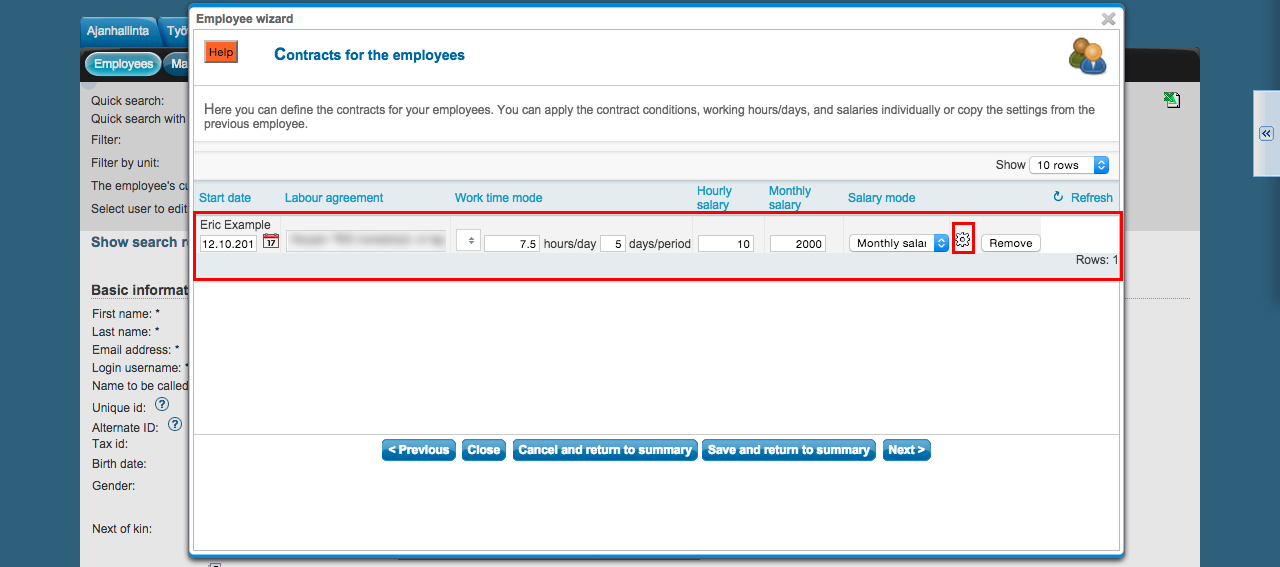
At On this page you will can define the employee's contracts: the starting start date of the contract, labour agreement, work time mode and salary.
...
In this view you are able to modify the following options:
- Write You may either enter the start date of the contract. It can also be set from the manually or use the calendar menu.
- Choose the labour agreement. There are lots of choices but if the suitable one is missing, you can choose (Jos muu niin kerro mikä, voimme lisätä toivomuksesta), this means "If something else, tell us what", and write enter the name of the labour agreement that you wantneed. This way our Our customer support will add it to the system Tuntinetti and inform send you about it with emailemail when it's available.
- The work time mode fields will be pre-filled based on the selected labour agreement. They can be modified if as needed.
- Next write you can enter the salary information. If you don't find it necessary to use the Tuntinetti's payroll functions, the salary mode is enough: bill, hourly salary or monthly salaryit's sufficient to fill the Salary mode -field (bill / hourly salary / monthly salary).
- From the gear -icon you can set additional information for example as needed, such as employee benefits if needed.
Move forward by clicking the Next -button.
...
Project wizard
In the project wizard you are able to can add projects to the company's units and define work tasks, organization costs and customers connected to the projects. It's also possible to add employees to the projects.
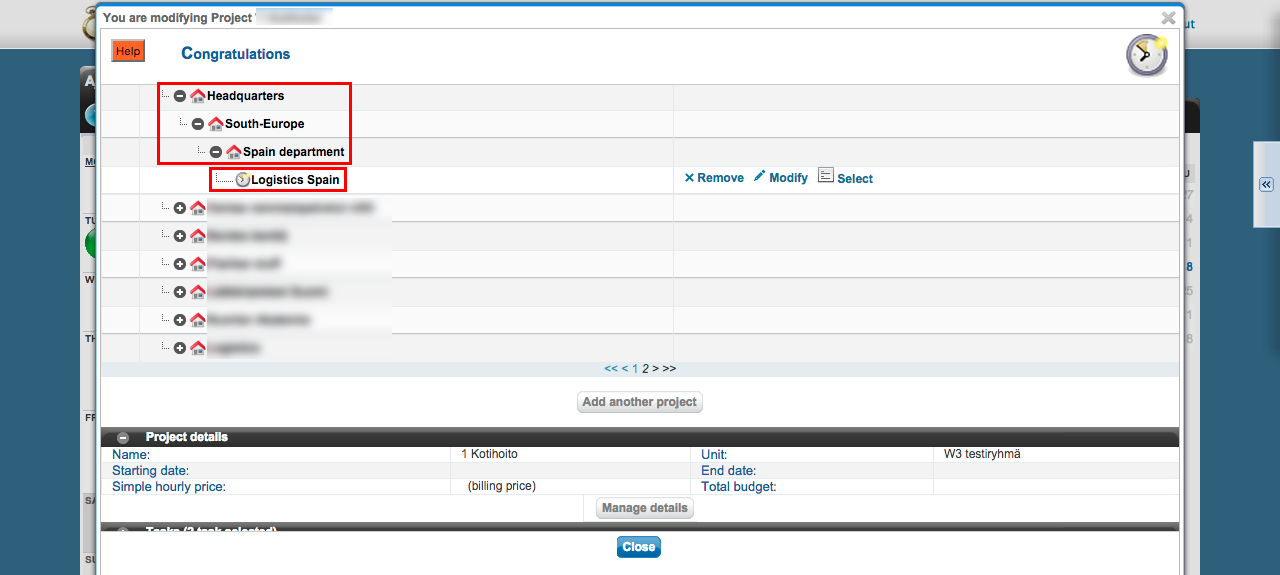
There On top of the wizard there is a diagram about the company's units. Also It also shows the projects below each unit are shown. The projects can be moved . You can move the projects from one unit to another simply by dragging them over unit's names.
Creating a new project
Lets create one example project by clicking Add another project -button.
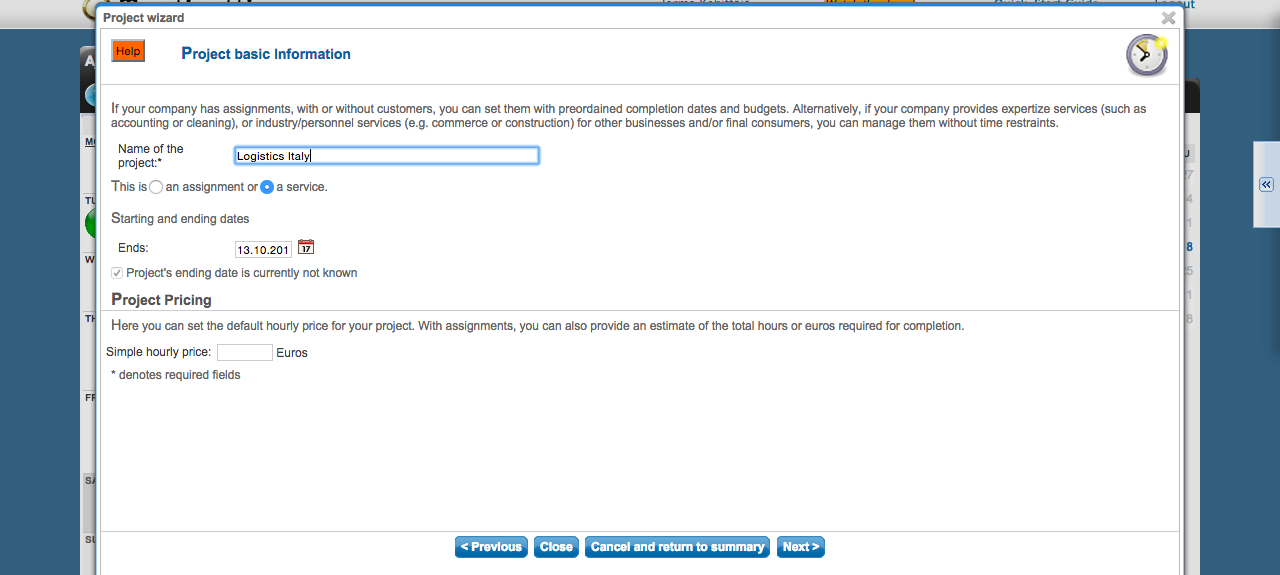
In the first stage of the process you must write down the project's basic information:
...
First you need to enter the basic information of the project:
- Enter the name of the project.
- Choose the time structure of the project. Choices are named based on the use of them. Assignment type means that the project has a start- and end date. Service type means that the project is always in effect.
- You can also define Next define the hourly price for the project, total budget can be estimated for the assignment type project. For Assignment type projects you may also enter an estimate of the total budget.
Lets move forward by clicking the Next -button.
...
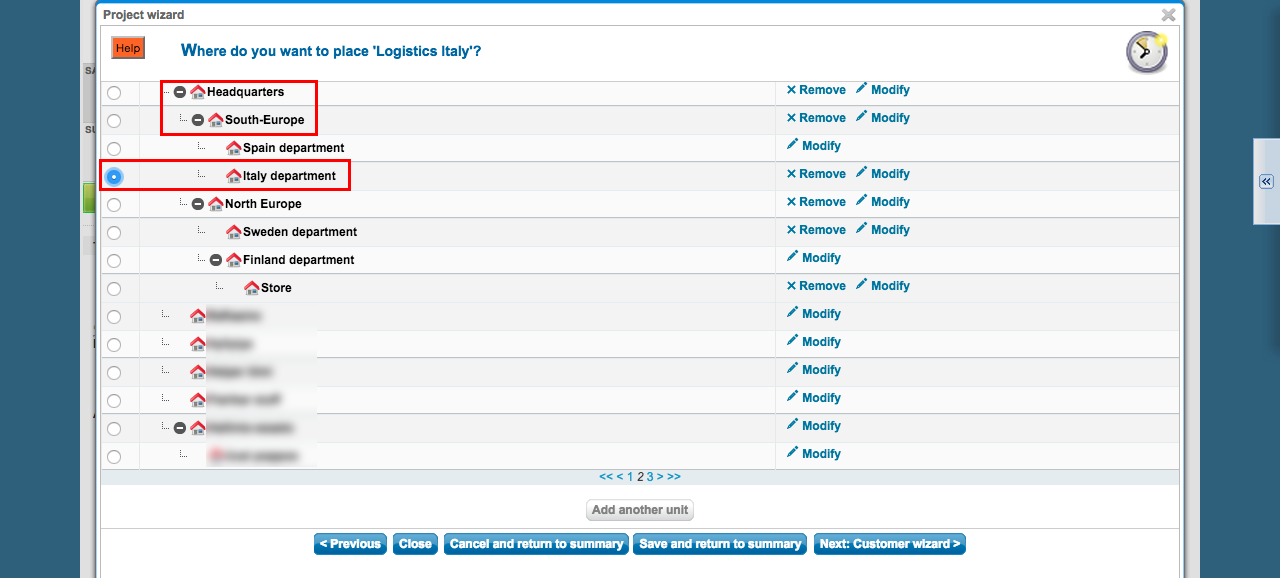
At this page you will choose the projects unit for the project.
The choice is made with the radio buttonsby clicking a radio button.
Lets move on by clicking the Next: Customer wizard > -button.
...
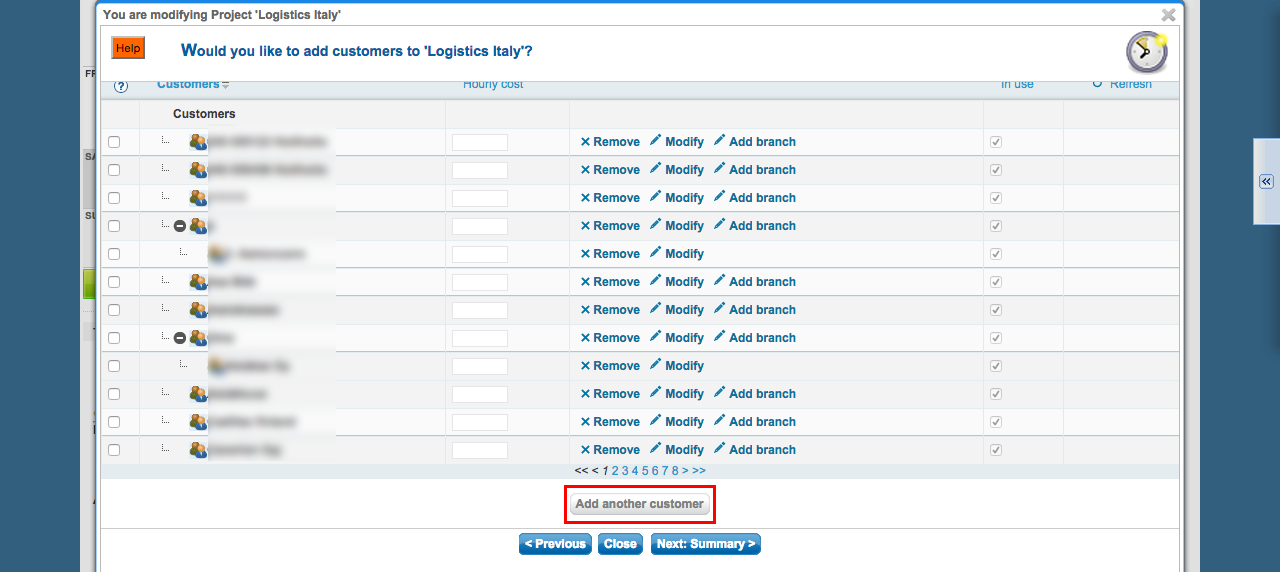
At this page you are able to place customers to the project. This will should be done when if the work related to the project will be billed from the customers, and the time reports about on the work is needed to specify by customers. The system remembers the created customers and they can be placed has to be itemized based on the customer the work was done for. You only need to create a specific customer once, after which you can associate the customer to other projects as well if needed.
Choose if you want to place all the customers of the unit's project to the project, the unit's subunitsub unit's customers as well or the customers of the whole company's projects. With the first choice it is possible to place customers one by one. Lets create an example customer.
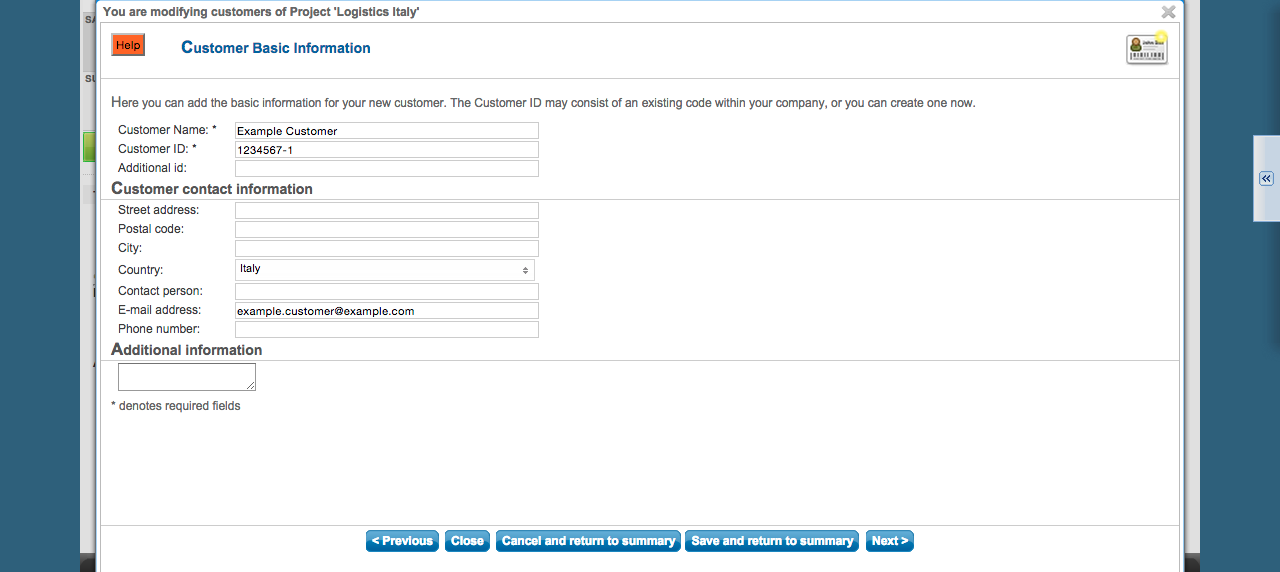
Write Enter the customer's name and business ID . The ID will be the Business IDof the customer.
Next write the email, which is required for some optional functions in Tuntinetti.
After that move forward by clicking Click the Next -button to continue.
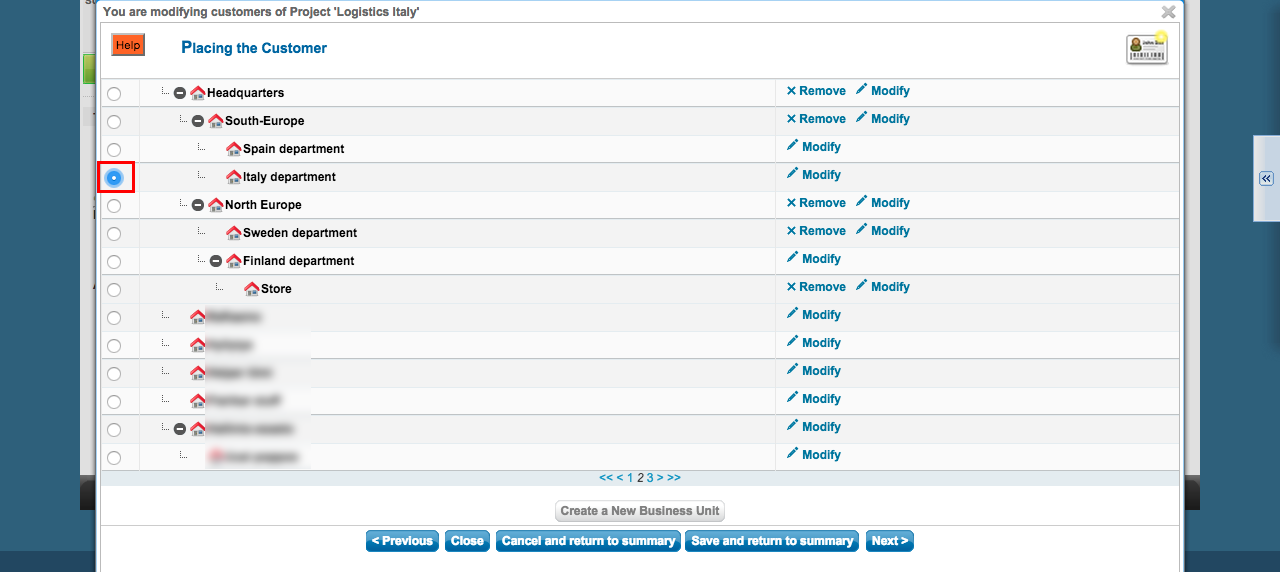
The customer can be placed to an unit of a project. The placing will structure the customer to the system, but it does not restrict his use you may still use it in any other unit or project. At In this window screen the customer will be placed to an unit and in the next one it will be placed to a project.
The customer will be is placed to an unit with the a corresponging radio button.
Move forward by clicking the Next -button.
...
The new customer can now be placed to projects. This is done by checking the checkbox check box next to the project. Customers can also be placed to multiple different projects.
...
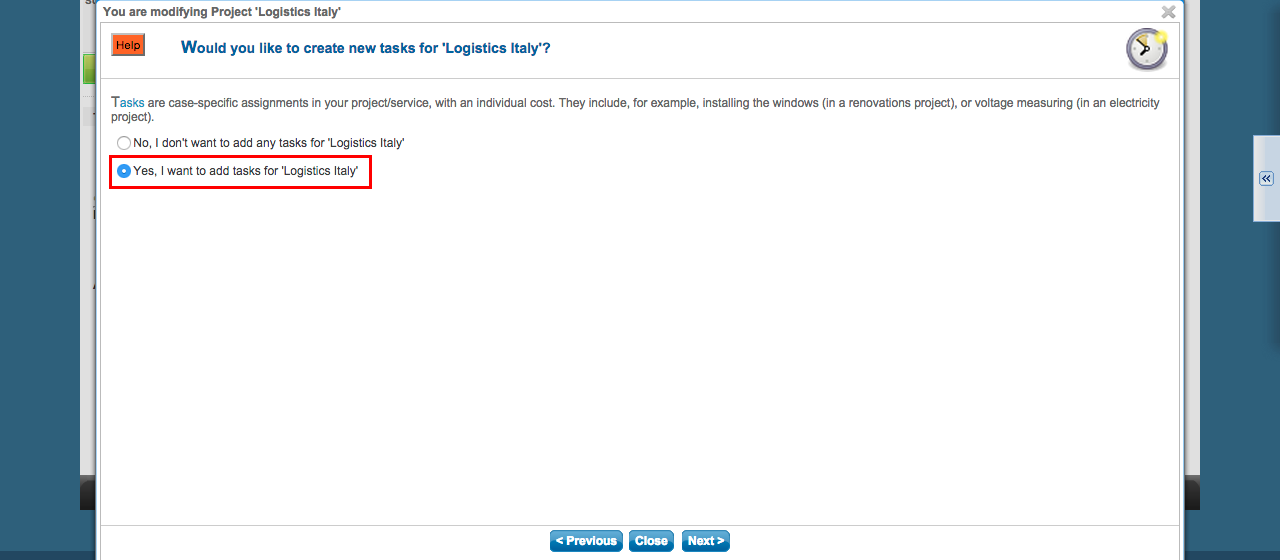
At this point the wizard will offer you a possibility to place tasks to projects. The task will be specified this way if it is needed to bill them in detail or when This should be done if you need to itemize the tasks in billing or if you want to monitor track the amount of them in time reports preciselywork done on different tasks.
Choose Yes and click the Next -button.
At In this window you will need to write the basic information of the task:
...
Move forward by clicking the Next -button.
At In this window you are able to place the new task to a project.
...
Lets move forward by clicking the Next: Summary > -button.
Organization cost wizard
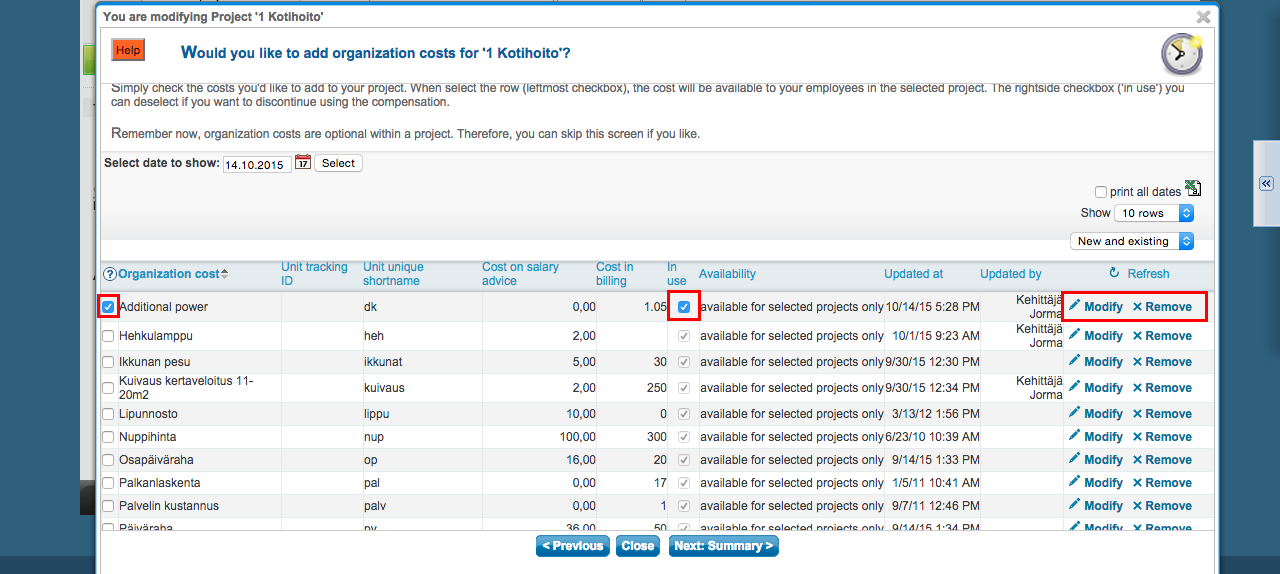
Now Here the wizard will offer a possibility to place organization costs to projects. Organization costs are running costs like , equipment costs or mileage coverage. The organization costs that are placed to projects can may be placed to entered in time reports reporting and they will go for example to payroll that waybe taken into account in various calculations like payroll.
Choose yes and move on.
...
Place organization costs to projects
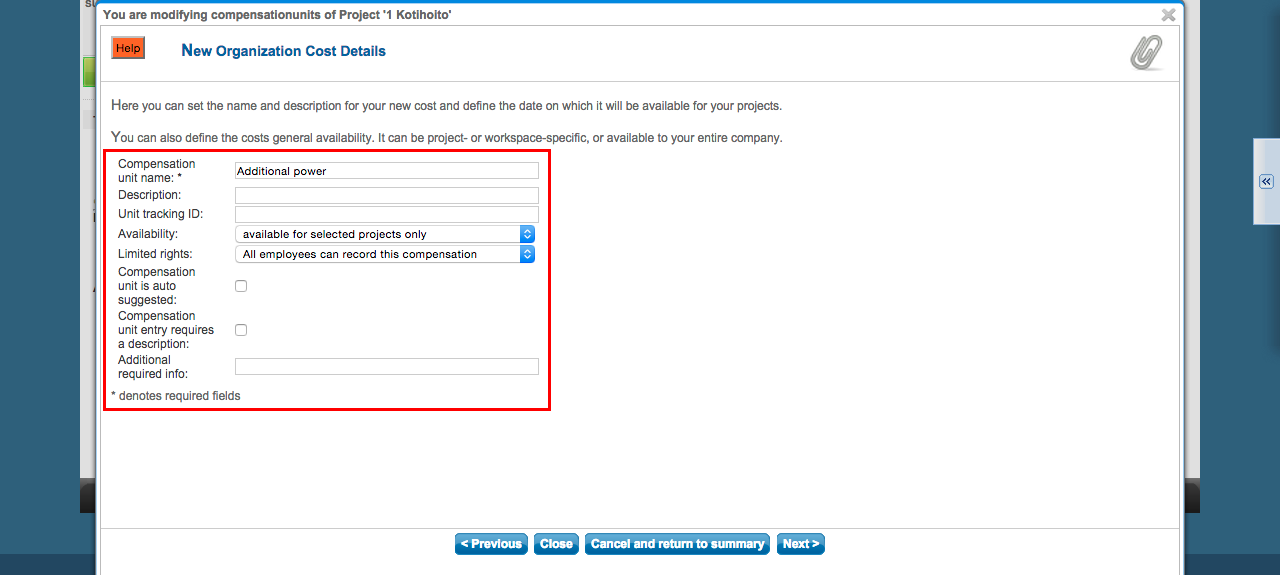
At this page you will need to write the basic information of the cost:
- Name of the compensation unit, which is required.
- Next you are able to may choose the availability of the cost. Lets leave it to the default now.
- Next choose who will be able record that compensation: is it for everyone or just for the supervisorall employees or only the supervisors. The cost can also be hidden for others than the supervisor.
- Choose whether the compensation unit is auto suggested or not.
- Lastly choose whether the to require a description for the compensation unit is requiredusage or not.
...
Employees to project -wizard
...
If the project has only one customer, you can select the customer in the "Project's customer"-field.
You can view all of the project's customers by clicking "Customers" in the "Projects organization and billable clients"-section.
...
First you must select a time period and desired employees. When these have been selected the "Select salary sheet" drop-down list will be updated to have the desired salary sheets. There you can choose a certain salary sheet.
...
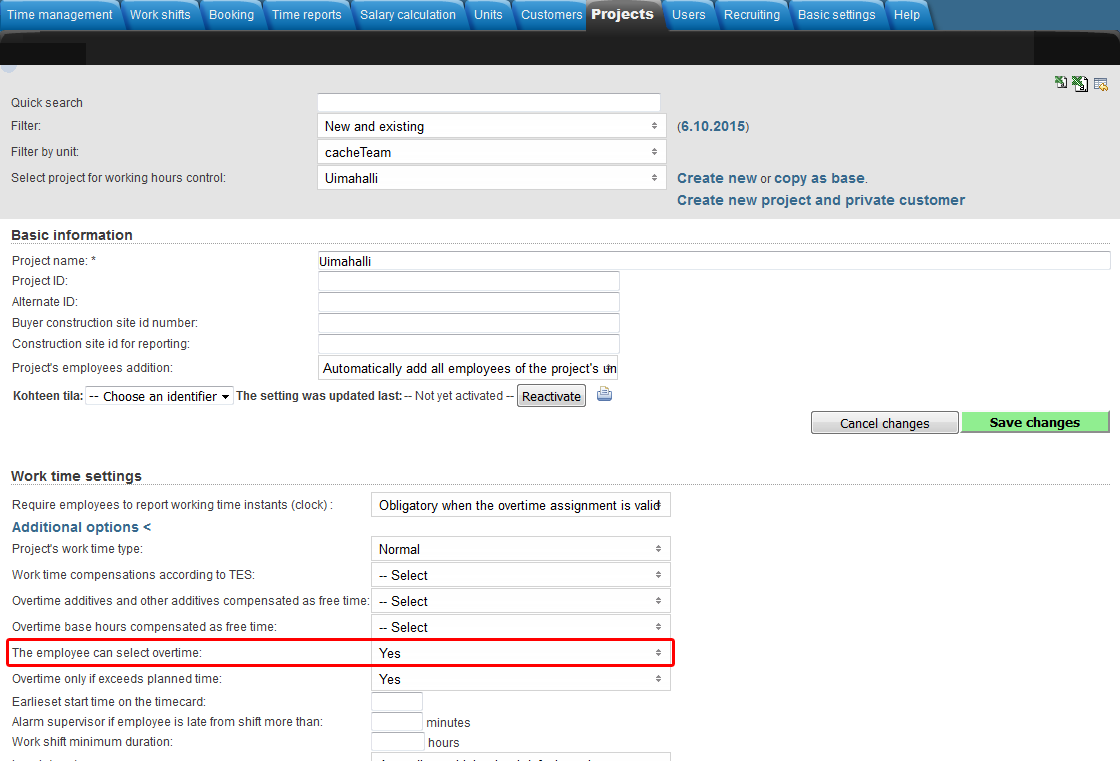
Adding an overtime assignment on the project level takes place in the Projects-tab.
Make sure that you have selected the desired project in the "Select project for working hours control"-drop-downlist.
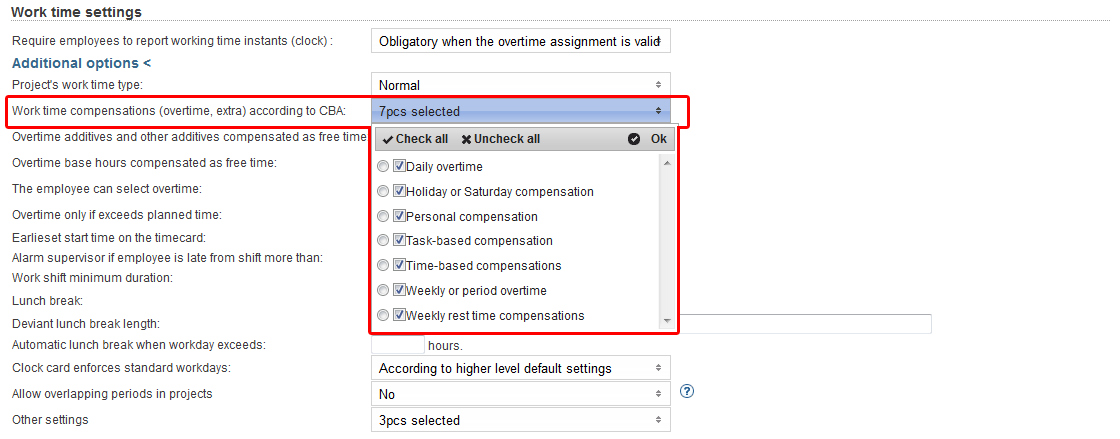
Overtime settings can be found in the "Work time settings"-section and clicking the "Additional options"-button.
You can select from "Work time compensations (overtime, extra) according to CBA" menu which overtimes and extras are going to be itemized in the time reports for payroll (Projects > Work time settings > Additional options).
From "Overtime additives and other additives compensated as free time" and "Overtime base hours compensated as free time" menus you can select which overtimes and extras will be compensated as free time.
A tooltip of each field can be viewed by hovering your mouse over the headings.
You can select "The employee can select overtime", which allows employees to set overtime assignments for themselves.
From "Other settings" menu, you can select the project work time decomposition setting to override possible employee work time decomposition settings.
...
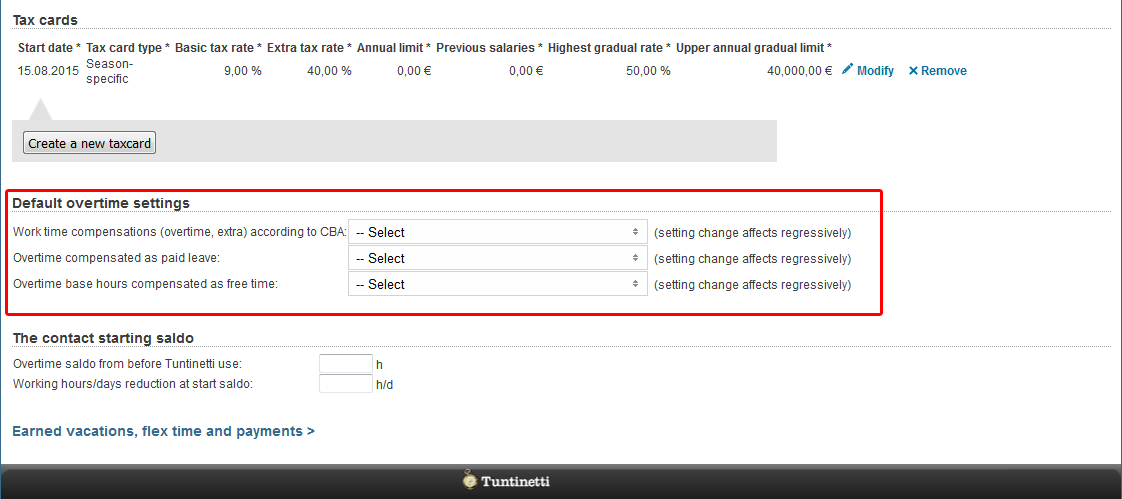
Adding an overtime assignment on the employee level takes place in the Users > Employees-tab.
Make sure that you have selected the desired employee in the "Select user to edit"-drop-downlist.
Default overtime settings can be found in the "Default overtime settings"-section.
You can select from "Work time compensations (overtime, extra) according to CBA" menu which overtimes and extras are going to be itemized in the time reports for payroll (Users > Employees > Default overtime settings).
From "Overtime additives and other additives compensated as free time" and "Overtime base hours compensated as free time" menus you can select which overtimes and extras will be compensated as free time.
A tooltip of each field can be viewed by hovering your mouse over the headings.
More information about overtime assignments can be found in the Overtime assignments-guide.
Pricing
Setting up a pricing for a project
...
