Time reporting
Time management > Time reporting
The following introduces time reporting and how to change between the different time reporting views. All employees can enter their daily working hours in Tuntinetti, and the program will do all the necessary classifications. The employees can also report expenses, such as mileage and daily allowances. Employees can enter their working hours under the Time reporting tab. Tuntinetti has three different possibilities for entering data, all specifically designed for different needs: a simple view (Times only), categorized view (Explanatory field) and a combination of the simple and categorized view (Mixed mode: multiple times and explanations).
There is also an instructional video on how to use the Time reporting at: Time reporting - Tuntinetti
Changing the view
There are three different time reporting views in Tuntinetti: simple view, categorized view and combination of the simple and categorized view. They all serve different needs. The simple view is best suited for basic working hour tracking that is suitable for those who mainly work in one location. The categorized view with a start clock is suitable for work that is client specific or mobile. The combined view is also suitable for client specific or mobile work.
You can choose suitable view for each employee from the "Employee settings" page in the "Users" tab. The time recording view can be selected from the "Select employee's view" menu in the "User interface settings" section of the employees page.
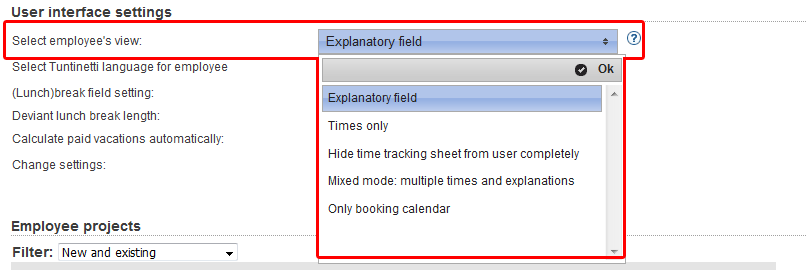
If the "Quick-Start Guide" link is visible at the top of the screen, you can change the view also from the links in there.
Simple view
Recording work hours
- Time reporting#Make sure that the salary time period is correct
- Time reporting#Select the project you have been working for
Time reporting#Enter the start and end time of your lunch break
- Time reporting#Add the possible expenses and notes
Time reporting#Check whether the hours are recorded correctly
- Time reporting#Save the data
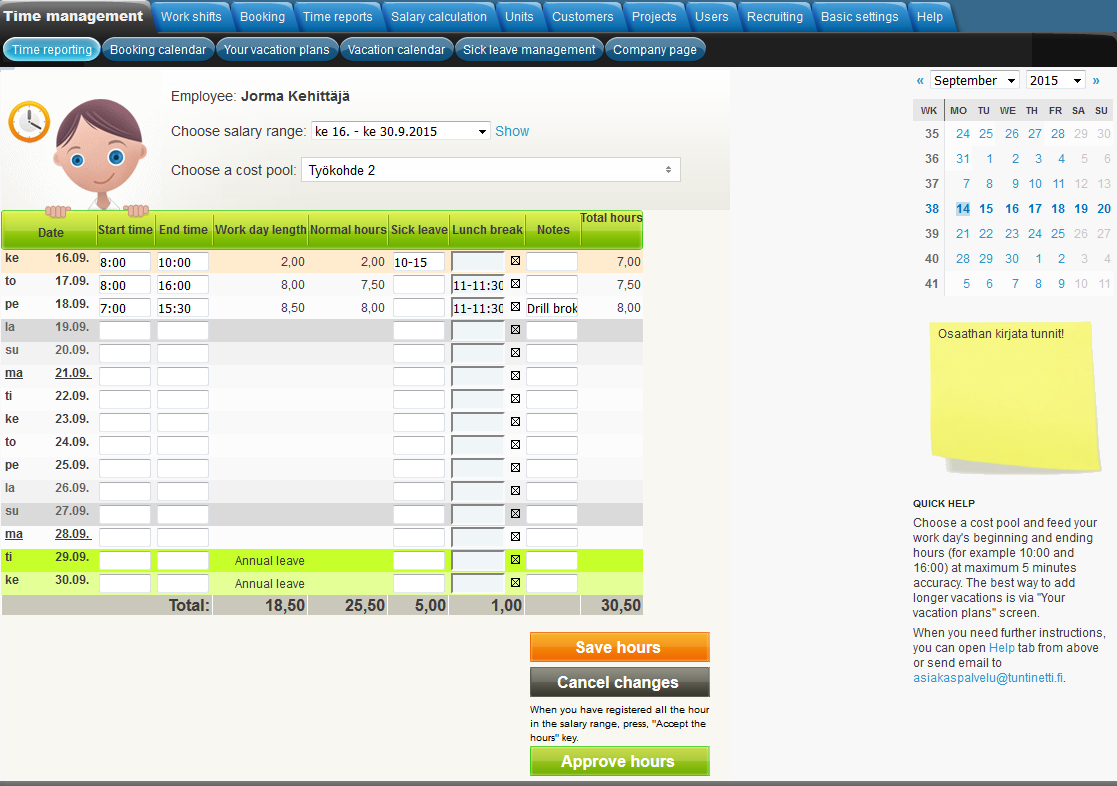
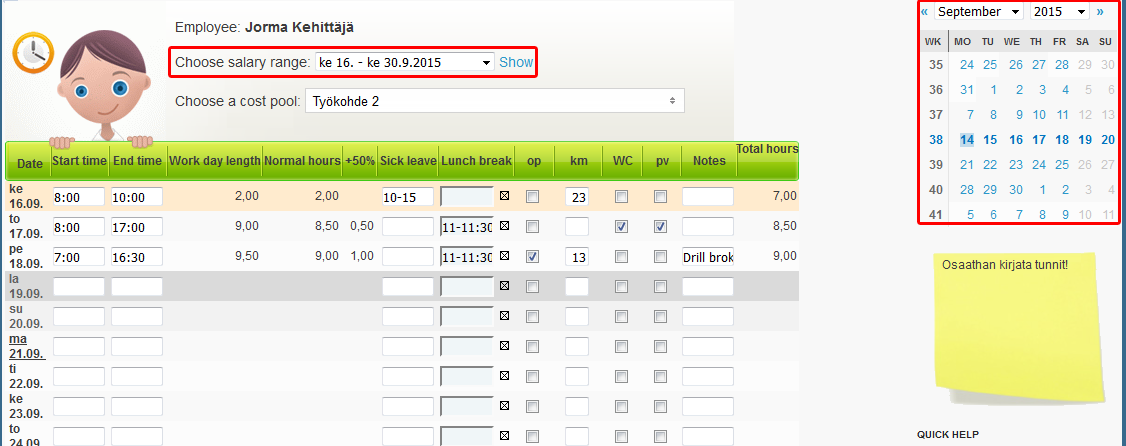
Make sure that the salary time period is correct
Make sure that the salary time period is correct.
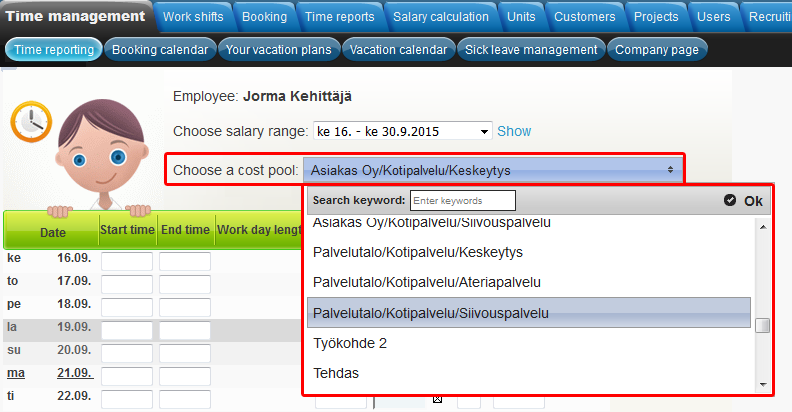
Select the project you have been working for
Project can be selected, from the "Choose a cost pool" menu.
Enter the start and end time
The program will also give suggestions.
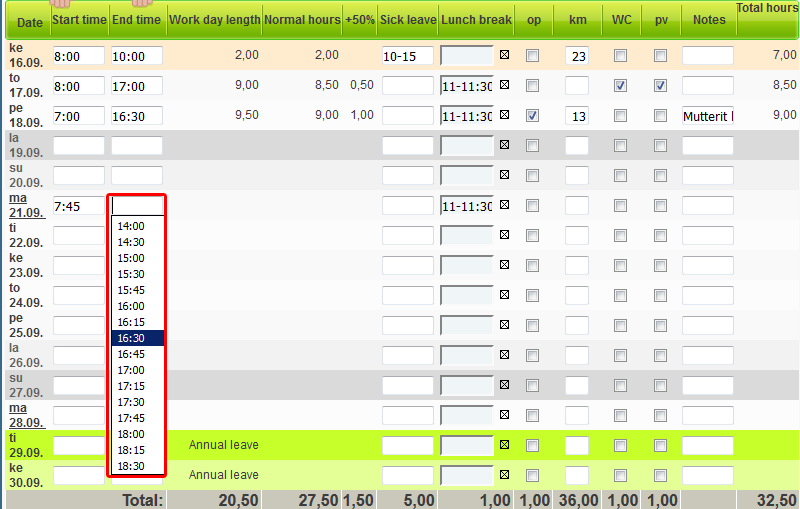
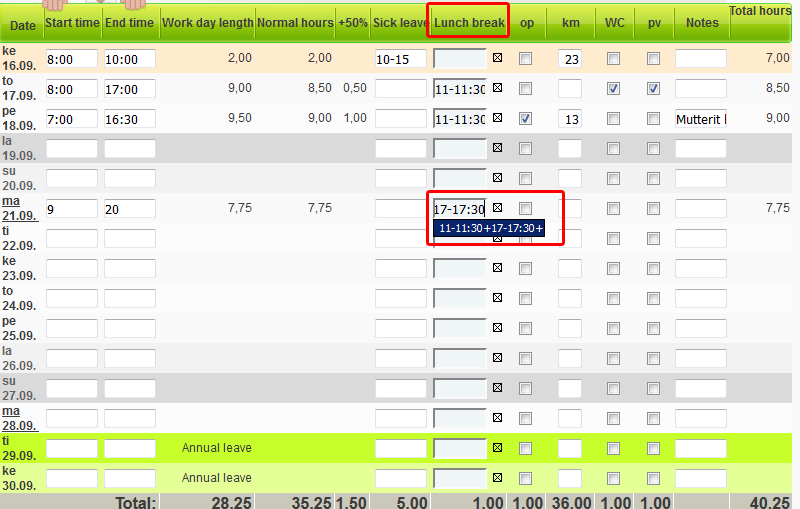
Enter the start and end time of your lunch break
You can use a plus sign when you want to enter two separate meal breaks. Lunch break can be marked, either as time of day, e.g. 11-11:30 or as hours and minutes, e.g. 0:30, whereupon the program changes it automatically into a time of day. The system also suggests options to choose from. Lunch break field can be cleared with icon.
icon.
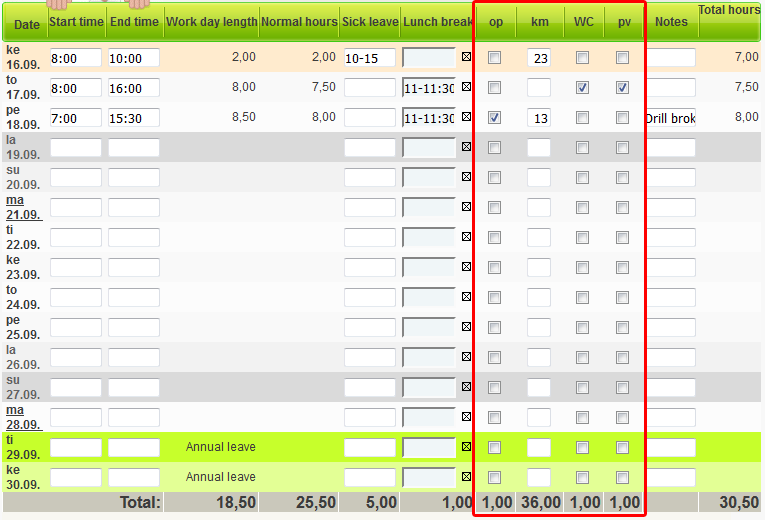
Add the possible expenses and notes
Possible expenses can be added also in the simple view, if expenses has been set for the project.
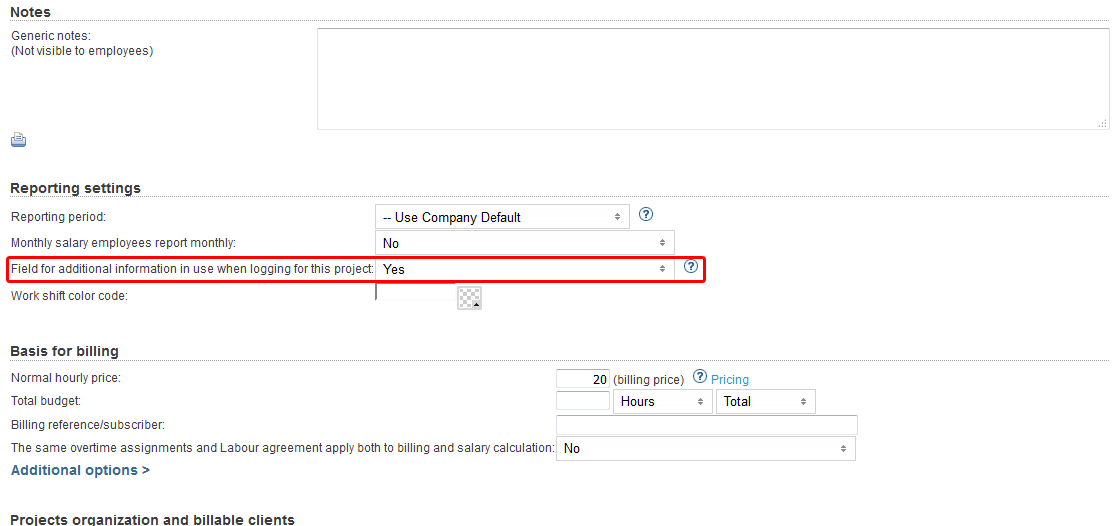
Depending on project's settings, you can write additional information concerning the project in the "Notes" text fields. "Notes" field can be activated from "Field for additional information in use when logging for this project" menu in the "Reporting settings" section of the "Projects" tab.
Check whether the hours are recorded correctly
Changes can be cancelled by pressing "Cancel changes" button. This is useful especially when there are many errors and you do not want to delete them one by one.
Save the data
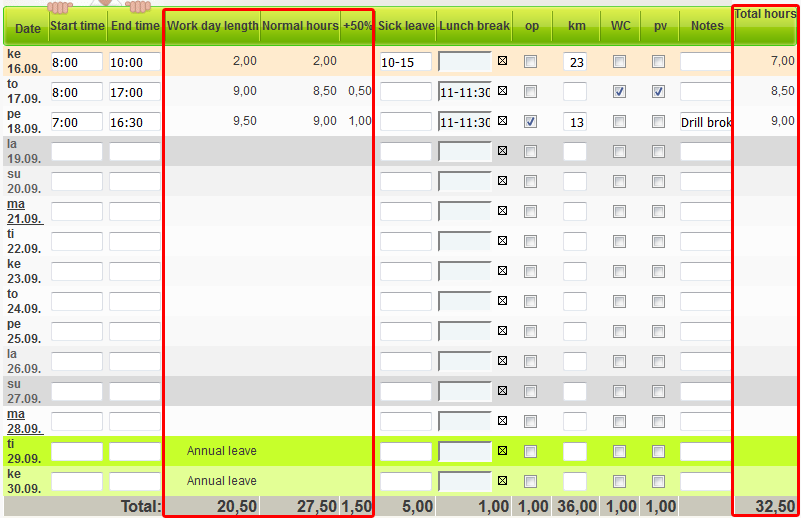
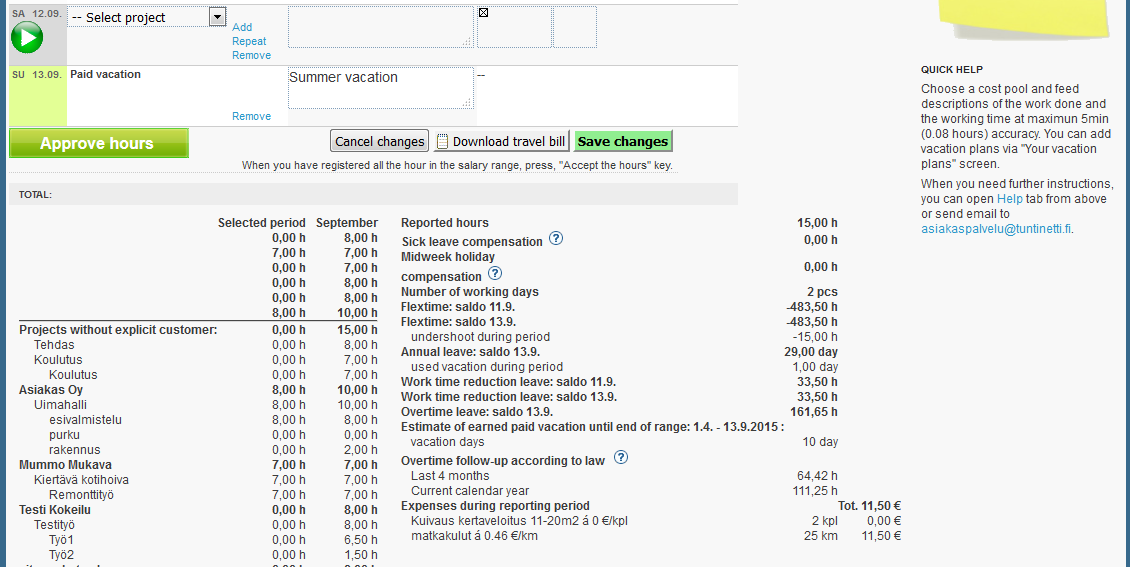
Save the data by pressing "Save hours" button. The system notify you that the data was saved successfully. Now you can see the salary period's total work time in "Total" row. The daily work time total is now displayed on the "Total hours" column. Possible overtimes are also itemized.
Other features
Adding sick leave
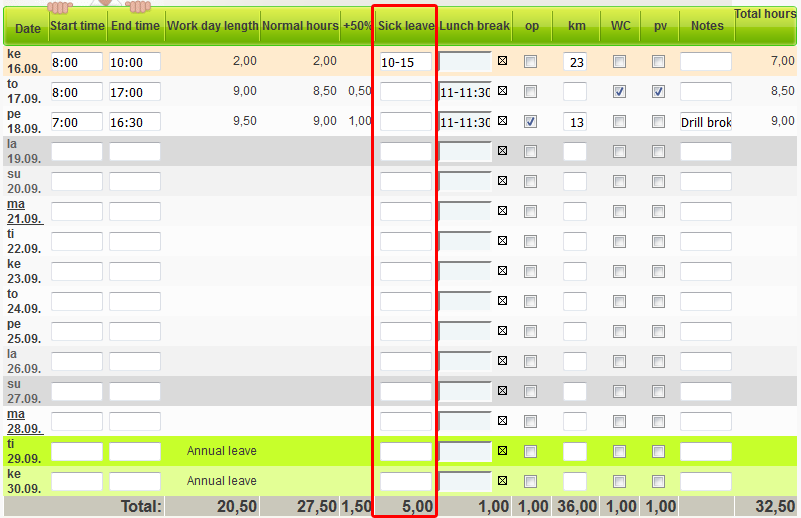
Sick leave can be added in the "Sick leave" text field. Remember also to record the work hours, if you have been sick just part of the day.
Approving hours
If "Employees will approve hours" setting (Basic settings > Company's basic information) has been enabled, employee can approve work hours by pressing the "Approve hours" button. By approving the hours your supervisor will know you are ready recording period hours. Approving the hours locks all the hours on the salary range and prevents you from changing them.
Compensation leave and overtime work day
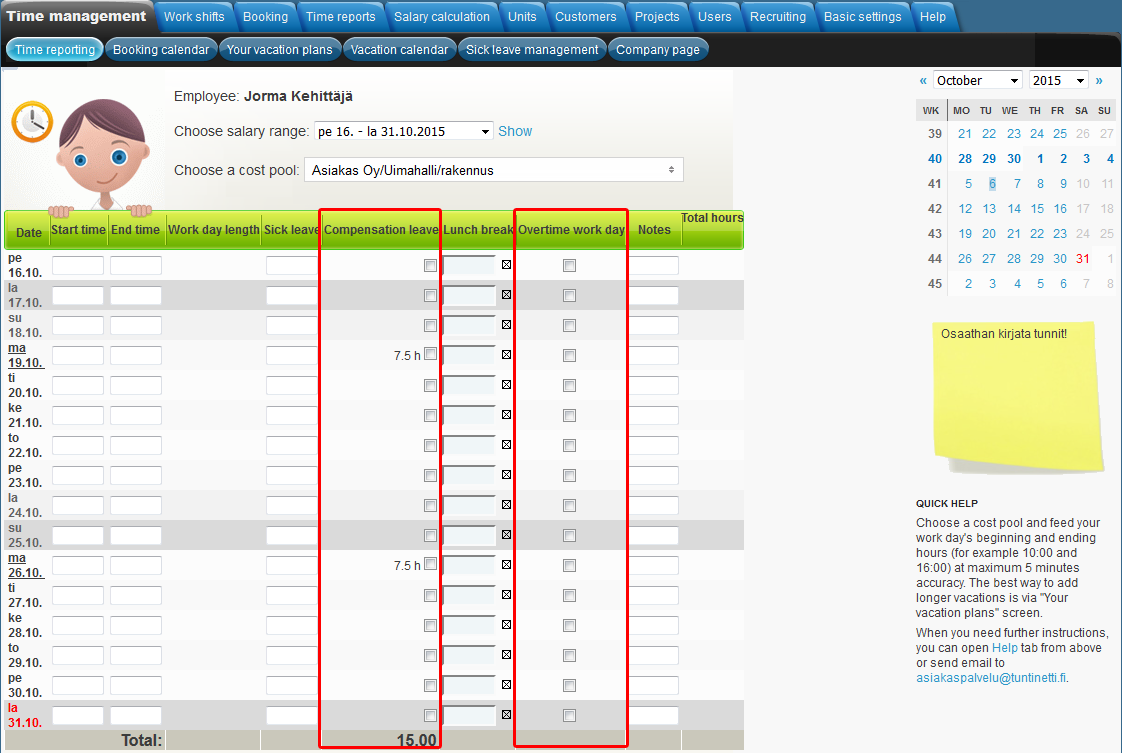
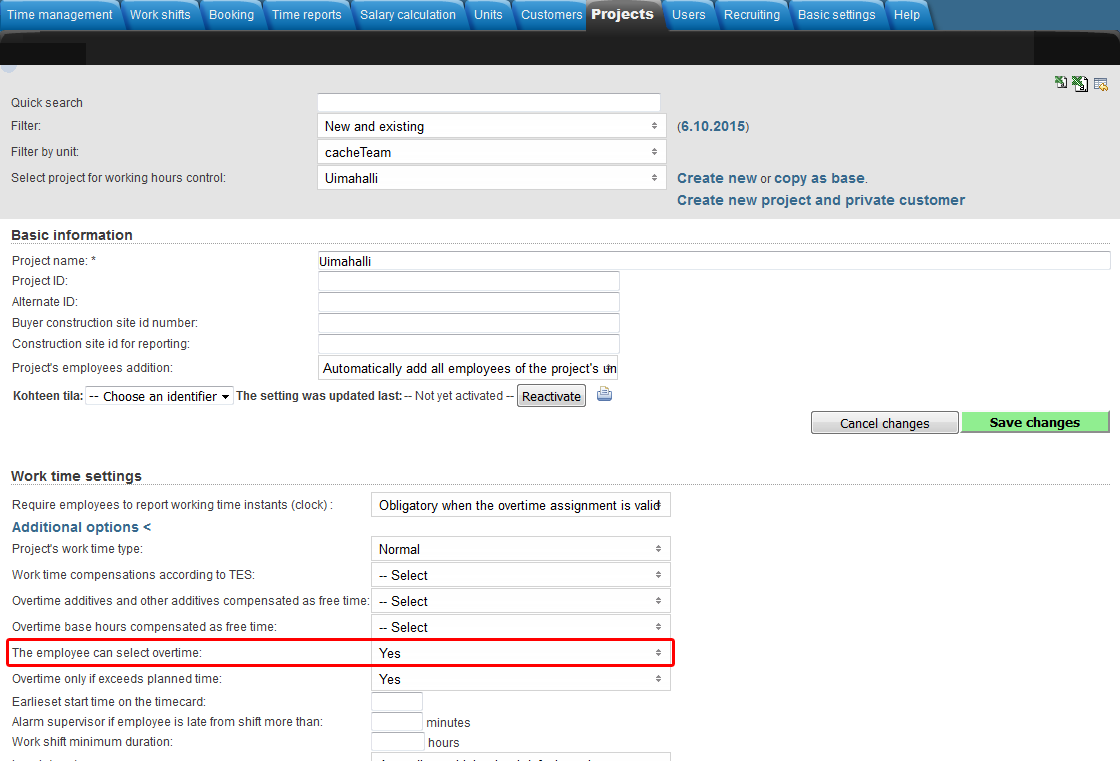
If "The employee can select overtime" option is activated in the "Additional options" of the "Work time settings" in the "Projects" tab, "Overtime work day" column will be visible on the time reporting view. You can then select a checkbox, if the work day was agreed to be done as overtime. (Projects > Work time settings >Additional options > "The employee can select overtime")
"Compensation leave" column will be displayed, if employee has a labour agreement that has the "The worktime compensation leave is a paid leave" option selected in the "Other options". You can then select the checkbox in the "Compensation leave" column, if you have had a compensation leave.
Categorized view
Recording work hours
- Time reporting#Make sure that the shown time period is correct
- Time reporting#Choose a day and then choose the project you have been working for
- Time reporting#Detail the day's tasks according to the starting and ending times, not including the lunch break
- Time reporting#Add the possible expenses and notes
- Time reporting#Enter the lunch break
- Time reporting#If necessary, you can also add another project for the same day
- Time reporting#Save the data
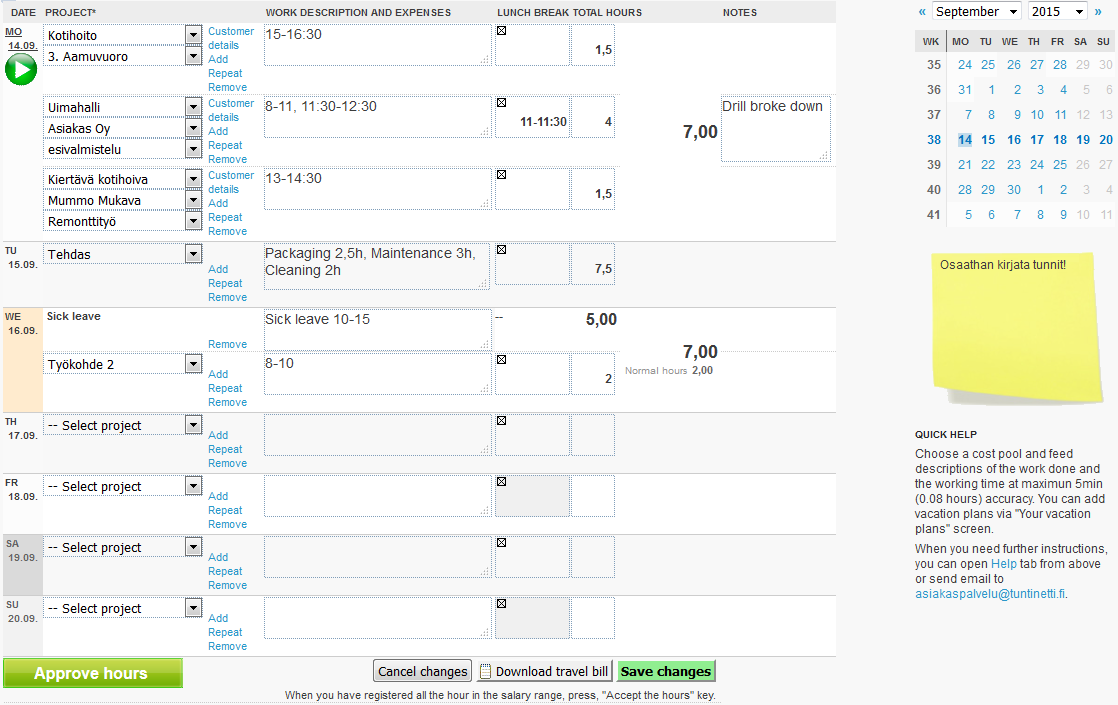
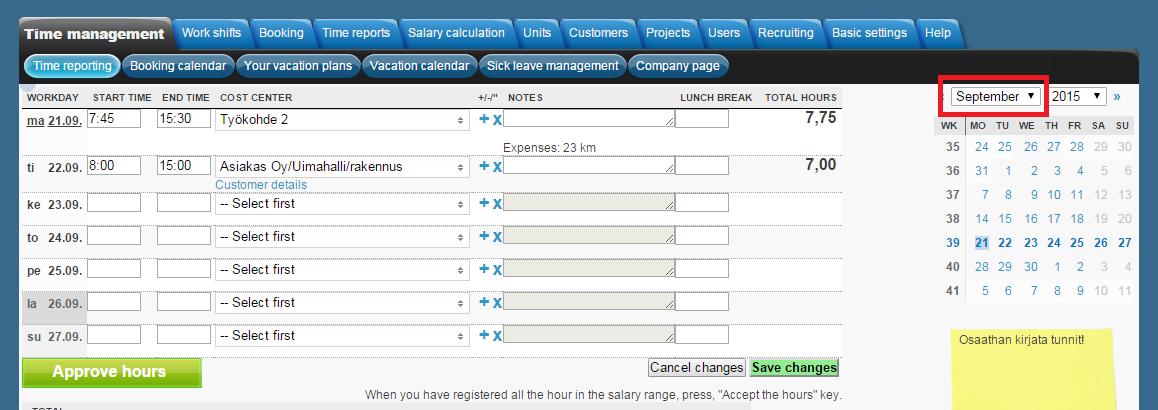
Make sure that the shown time period is correct
You can select a different week by clicking the calendar or month and year from the menus.

Choose a day and then choose the project you have been working for
Project can be selected, from the "Select project" menu in the "PROJECT" column. If customers and tasks have been assigned for the project, you can select a customer and a task from the "Select customer" and "Select task" menus, that appear under the selected project. As a default, the system suggests the project that has recently been most active (unless there is only one choice).
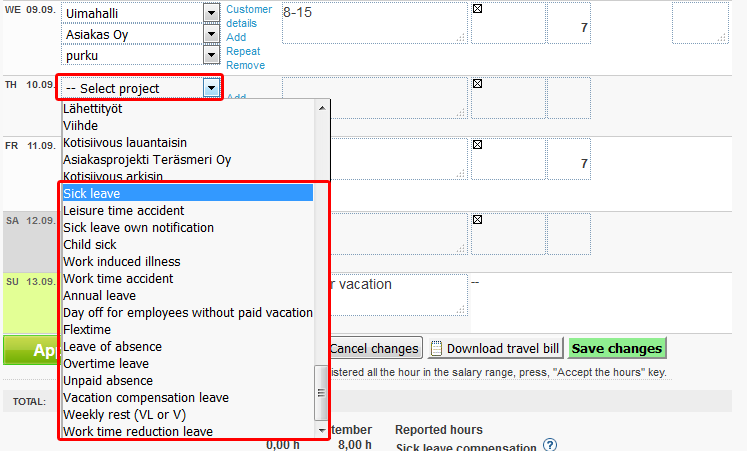
Besides project, you can also select an absence, such as sick leave, from the "Select project" menu.
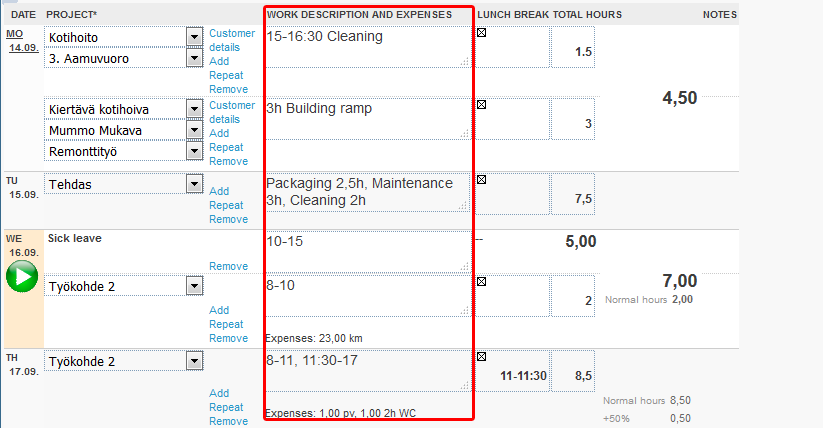
Detail the day's tasks according to the starting and ending times, not including the lunch break
Work hours are recorded in the "WORK DESCRIPTION AND EXPENSES" fields. Do not include the lunch break, Tuntinetti calculates it automatically. For example: "8-11:30 window cleaning. 12-14 vacuuming". You can also choose to enter the amount of hours, either by using a decimal ("window cleaning 3,5h") or by using a colon ("window cleaning 3:30").
It is not necessarily obligatory to enter the times in the description field for all projects. In such a case a simple verbal description is sufficient. The setting is activated separately for each project. The settings can be changed from "Work time settings" section in the "Projects" tab. After entering the data, system automatically calculates the total working time in the "TOTAL HOURS" field.The day's hour total will be displayed at most 5 minutes or 0,08 hours (or 0:05) accuracy.
If a work shift spans over such a time range that clocks are adjusted due to daylight saving time, start and end times of the work shift are always expressed in the current time of the moment. E.g. if the work shift starts saturday night at 22 o'clock, ends sunday morning 6 o'clock and clocks are adjusted one hour backward during the shift, one would simply input 22-6 and Tuntinetti will automatically calculate the length of the shift, 9 hours. The only exception occurs when the shift starts in summer time and ends between 3:00 and 4:00 normal time. For example, a 7 hour shift from 21:30 to 03:30 is expressed as 21:30-03, 03-03:30. Description 21:30-03:30 means the work shift also ended in summer time and thus its length would be 6 hours. If the shift ends at 04:00 daylight saving time or 03:00 normal time, the end time should be set to 04.
Add the possible expenses and notes
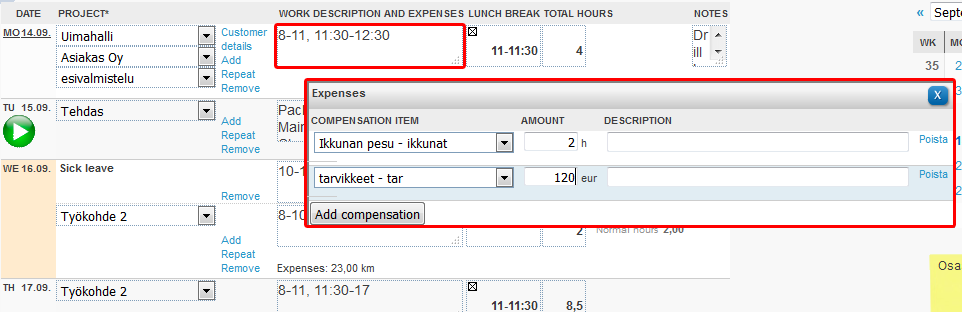
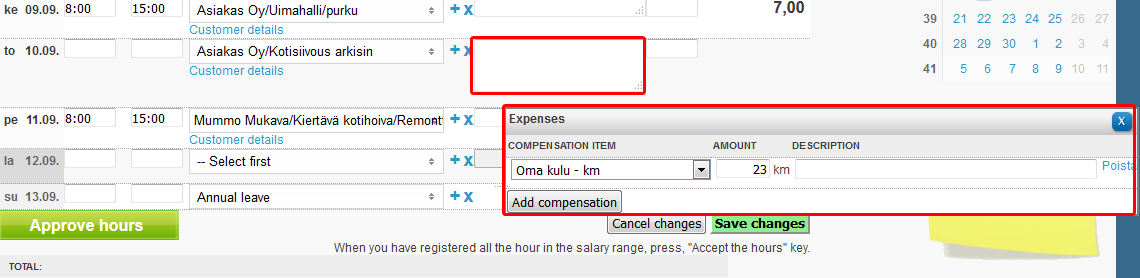
It is possible to make compensation entries for some projects. You can record expenses either among the work hours in "WORK DESCRIPTON AND EXPENSES" field or choose from selection list.You can open the "Expenses" window, by clicking "WORK DESCRIPTION AND EXPENSES" field. New expenses can be added, by pressing "Add compensation" button in the "Espenses" window. Select compensation item from the "Choose compensation type" menu. In that menu you can find all of the compensation types that can be added for the selected project. After you have entered all the compensations and information for them, you can just close the window and the data will be saved automatically.
Expenses can be written among the work hours, if the project has these expenses in use. If the expenses have been given short names like day or km, these short names are used to write the expenses straight amongst the work hours.
Expanses become visible on the "WORK DESCRIPTION AND EXPENSES" column after you save the changes with "Save changes" button.
Depending on project's settings, notes regarding the project can be added in the "NOTES" text field. "Notes" field can be activated from "Field for additional information in use when logging for this project" menu in the "Reporting settings" section of the "Projects" tab.
Enter the lunch break
In this view, entering the lunch break is optional. The program can calculate it based on the entered working hours.
If necessary, you can also add another project for the same day
To add another project, click "Add" link. New menu appears below the previous project.
Save the data
Save the information, by pressing "Save changes" button. The program will let you know that the data was successfully saved. The program will count the working hours.
Other features
Adding absence
Absence can be added from "Select project" menu in the "PROJECT" column.
Work time tracking (Play-Pause button)
You can start work time tracking by pressing the green start-button. After you activate the time tracking, the button transforms into stop-button. Use the stop-button to stop the work time tracking.
- Press the green start-button
- "Choose action" window opens
- Select project from the "Select project" menu
- Also select possible customer and task
- Start the recording with "Stamp in" button
- Start-button changes into stop-button
- After you are finished working, press the orange stop-button
- "Choose action" window opens
- Stop the recording with the "Stamp out" button
- Recorded work time now appears in the "WORK DESCRIPTION AND EXPENSES" field
![]()
Customer details
Customer's information can be examined from the "Customer details" link next to the project. If street address has been set for the customer, you can view customer's location on a map with the map-button in the customer details. If there are several projects for one day, they are all displayed on the map and also driving instructions between them.

Travel bill
Travel bill can be downloaded by pressing the "Download travel bill" button and filling the needed information. "Download travel bill" button opens new window, where you can choose a time period for the travel expenses. New window opens when you press "Ok" button and you can check the correspondence of the heading fields and the expenses categories on the travel bill and enter new headings for the expense types. From this window you can download the travel bill with "Save and download" button.

Approving hours
If "Employees will approve hours" setting (Basic settings > Company's basic information) has been enabled, employee can approve work hours by pressing the "Approve hours" button. By approving the hours your supervisor will know you are ready recording period hours. Approving the hours locks all the hours on the salary range and prevents you from changing them.
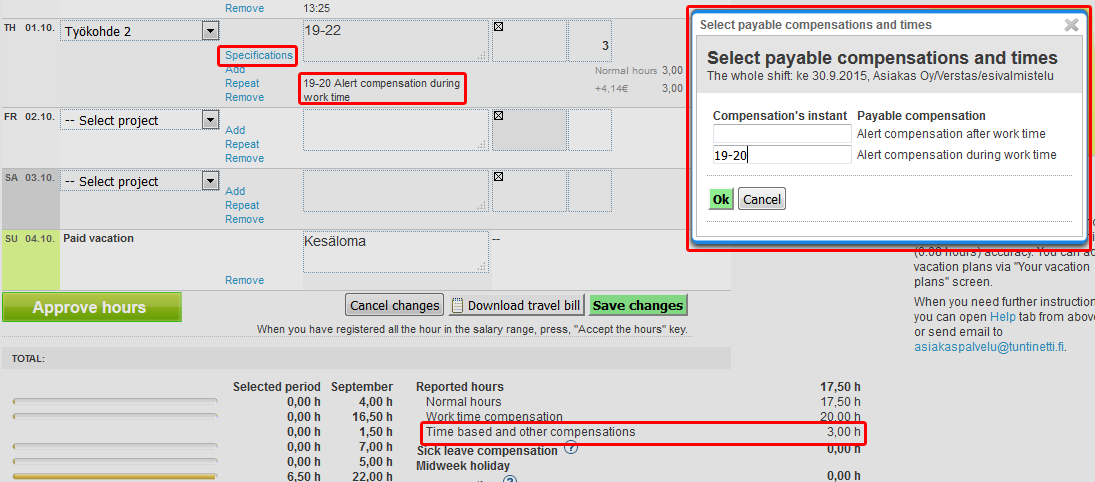
Specifications
Possibility to set specifications in the time reports, can be switched on, if needed. These are related to manual work time compensation types in the labour agreements. Please contact customer service, if you have need for the specifications.
Shortlist
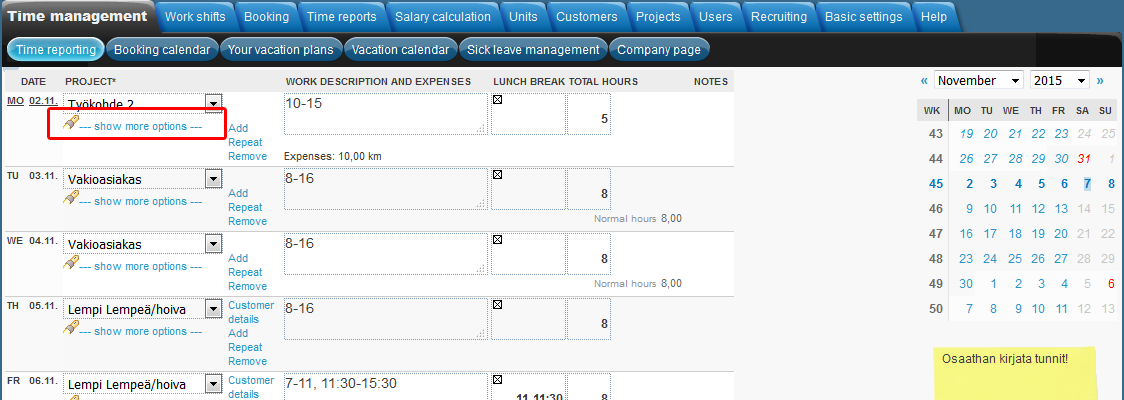
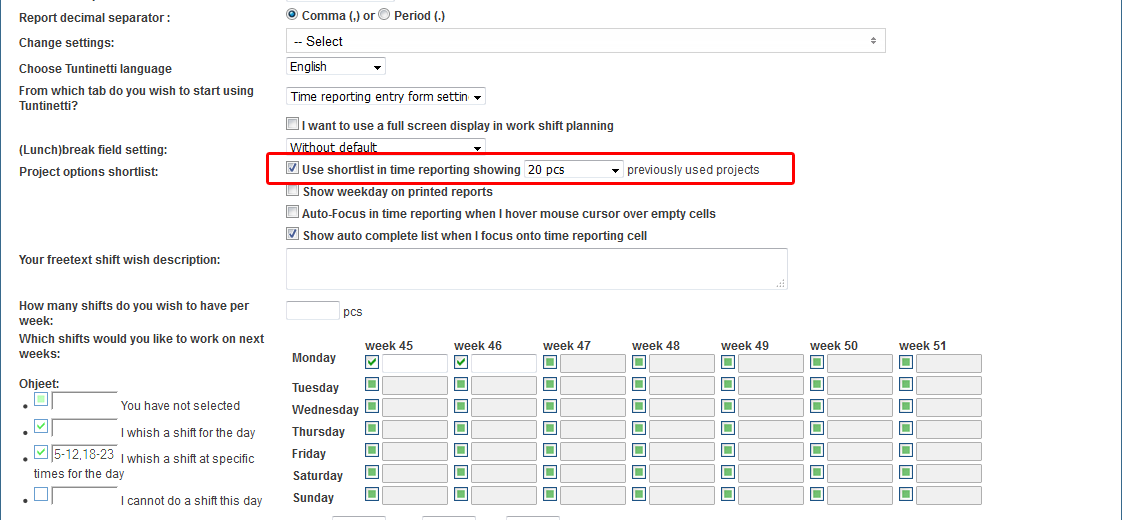
You can activate "show more options" shortlist from your basic settings. (Basic settings > My settings > "Use shortlist in time reporting showing"). Turn it on by selecting the checkbox and set how many previously used projects you want there to be displayed. Shortlist won't be displayed, if there are fewer projects than the amount you set to be displayed.
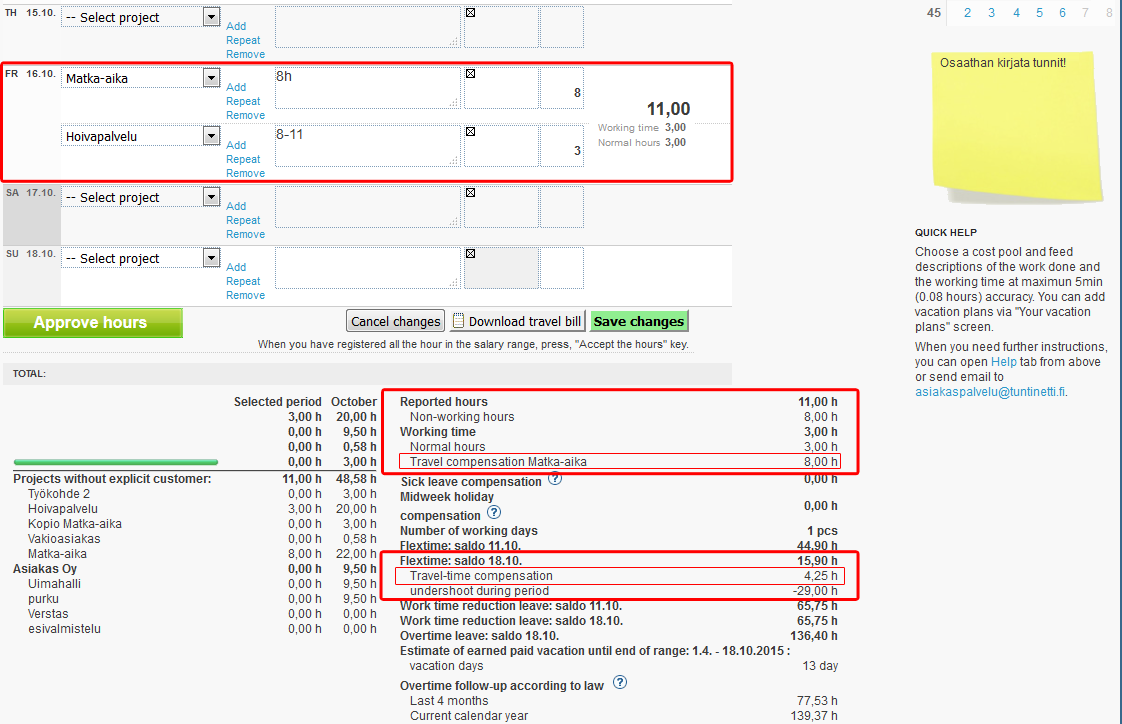
Travel-time compensation
If you are using labour agreement, that has "Travel time compensates flex time up to standard hours" option selected in the "Other options" menu, part of the work day can be used for traveling without reducing it from the flextime. Travel compensation information will be displayed in the work hours itemization in the time reporting and time reports.
For example, if regular work day is 7,25h/day and employee works 3h and travels 8h, then he or she gets 4,25h travel-time compensation.
Combination of the simple and categorized view

Recording work hours
Time reporting#Make sure that the shown time period is correct
Time reporting#If necessary, you can also add more projects for the same day
Make sure that the shown time period is correct
Time period of the view can be changed from the calendar.
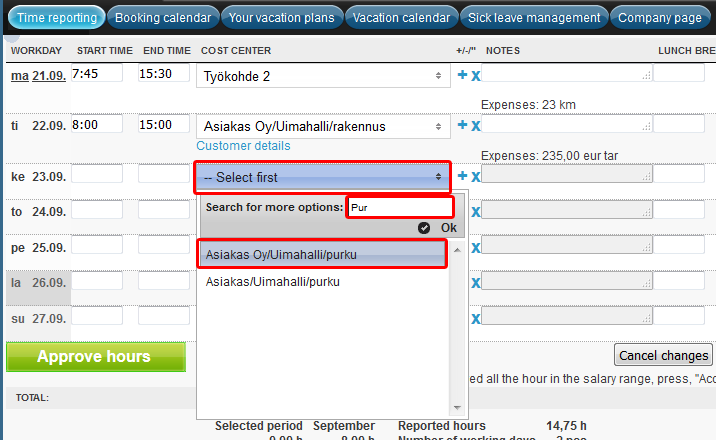
Select project
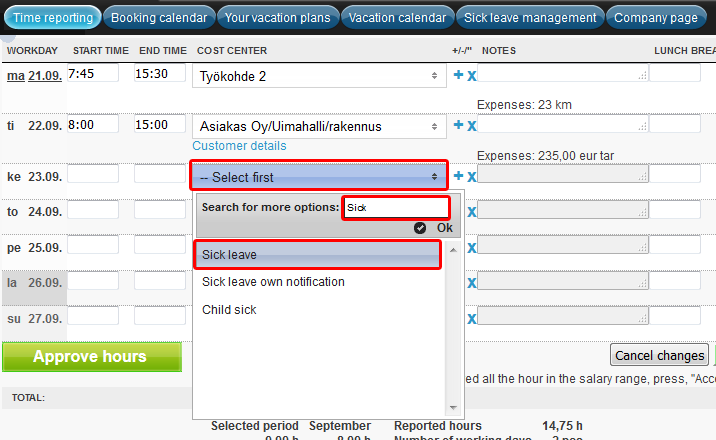
Select project from the "Select first" menu on the "COST CENTER" column under the day you want. When you start to write in the "Search for more options" text field, program offers list of options based on the search word(s). As a default, the system suggests the project that has recently been most active (unless there is only one choice).
Set start and end time
The program will also give suggestions.
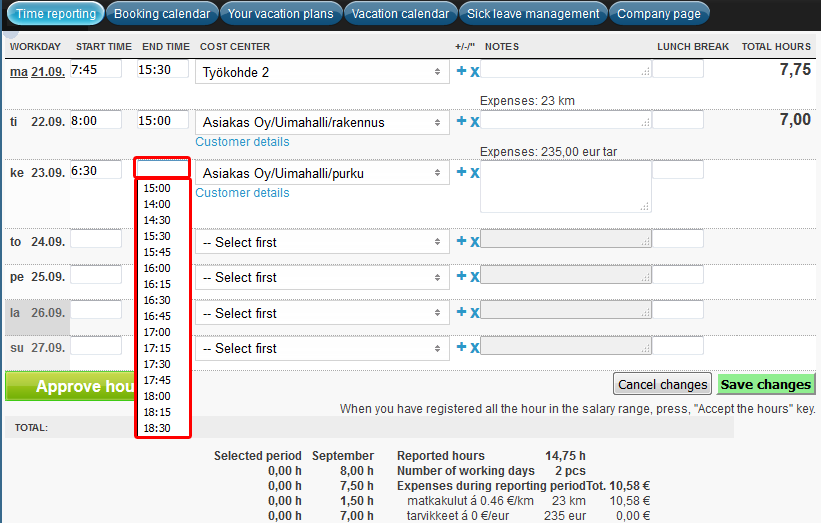
Write down the time of the lunch break
You can use a plus sign when you want to enter two separate meal breaks. Lunch break can be marked, either as time of day, e.g. 11-11:30 or as hours and minutes, e.g. 0:30, whereupon the program changes it automatically into a time of day.
Add the possible notes and expenses
It is possible to make compensation entries for some projects, by clicking "NOTES" field to open the "Expenses" window. New expenses can be added, by pressing "Add compensation" button in the "Espenses" window. Select compensation item from the "Choose compensation type" menu. In that menu you can find all of the compensation types that can be added for the selected project. After you have entered all the compensations and information for them, you can just close the window and the data will be saved automatically. Expanses become visible on the "NOTES" column after you save the changes with "Save changes" button.
Depending on project's settings, notes regarding the project can be added in the "NOTES" text field. "Notes" field can be activated from "Field for additional information in use when logging for this project" menu in the "Reporting settings" section of the "Projects" tab.
If necessary, you can also add more projects for the same day
Add more projects for the same day with the '+' sign.
Save the data
Save data by pressing "Save changes" button. Itemization of the work hours and expenses are displayed below the save button.
Other features
Adding absence
Absence, like sick leave, can be added from the same menu as the projects. When you start to write in the "Search for more options" text field, program offers list of options based on the search word(s).
Approving hours
If "Employees will approve hours" setting (Basic settings > Company's basic information) has been enabled, employee can approve work hours by pressing the "Approve hours" button. By approving the hours your supervisor will know you are ready recording period hours. Approving the hours locks all the hours on the salary range and prevents you from changing them.
Retrieving work shift prints
You are able to retrieve work shift prints in the Work shifts tab's sub tab Work shift prints. Follow next steps to retrieve work shift prints:
- Selecting time range
- Time reporting#Filtering
- Time reporting#Choosing work shifts
- Time reporting#Grouping shift lists
- Downloading or printing shift lists
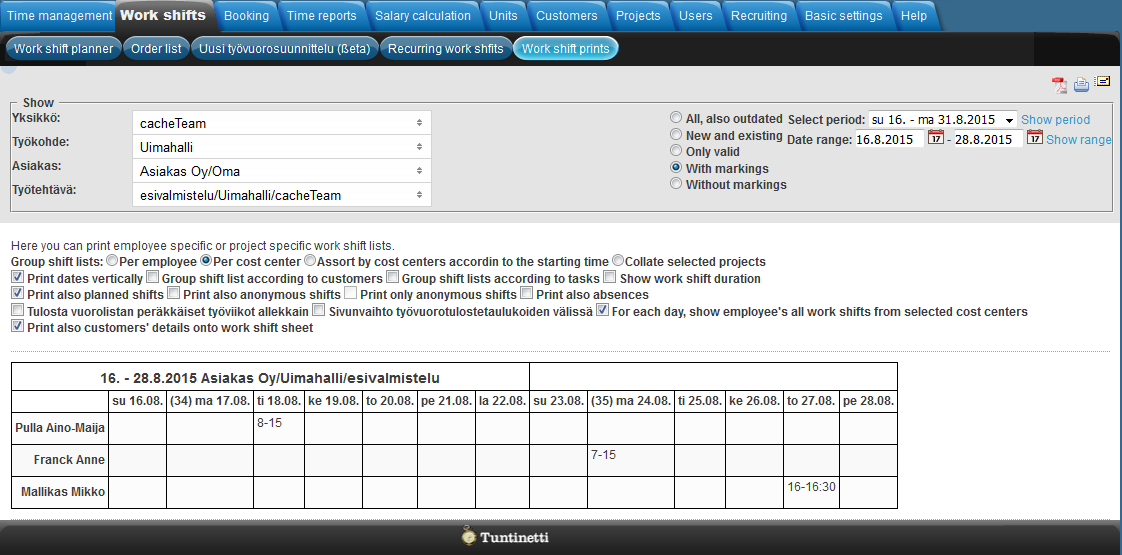
Selecting time range or period
Choose first, which date range or period you want to be listed. Remember to press "Show period" or "Show range" button to confirm the settings.
Filtering
You can filter selectable shifts also according to the validity and activity of the projects and employees.
- All, also outdated
- New and existing
- Only valid
- With markings
- Without markings
Choosing work shifts
Select from the Unit, Project, Customer and Tasks menus what work shifts you want to be shown. If Customer or Tasks menu isn't visible, there might not be suitable options in these menus' and therefore Date range or period needs to be broadened. Also Customer and Tasks menus won't show up, if there isn't any customers and tasks defined for the selected project.
Grouping shift lists
Group shift lists:
- Per employee
- The work shifts and projects to table
- Per cost center
- Project's employees and their work shifts to table
- Assort by cost centers according to the starting time
- Collate selected projects
- One combined table, with all the projects and their employees
More options:
- Print dates vertically
- This turns all dates in the table horizontally and employees, projects, etc. vertically
- Group shift list according to customers
- If the tables have been selected to be formed according to work shifts or their starting time, they can be further divided by customers, tasks or both
- Group shift lists according to tasks
- If the tables have been selected to be formed according to work shifts or their starting time, they can be further divided by customers, tasks or both
- Show work shift duration
- Select this to display also the work shift lenghts (in hours) in addition to the time of day
- Print also planned shifts
- With this option, the tables show also the shifts that have not yet been confirmed
- Print also anonymous shifts
- If "Print also planned shifts" is selected, you can select this to make also the anonymous (no employees marked for them yet) shifts visible. "(nimettömät vuorot)" is displayed as the employee of these shifts.
- Print only anonymous shifts
- If "Print also planned shifts" and "Print also anonymous shifts" are selected, you can select this to show only the anonymous shifts
- Print also absences
- Select this, to show also the shifts, even if the employee is absent. In this case, the reason for the absence is marked instead of the work time
- Print consecutive weeks below each other
- With this selection, you can structure the tables to have shift lists successive weeks one below another
- With this selection, you can structure the tables to have shift lists successive weeks one below another
- Print each work shift table onto its own page
- Select this to print every work shift list to separate sheet, as far as they each fit into one sheet of paper
- Select this to print every work shift list to separate sheet, as far as they each fit into one sheet of paper
- For each day, show employee's all work shifts from selected cost centers
- This can help, for example, to find free employees when looking for substitutes
- Print also customers' details onto work shift sheet
- Select this, to show additional information about the customers in the table, typically customer addresses
Downloading, printing and sending shift lists
Download:
Work shift lists can be downloaded in PDF format with the PDF-button ( ).
).
Print:
Work shift lists can be opened to new window for printing with the print-button ( ).
).
Send:
With message-button ( ), you can open a window from where you can send shift lists via e-mail. A list of employees, that the shift list concerns, and their e-mail addresses are displayed in the window. You can change the e-mail addresses, if needed, and select with the checkboxes, to which addresses the shift lists will be sent. In "Email a copy also to the following addresses" text field, you can write other e-mail addresses, separated by commas. If you want, you can attach an informal message with the e-mail, by writing the message in the "Accompanying message" text field. Lastly press "Confirm and send" button to send shift lists and the message.
Needing guidance or training? Give us a call +358-(0)9-6898 8221. |
||
Technical support +358-(0)9-6898 8222 tuki@tuntinetti.fi |
Sales services +358-(0)9-6898 8221 myynti@tuntinetti.fi |
|