Billing reports by customer
Time reports > Billing reports by customer
The following explains how to examine, compose and download billing reports by customer. You can compose billing reports that show the worked hours. If projects are paired with clients, and the entered hours are client specific, you can also view client specific reports. You can then print the reports and send them with the bill.
There is also a demo video on how to use Billing reports by customer: Billing reports by customer - Tuntinetti
Finding reports
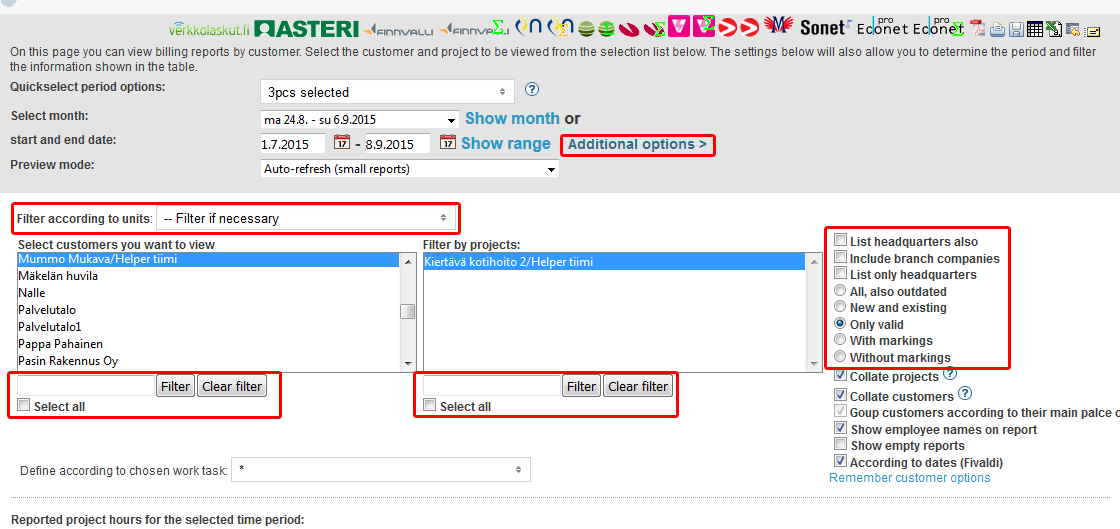
Selecting month or time frame
First select month or time frame you would like to see. Depending on preview mode, chosen month/start and end date will refresh automatically or you have to press "Show month" or "Show range".

Use "Quickselect period options" to change the periods available in "Select month" menu:
- Every second week from the start of the year
- Monthly
- Twice a month
There are three different preview modes:
- Auto-refresh (small reports)
- Refresh on-demand from show-button (larger reports, filtering)
- No preview, download only (data transfer etc. mass actions)
Filtering customers and projects
Customers and projects can be filtered by:
- Filter according to units menu
- Word filter
- Filter settings (You can see more detailed information by moving mouse pointer over the names):
- All, also outdated
- New and existing
- Only valid
- With markings
- Without markings
More filtering options can be found in the Additional options menu.
Headquarters
The way headquarters are shown on the list of customers can be changed with the following selections:
- List headquarters also
- Include branch companies
- List only headquarters
Provided that "Include branch companies" and "Collate customers" are selected, customers can be collated according to headquarters with selecting "Group customers according to their main place of business".
Additional options
More ways to sort and filter data shown in the reports, can be found in the Additional options menu. Additional options offer versatile possibilities to modify reports to suit your needs.
- According to payment date
- You can filter reports according to payment date by choosing first the time frame and pressing then "Show"
- Supervisor
- Approval status
- State of billing
- Show profitability charts also in downloadable prints (checkbox)
Additional feature Profitability reports must be enabled
Basic settings > Tuntinetti's paid features > Profitability charts checkbox
- Show all time profit charts (checkbox)
- You can choose whether you want to display all time profit charts at the end of the reports
Additional feature Profitability charts must be enabled
Basic settings > Tuntinetti's paid features > Profitability charts checkbox
- You can choose whether you want to display all time profit charts at the end of the reports
- Show entry warnings
- Group into detailed report (
 )
)Project
Client
Task
Employee
- Show daily compensation units
- You can choose whether you want the daily compensation units to be displayed together or in their own separate columns
- Billing prices
- Choose whether you want to see the billing prices only in summaries or also in the hour entries or not at all
- Show statistics in multidimensional reports ()
- Hide statistics
- Show only for valid work shifts
- Show for all work shifts
- Show project budget on multidimensional reports () (checkbox)
- Show total cost on multidimensional reports ()
- Show average billing prices also in printed reports (checkbox)
- Show price to salary ratio even when not rational price (checkbox)
- Summarize compensation items also grouped by measuring unit (checkbox)
- Compress empty rows (checkbox + menu)
- With this you can select how to filter the report rows
- Skip days without hours
- Omit all daily reports, show only summary
- With this you can select how to filter the report rows
- Hide the zero prized hour and compensation summary rows (checkbox)
- Hide task hours (checkbox)
- Show compensation descriptions in the summary (checkbox)
- Correct billing period when clicking "Bill" (checkbox)
- Show daily start and end time in their own columns (checkbox)
- Always summarize all daily tasks in one row (checkbox)
- Show the regular working hours of additional and overtime work (if existing) (checkbox)
- Show entry warnings also in downloadable prints (checkbox)
- Print without approval colors (checkbox)
- Show VAT (checkbox)
Selecting customers and projects
Choose first the customer(s) and then the project(s) you want to be displayed on the report.
Reports open automatically below selection menus, everyone to their own worksheet, if "Auto-refresh" Preview mode is selected. If "Refresh on-demand from show-button" is selected, remember to press "Show" after selecting the employees.
Examining reports
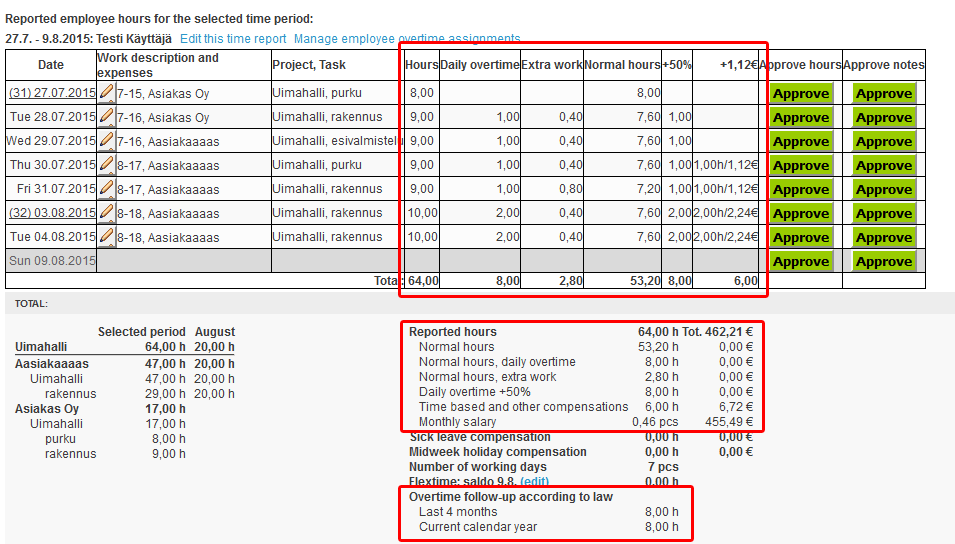
If none of the collate checkboxes are selected, tables show the work hours which one employee has registered for specific customer's specific project.
If overtime assignments have been set to apply also to the invoice report and program has been given overtime billing agreement to be used, overtime hours will be displayed on the reports.
Overtime assignments can be changed in Users and Projects tabs. Add an overtime assignment to a project and employee of your choice. The overtime work will be itemized automatically to a billing report when you choose the overtime assignment to apply for the billing report or the billing report and the paycheck. You also need to choose the calculation principle needed so that the program can itemize the hourly rates for overtime work.
When an employee is temporarily assigned to work overtime, he only needs to enter the working time once. Tuntinetti will itemize automatically the overtime work (as long as the overtime assignment is effective) on a billing report according to the given hourly rate calculation principle.
Demo video about adding overtime assignments can be found here: LINK TO VIDEO (Ylitöiden laskutuserittely)
You can view the summary of the billing report's time report by hovering your mouse cursor over the  -icon.
When you click the -icon, the time report's full information will be opened in a new window.
Collating settings
Collating makes particularly the assembling of billing reports easier. By choosing both "Collate projects" and "Collate customers" at the same time, you get all work hours and projects employees have done to specific customer to one table.
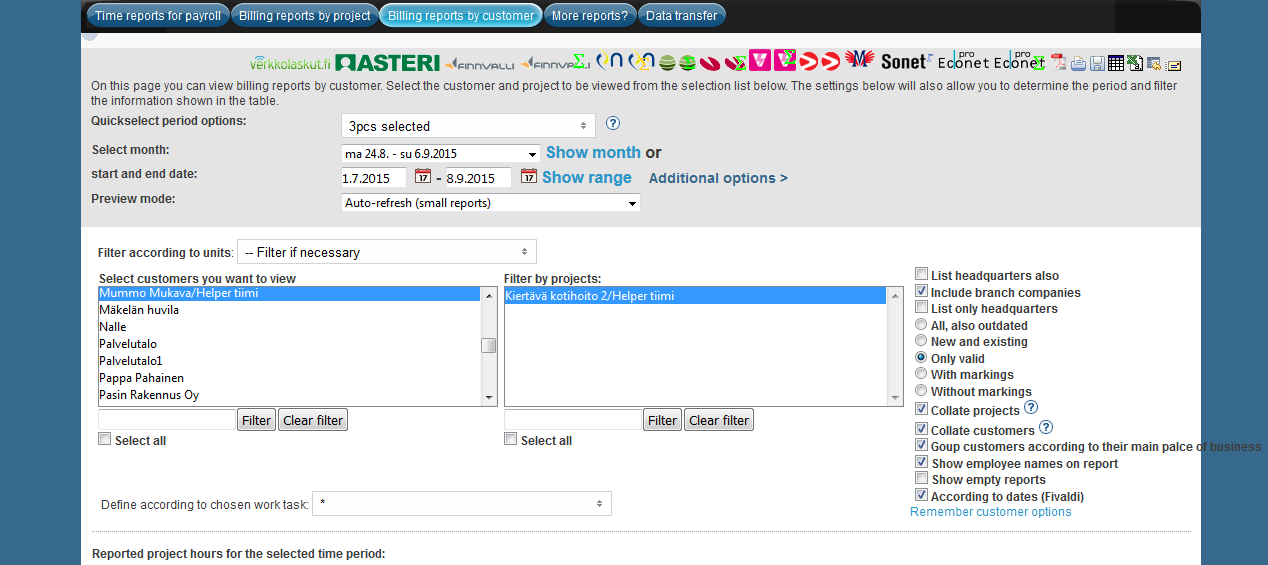
Collating projects
By collating projects, you will get a table of all employees' working hours for a given project.
Collating customers
By collating a customer's projects, you can collect all the hours logged by employers for a single customer in a single project in one table. Projects are then shown in their own column.
Collating according to headquarters
Provided that both "Include branch companies" and "Collate customers" are selected, customers can be collated according to headquarters by selecting "Group customers according to their main place of business". This way you can create bill for the headquarters.
Employee names on report
Employee names can be displayed on the report, by selecting "Show employee names on report" checkbox, while "Collate projects" is selected.
Saving customer options
Customer-specific options can be saved, by pressing "Remember customer selections" link. After selection the system will remember these selections and will automatically restore these selections when customer is selected. Notice that these saved selections are activated even when there is other customers selected.
Selections can be changed and resaved.
Customer specific selections can be skipped by removing selection from [x] Remember customer selections
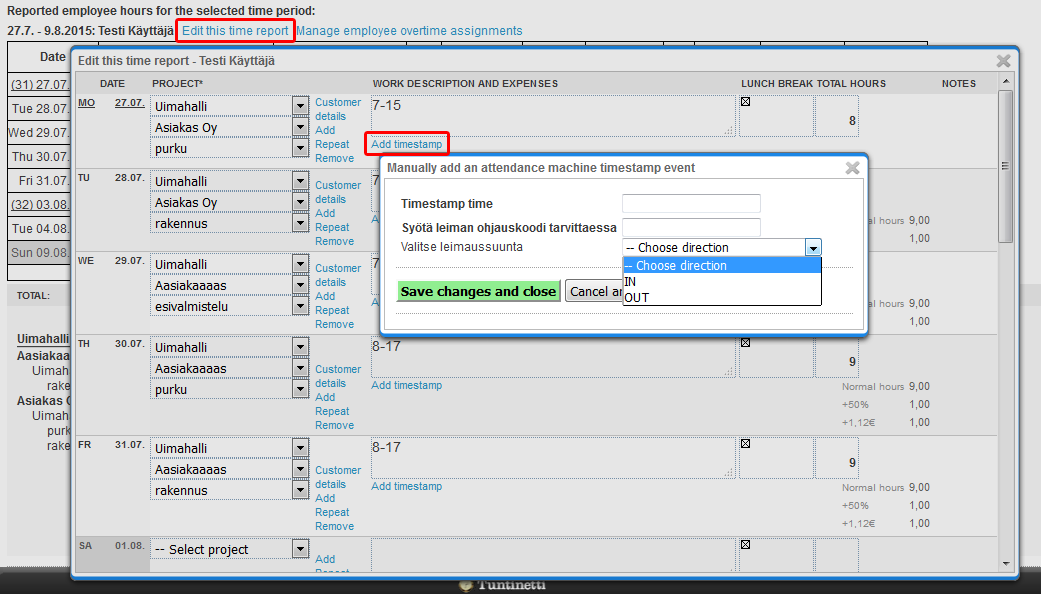
Editing the report
Managers can edit the data in the reports, if needed. Reports data can be modified by choosing individual row with pen-icon in "Work description and expenses" column.
Expenses can be set by clicking "Work description and expenses" field in the "Edit this time report" window. Expenses are displayed in the tablet and in the report itemization, after saving.
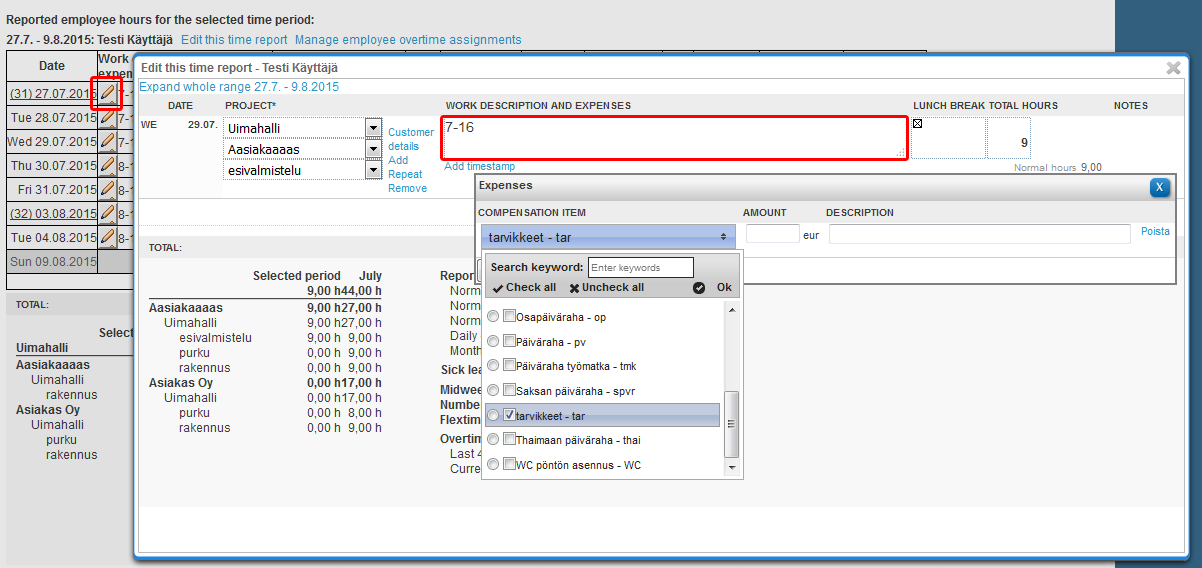
If needed, you can add timestamp manually with "Add timestamp" link. Travel bill can be downloaded from this window, with "Download travel bill" button.
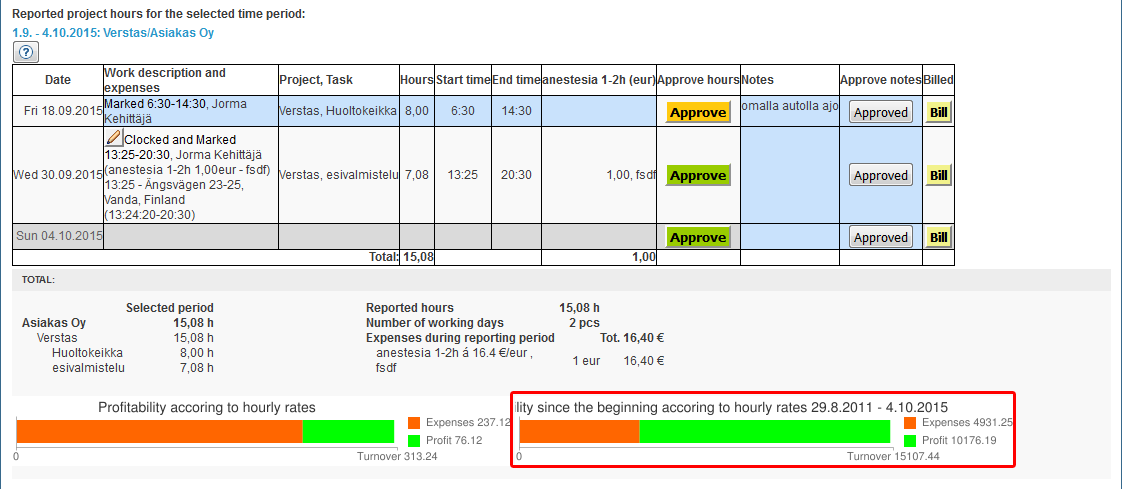
Profitability chart
If additional feature Profitability charts is enabled, profitability calculation and bar chart is displayed below the report. Profitability calculation is particularly useful, when company's profit comes from billable work. Profitability calculation is formed from employees' and projects billing and cost prices.
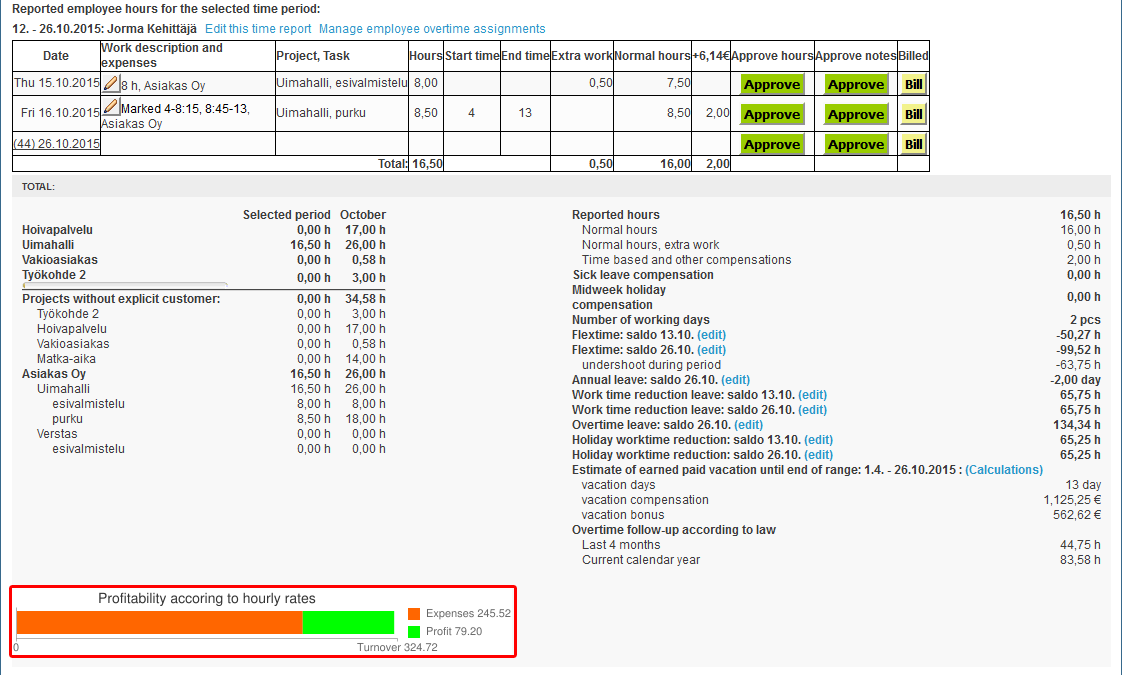
You can also select the "Show all time profit charts" checkbox in the "Additional options", to show profitability since the beginning.
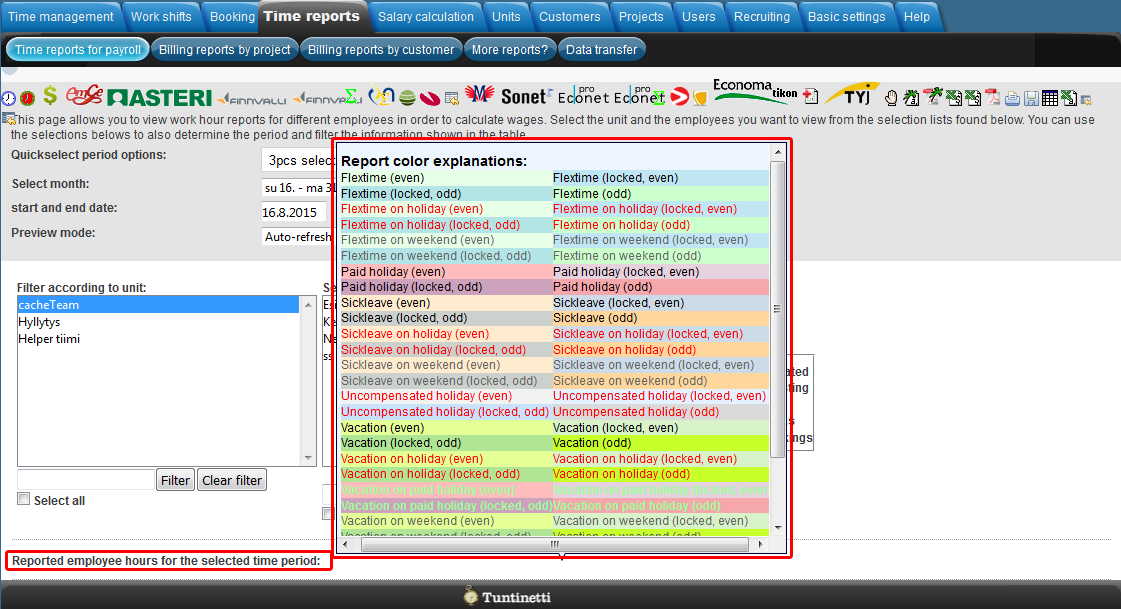
Report color explanations
Explanations for colors found in the reports can be opened by bringing the mouse pointer above the "Reported employee hours for the selected time period:" text at the start of the reports.
Approve and Bill buttons
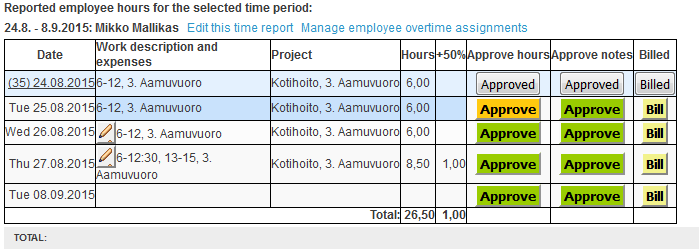
Finished report can be approved by pressing Approve button. Approving freezes hours, for example for salary calculations, so that the report can't be edited anymore. Hours and notes can be approved separately.
Clicking Approve button approves hours until that date. Approval can be cancelled simply by clicking Approved button.
Explanation for button colors:
- Green = reported hours are not approved for any project on this day
- Orange = reported hours are approved for some projects on this day
- Gray = reported hours are approved for all projects on this day
Report can be marked as billed by pressing Bill button. Bill buttons are displayed only if billing price (hourly price or price list) has been set for the customer or the project. More information about the pricing settings can be found from Projects and Customers tabs' demo videos (LINK and LINK) and instructions (Projects and Customers).
Rounding of the euro amount on a billing report
It is possible to include the euro amount of the billing prices with the Billing prices additional option.
Tuntinetti calculates the report's euro amounts using exact values of work hours, even though the hours are presented with two decimal places on the report. An exact amount means the following: for example 8 hours and 35 minutes is 8,58 hours. But technically it is 8 and 35/60 hours which is 8,583333... hours. This principle must be taken into account when doing your own calculations.
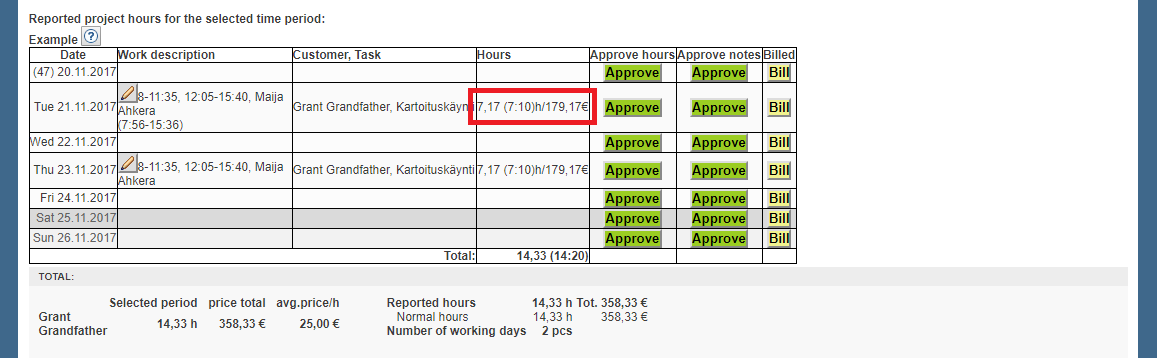
Example calculation
Employee's hourly billing price is 10,50 euros and he has been working for 8 hours and 35 minutes.
The right way to calculate the total amount: 10,50 x (8 + (35/60)) = 90,125. Which can be rounded to 90,13 euros.
Downloading reports
Reports can be downloaded in different formats: pdf ( ), doc (
 ), xls (
 ) and csv (
 ). You can also open reports in new window for printing (
 ).
).
Report data can be transferred to many different programs with the buttons found at the top. You can see tooltips about the buttons by hovering mouse pointer over them.
Buttons at the top:
- Move selected report's information on a bill to Verkkolaskut.fi -service (
 )
) - If Tuntinetti is linked to an online billing program, the data on the report can be send straight to the program in question, and thus it will form basis for a new bill
- More detailed instruction about using Verkkolaskut.fi -service can be found in the Help tab
- Report data to Asteri (
 )
) Report data in Fivalsi's XML-format (

 )
)- Export sales invoices with daily summaries to Netvisor (
 )
) - Export sales invoices to Netvisor ()
- Download sales invoices with daily summaries in Procountor suitable format (
 )
) - Download invoices in Procountor suitable format (
 )
) - Billing file of the selected reports' data to Visma (

 )
) - Billing file of the selected reports' data to Heeros Venda (

 )
) - Upload day specific invoices in Clarus suitable format (
 )
) - Upload invoices in Clarus suitable format ()
Report data to Mepco (
 )
)Report data to Sonet (
 )
)Report data to Econet (

 )
)Report in PDF format (
)Report in a popup for printing (
)Report to an Office suitable form (
)Report into a spreadsheet program in CSV format (
)Report into a spreadsheet program (
)Multidimensional report (
)- Send hours to the customer for an approval (
 )
)
Customer approval processes in Tuntinetti
In Tuntinetti, there are three alternative customer approval processes:
1. By default, approval from the supervisor responsible for time reports in your company is decisive. The customer only sees hours approved by your supervisor.
2. In the alternative process, the customer can also approve hours not previously approved by your supervisor, with the aim of replacing the need for approval from your supervisor.
The latter process is often used in conjunction with the basic setting "Are hours approved by employees," so that, as a result of the employee's approval, a request for approval of the hours is automatically sent to the customer without requiring intermediary actions from the company's own supervisor.
3. If hours are sent to the customer for approval in an editable format, the settings should be as follows:
In the company's basic information:
Are hours approved by employees (Yes)
Report to the customer upon employee approval (Yes)
In the Report Settings menu, the selections are:
Customer can approve hours before supervisor approval
Notify supervisor (if not directly to the customer) when the employee approves their own hours
In the customer's information:
In the Additional Settings menu, select:
Send reports to the customer for approval by job site
Also, the following points should be noted:
Hours of employees/job sites meeting the following conditions in their settings will not be visible to the approver:
The employee whose hours are being approved has a view other than a simple recording view. AND
The job site has a selection other than "Required whenever recording time for this work time tracking item" in the "List times in time entry" selector.
These conditions ensure that only hours with start and end times marked are sent for approval.
Getting customers approval for worked hours
You can send the hours to a selected client by clicking the e-mail icon (). The client will then receive a link that enables him/her to approve the hours. In order to use this feature the Lock reports additional feature must be enabled. Help > Tuntinetti's paid features > Lock reports checkbox. There can be multiple customers selected at the same time, because every customers report will be sent separately.
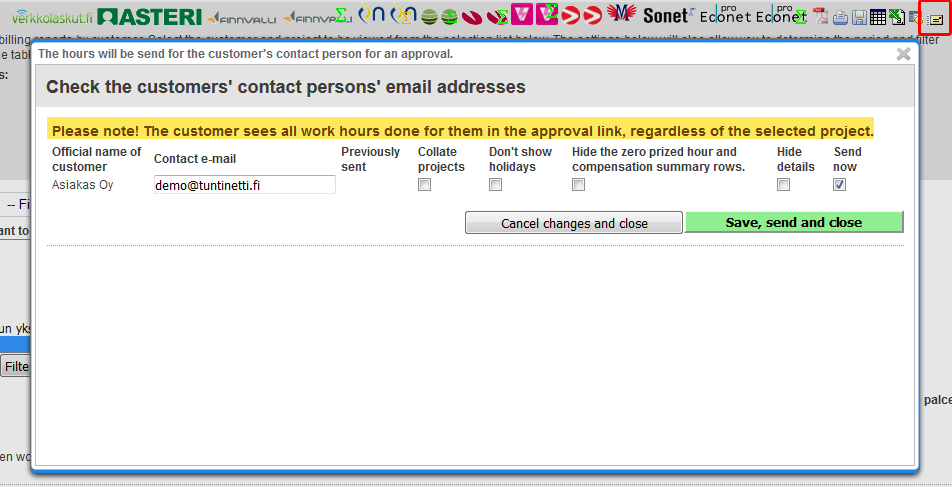
Sending for approval:
- Choose reports
- Press the e-mail icon ()
- New window opens
- Fill out each customer's e-mail address
- Information needs to be filled only the first time
- If you want to update contarcts later with out sending the reports, just uncheck the "Send now" checkbox
- Choose the checkboxes you want
- Collate projects
- Don't show holidays
- Hide the zero prized hour and compensation summary rows
- Hide details
- Save changes and confirm the send action
Hour reports
If you have selected Employee approval to customer first active in the Basic settings in the Company's basic information, a new tab will appear under the Time reports tab, Hour reports.
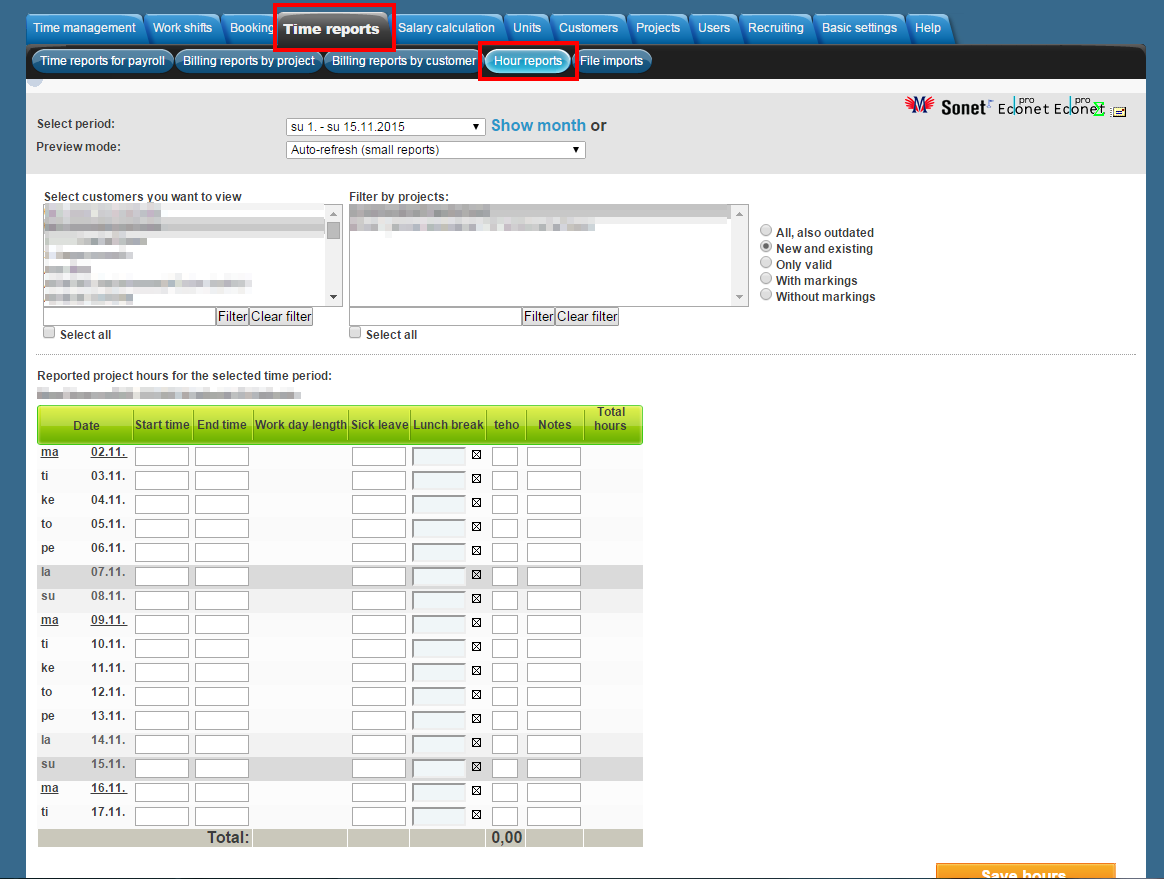
In the Hour reports tab you can create hour reports that are transfered directly to payroll after employee, employer and client have approved it.
You can send the hour reports to the customer for an approval by clicking the message icon and filling the necessary information in the window that opens.
Statistics of visiting at customers
If in homecare job is needed to get statistics of visiting at customers, you get these statistics from “Billing reports by customers” -page.
Loading the report:
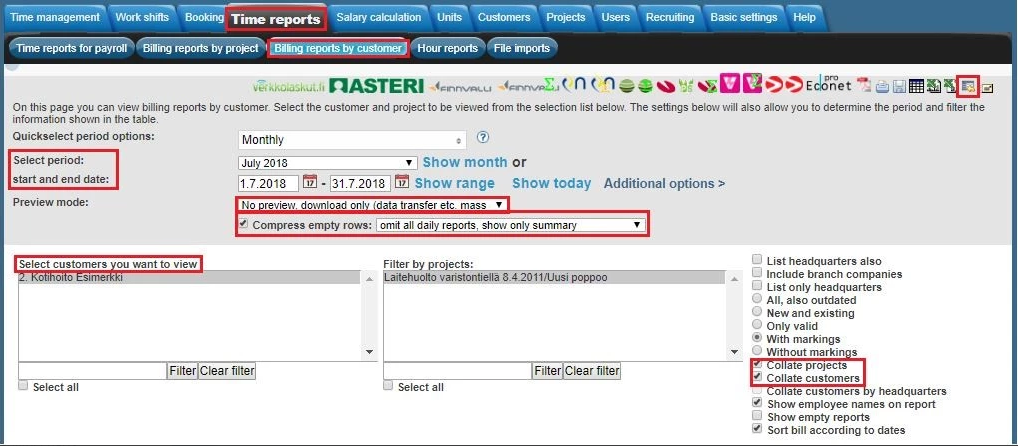
- Choose wanted period, from what timeline you want the statistics.
- To fasten loading the report, choose in "Preview mode" selection "No preview, loading only".
- In "Additional options" -settings you can simplify statistics by choosing “compress empty rows” and choose selection “omit all daily reports, show only summary”.
- Choose wanted customers, which customers you wish the statistic include.
- Add from filters “Collate projects” and “Collate customers”.
- Click the “Multidimensional report” button from the upper right corner.
Total number of visits at customers you can find from Excel in column “Total number of pieces”.
Needing guidance or training? Give us a call +358-(0)9-6898 8221. |
||
Technical support +358-(0)9-6898 8222 tuki@tuntinetti.fi |
Sales services +358-(0)9-6898 8221 myynti@tuntinetti.fi |
|