Units
The following explains the basic settings, how to modify the information of a unit and how to add supervisors in the Units tab.
...
In the Units tab you are able to arrange employees and projects in desired units and appoint supervisors to units. You can also set reporting, billing and salary, work time and work shift settings unit specific. The selection "According to a higher default setting" means that the unit will follow the basic settings assigned to it. The basic settings are set in the Basic settings tab.
...
In the basic information you can modify the unit's basic information like name and type. If you created a new unit it must be named so that it can be saved.
- "Which unit belongs to" defines if the unit is a sub unit for some other unit. "Main level" means that the unit is not a sub unit.
- In "Unit's email address" you should enter an email address which can be used to contact the unit.
- In "Unit ID" fields you can enter ID codes that are needed by accounting. They must be unique and Tuntinetti informs if a field is left empty.
You can set a logo for a unit that is visible in the top left corner. The maximum size of the image is 400 x 40 px (It is horizontal) and 250 kB.
Info Notice that in some cases you must erase the internet browser's cache to show the new logo.
- You can download a list of the unit's employees in an Excel sheet by clicking the excel icon (
 ).
). - If unit type is either Another company or Subsidiary then also these fields can be filled:
- Unit account number
- Unit payment ID
- Unit TyEL insurance number
- If you need to process retroactive materials with an old TyEL number, you must set and save the old TyEL number for the time being, and set and save the new one when processing new materials.
- Unit street address
- Unit postal code
- Unit city
Reporting settings
In the reporting settings you can modify the settings involving in reporting in the unit level.
Info The default setting is in many cases that a setting follows a setting that is on a higher hierarchy level. The basic settings are above the unit level. - "Employee approval to customer first" defines if reports must have supervisor's approval before going to a customer.
- "Criteria for a project's validity" defines if a project is in force if it has a valid member or if a project is in force when there are working hour entries or the employee's membership starts within the given time range.
- "Calculate paid vacations automatically" defines if paid vacations would be calculated automatically.
Billing and salary settings
...
- Clicking "Pricing" opens up a pricing window where you can set the unit's pricing. There is a separate instruction about Billing and pricing and a instruction video Billing and pricing - video tutorial.
- In "Billing report itemization default" menu you can modify a project's fee. For example if fee is changed depending on the day of the week or the time of the day. You should choose the according labor agreement.
- Clicking "Cost" opens up a window where you can define the price lists of the unit. This is similar to the pricing selection.
- In "Unpaid absences will be deducted from the monthly salary" you can select if unpaid absences are deducted from the salary or if a higher default setting is being followed.
- In "The unit has its own salary classes in exportable file format" you can select if the unit has its own salary classes in exportable file format or not.
- In "Automatically compensate work time reduction (except percent based)" you can select how the automatic compensation of work time reduction works. For example you can select monetary compensation.
- "Calculate paid vacations automatically" defines if paid vacations are automatically calculated.
...
In work time settings you are able to modify clock card and overwork compensation reporting settings.
- In "Automatic standby or travel time cost center" you can select how Tuntinetti selects a cost center when none is selected. This setting can be useful to automatically register cost center transfers. In the field below can be used to define how long is the maximum time automatically set in one work day.
- In "Lunch break" you can select if a lunch break is deducted automatically from the work hours.
In "Clock card enforces standard workdays" you can select if too long workdays are cut so standard workdays are enforced.
Info The rounding rule concerning time stamps are primarily applied from the project's unit's settings. In "The time stamps will be rounded" you can select ho the time stamps are rounded. In the "Valid during" fields you can define a time of the day when rounding is active or leave it blank and have rounding active around-the-clock.
Info The rounding rule concerning time stamps are primarily applied from the project's unit's settings. - In "Holidays are earned" you can select if midweek holidays are calculated according to labor agreement, only employees with standard working hours or if midweek holidays are not paid at all.
In "Work time compensations" you can define the work time compensations.
Info More information about overtime settings can be found in the Overtime assignments guide. - In "Compensation of overwork extras as free time" you can select compensation of overwork extras to be compensated as free time.
- In "Additional and overwork compensated as free time" you can select additional and overwork to be compensated as free time.
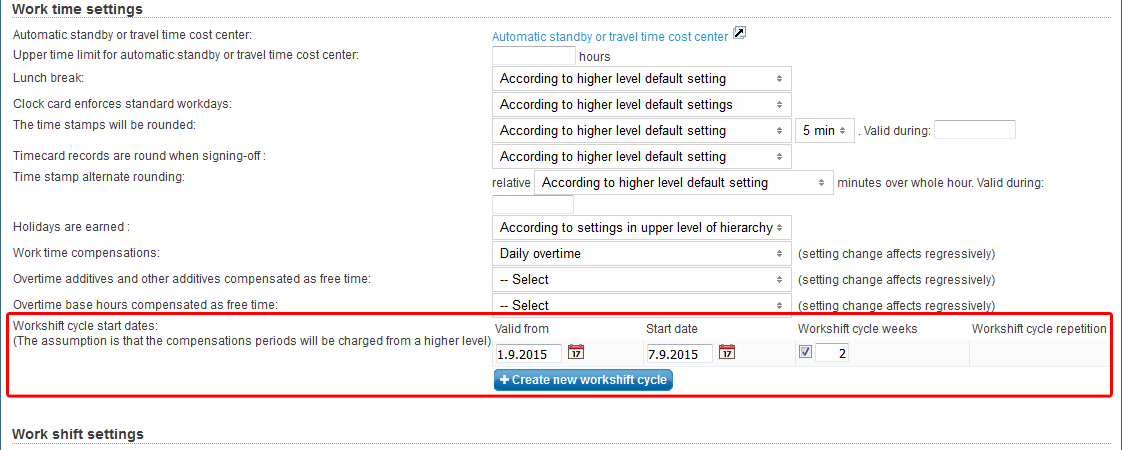
In "Workshift cycle start dates" you can modify workshift cycles. Basic settings are used as default. You can set "Valid from" and "Start date" for the unit. Set also "Workshift cycle weeks", if labour agreement doesn't give it. New workshift cycle can be added with the "Create new workshift cycle" button.
- The default length for the workshift cycle is set by labour agreement. Typically, the length on the labour agreement level is 1, 2 or 3 weeks. When you need to set deviant workshift cycles, the lengths of the period is set in: the company's basic information for company level, the unit settings for unit level and in employee's contract settings for employee level. Settings are inherited from the unit's settings to unit's employees, either on the grounds that the employee is positioned to the unit in question or that the unit has been selected in the "Work time cycle group" in the additional settings of the employee's contract.
Work shift settings
In work shift settings you can modify work shift settings in unit level.
- In "Work shifts open" you can select how many months in advance work shifts are open for employees.
- In "Work shift color code" you can select the color of work shifts in the work shift calendar.
- In "Can the employee alter the shifts he/she has reserved" you can select if employees are able to alter reserved shifts.
- In "Shifts visibility to employees" you can select if employees are able to see other employees' shifts, shifts of the employees' that work in the same unit or only their own shifts. The setting affects the shift prints as well.
- "Unit's additional attributes" contains some of the unit's miscellaneous attributes.
- All employees of the unit can confirm/select all planned shifts. This makes open shifts visible to non-permanent employees as well.
- Employees in units projects can modify unapproved hours.
- Remind employees to enter their working hours (requires company level reminders to be activated).
- Show employees only approved plans in work shift print outs.
- Show flex saldo to unit and unit project employee.
- All employees of the unit can confirm/select all planned shifts. This makes open shifts visible to non-permanent employees as well.
...
First you have to select a unit where the new supervisors will be added. The unit can be selected from the menu called "Choose the unit you want to edit" on top of the Units page. When a unit is selected, its information opens to the page.
...
Authorization depth
Selected unit only
Selected unit and employees via its projects
Selected unit and employees via its customers
Selected unit and employees via its projects/customers
Also sub-units of the selected unit
Selected unit/sub-units and employees via its projects
Selected unit/sub-units and employees via its customers
Selected unit/sub-units and employees via its projects/customers
Selected unit, its sub-units, and units managed by their employees
You can also remove supervisors with the "Remove"-button.
...